Monday, October 18, 2021

Five Parsecs From Home - First Impressions

I bought myself a present the other week and wanted to share my initial thoughts now that I've finished reading it. This post isn't a review. There's worlds of difference between perusing a set of rules and actually playing the game.

Pew! Pew!

Five Parsecs From Home, Third Edition is tabletop sci-fi miniatures wargame designed for solo play. My interest in alternatives to face-to-face play rose dramatically over the past year and a half or so. I explored online play, used the time to press forward on various related projects, and encouraged my family's interest in tabletop games. Why not try a solo game at this point?

My personal experience with solo tabletop wargaming began with Star Fleet Battles. SFB single player scenarios frequently feature a "space monster" running on simplified rules - no energy allocation, attacks and movement determined by automatic processes, etc. SFB "space monsters" often present a tactical puzzle for the solo player - attacks that ignore the ship to kill the crew directly, a requirement to collect enough scientific data to find a way to stop it, etc. Playing these scenarios were not as memorable as an all-day fleet action or a starship duel with a skilled opponent, but they still offered an interesting challenge on a slow afternoon. I've tried solo games from time to time since then, but it's not something I've put any focus on until now.

The Concept
Five Parsecs From Home is built around campaign play. The player runs a spaceship crew doing odd jobs involving violence for people who don't ask questions about how the job got done. There are many persistent elements. Members of the crew acquire experience and better gear - if they survive. If not, then the crew may find themselves shorthanded for the next battle. Rumors can be tracked down, becoming Quests for the crew to follow. The opposition for one job may become Rivals and reappear looking to settle scores. There is no point system to balance the battles. One might be a milk run and the next may be a struggle that the crew barely escapes.

Production Quality
I purchased a physical copy out of personal preference. The book is a hardcover printed in full color on glossy paper. It measures roughly 9 1/2 x 6 1/4 inches. The compact size and sturdy cover make it ideal for my kind of tabletop gamer life - in other words, tossing it in a backpack on the way to a game or finding shelf space for it at home.

Scale, Measurements, Table Size, and Dice
Five Parsecs From Home works with a variety of scales. 28mm works as written with all measurements in inches. Using smaller scales in the game involves exchanging inches for centimeters. The recommended table sizes range from 3x3 feet (to allow for maneuvering) to 2x2 feet (for a more intense fight). The system uses six- and ten-sided die.

Currencies
The abstractions to track and spend in the game are credits, experience points, and story points. Credits are in-setting money used for expenses and purchases. Experience points are used to improve characters. Story points are handy when the dice aren't cooperating.

The Crew
Much like a roleplaying game, the book opens with a basic description of the game and then jumps into character generation. There are various methods of creating a crew, depending on the player's level of experience. Characters can have a variety of origins and classes. Equipment is generated as a pool and assigned to the characters at the player's discretion.

The Ship
The rules for the crew's ship handle it as an abstraction. The existence of the ship explains how the crew gets around. There are events that occur during interstellar journeys (including boarding actions), but there are no rules in the book for ship-to-ship combat. The ship supports the crew in various ways - injured characters go to sickbay, it provides secure storage for equipment, etc. However, the ship rarely appears on the battlefield and even then only as an objective for the opposition to capture.

Combat
This is a skirmish level game - the half-dozen members of the crew going up against opposition that may slightly outnumber them. Setting up a battle involves determining objectives, generating the opposition, and placing terrain. There is solid guidance on running the opposition. Different types of opponents will behave differently on the battlefield - some cautiously remaining behind cover while keeping the range open, others boldly advancing, and still others maneuvering tactically for advantage. The rules for fighting it out appear to be straightforward. I'll reserve judgment on how well the rules work until I get a few games in. However, the game seems to avoid the trap of adding complexity for the sake of covering every conceivable exception and edge case.

The Campaign
There are plenty of options for setting up and running a campaign. I'm tempted to borrow some of the rules for my next sci-fi roleplaying campaign. The campaign rules break things down into steps. There are world generation rules if the crew is trying their luck on another planet. The rules detail what each member of the crew is doing between battles - recovering from the last fight, getting into mischief on their own, training up, etc. Generating jobs may result in a crew having multiple offers on the table. Deciding which job to take is up to the player - unless a Rival catches up and ambushes the crew, causing them to miss the opportunity to get the job done.

Setting
There is enough setting presented to explain why spaceship crews are wondering around looking for the kind of work best depicted with miniatures, terrain, and dice. The eight pages of text conveys the feel of the setting without getting lost in the details. The idea of a spaceship crew operating on a frontier and being hired by various groups that would rather no get their own hands dirty should be familiar to most readers.

Layout
There is a table of contents, but no index. I'll have to see how easy it is to find things during actual play. However, the fact that each chapter is color coded should be helpful. The back of the book contains several handy appendixes - how to play the game on a grid, taking Red and Black Jobs if the campaign is getting too easy, adding more narrative elements, and various bits of advice.

Not long after I got my copy. I love that new book smell!

Outro
My first reading of Five Parsecs From Home did what it was intended to do. I'm looking forward to starting a campaign. I just need to get enough miniatures and terrain assembled and painted to put on the table. I hope that you've found this quick look at the game useful.

Saturday, October 16, 2021

Reaper Bones Zombies

I had a fit of Halloween enthusiasm and painted up all of the zombie and zombie-like figures in my Reaper Bones collection. Fortunately, I didn't completely lose my mind (any more than usual) and decided to use a common paint scheme for all of them. After all, rotting flesh covered with a few scraps of decaying clothes would look about the same on any animated corpse after being out in the sun for awhile.

Like a scene from a horror flick.

Notes on the paint scheme I used are presented first. Comments on each set of miniatures follow. All figures are from the first Reaper Bones Kickstarter.

Preparation
The usual steps I take for Reaper Bones, as described here. I used FolkArt 231 Real Brown as an undercoat color.

Base Coat
FolkArt 231 Real Brown. I brushed on some additional brown to guarantee an even coat over all areas of each miniature.

Dry Brush Layer
Reaper 09293 Alien Flesh. This is a medium gray with touch of warmer color - brown or maybe red. Dry brushed over each figure to provide highlights.

Black Wash Layer
Reaper 09255 Black Wash. This is a basic black wash. It does the job of settling into the recesses, but otherwise unremarkable.

Brown Wash Layer
Reaper 09254 Brown Wash. A wash that works for flesh or cloth over a black wash. This is the final coat applied to the cloth and hair.

Green Wash Layer
Citadel Washes Thraka Green. A long out of production product that I'm trying to use up before it dries up. It was applied only to the areas of exposed flesh. This coat turned out to be too green. I was going for "necrotic" not "the expression of Bruce Banner's anger management issues" for the flesh tones.

Green-Brown Wash Layer
Secret Weapon Wash W008 Baby Poop. My choice for Cthulhu-related projects. It produces an unhealthy looking tone when applied over a neutral color. The sickly color turned out to be a perfect fit for this project. Again, it was used over the flesh areas only.

Reaper Bones 77053 Zombies

Reaper Bones 77053 Zombies
These resemble the "shambler" zombies common in media depictions. Slow mobs of decaying corpses that shuffle towards potential prey. Sold in packs of three.

Reaper Bones 77014 Zombies

Reaper Bones 77014 Zombies
More "shambler" zombies, although I'm tempted to refer to these as "disco" zombies given their pose. They provide some variety when combined with 77053. Sold in packs of three - I received the two pictured as a Kickstarter reward.

Reaper Bones 77159 Ghast

Reaper Bones 77159 Ghast
Although "Ghast" is Reaper's name for this figure, it's handy as a variety of undead threats. It could represent a more powerful zombie, a ghoul, some kind of wight, a vampire that hasn't feed for awhile, or other abomination with a hunger for flesh.

Reaper Bones 77169 Flesh Golem

Reaper Bones 77169 Flesh Golem
This big guy is clearly inspired by popular adaptations of Mary Shelley's novel Frankenstein. This figure could represent the creation of a mad wizard or ambitious scientist, a "boss" zombie, or some other physically powerful undead.

Overall, I'm happy with how this mob of undead turned out. They'll be menacing some adventuring party or other group of player characters soon enough. Although I might need to find something to feed them in the meantime...

Thursday, October 14, 2021

Playing with Power (Plant Parts)

Recently, I realized that I could use more 28mm scale sci-fi terrain. Nothing to do with a new game I want to try out. It just came to me out of the blue.

Honest.

The box is a little worse for wear, but the plastic is fine.

Digging around my pile collection, I came across a Power Plant Construction Set. Like the Hexagon Platformer Construction Set, it was manufactured by Tehnolog in Russia and distributed in the United States by Pegasus Hobbies. It's been awhile since I last saw a Power Plant kit on the market. I was kinda saving mine, but this seemed as good a time to put it to use as any.

Looking over the Power Plant sprues, I decided not to go with the build seen on the box. It would use up all of the parts in the kit for a single piece of terrain. Besides, the pipes, antenna, and other bits would be handy for other projects. But the generators and structural components looked promising for my immediate needs.

I put this piece together as a proof of concept and liked it enough to paint it up. It works as stand alone terrain. However, I may make similar piece with other parts from the kit and connect the two using some of the pipes.

As with the Hexagon Platformer parts, the plastic takes Krylon spray paint well. I disassembled the piece before painting so that I could use more than one color without the need to use masking tape.

"This one? She's a beauty, isn't she? Sure, there's some wear and she could use a good cleaning, but we've been running our local operation on her output. Not only that, but we've been making a pretty credit off selling the excess to our energy provider. Rumors? What kind of rumors? Well, nobody's really sure where it came from. The crew we bought it from wouldn't say. Wait! Where are you going?!"

- Sales representative, name withheld, Kessler's Upcycling

Rosie gives this bit of tech a once over before making an offer.

Underlayer
Krylon ColorMaster Paint + Primer Flat Black. All parts of the disassembled test piece got an even coat on all surfaces.

Red Parts
Krylon ColorMaster Paint + Primer Matte Poppy Red. This bright red darkened up when sprayed over the black to produce a nice industrial looking color. I sprayed the parts at an angle to produce shading when the piece was reassembled.

Metallic Parts
Krylon ColorMaster Paint + Primer Metallic Aluminum. A couple of light coats produced a smooth, shiny metallic finish. Again, the parts were sprayed at an angle to help generate the appearance of shadows on the finished piece.

Dark Wash Layer
The colors on the reassembled piece seemed a little flat in places, even with the shading that was already there. I mixed some dark (gray-blue) wash and brushed it over all surfaces. The excess was wiped off with a sponge to prevent pooling. The result provided additional shadows and brought out the recessed details.

Brown Wash Layer
Even with the dark wash, the piece still looked a little too new. A brown wash mix applied the same way as the dark wash layer gave the piece a more used look.

"We have no idea what it is, how it works, where it came from, who might come looking for it, and some junk yard wants to sell it off as salvage?"

- Doctor Solheim, Xeno-Archeology Department, Miskatonic University

It just fell out of orbit? Sure, pull the other one.

This piece started out as a test, but turned out well enough for the tabletop. I could add more weathering later, but I'd like to see what more I can do with this kit first. Before that, I have some other terrain ideas to pursue with the other materials I have on hand.

Tuesday, October 12, 2021

Reaper Bones 77067 Virina, Female Demon

Halloween's coming up, so it's a good time to get projects like this nice lady with the horns, wings, and tail done. My players don't react well to demons, devils, cosmic horrors, or undead. A dark color scheme seemed the best bet. No point in being subtle. With that in mind, I decided to experiment with layering coats of color over black for this project.

Painted in Chaos Black, Spattered Crimson, Gory Red, Blood Red, and Fresh Blood.

Preparation
Details on my approach to working on Reaper Bones miniatures are posted here. The base color is Citadel Colour Chaos Black. With that name, it was the most appropriate choice.

Basing
I used black instead of using brown to color the basing material and followed up by brushing on some gray. The intended result is "burnt out ground covered in ashes" rather than the "dry soil" I usually shoot for.

First Color Layer
Reaper 09277 Spattered Crimson. I left more paint on the brush than I usually would for dry brushing and tried to cover everything but the recesses on the figure.

Second Color Layer
Reaper 09278 Gory Red. This still used more paint than most dry brushing techniques, but wasn't as heavy as the first layer. The goal was to partly cover the areas previously coated, producing a highlight.

Third Color Layer
Reaper 09003 Blood Red. I partly covered the previous coat with a dry brushing of this color.

Fourth Layer
Reaper 09279 Fresh Blood. A light dry brush layer to provide a final highlight.

Wash Layer
Surveying the results so far, I saw that I was a little too aggressive with brushing on the red layers. More paint got into the recesses than I intended. The fix was a coat of Secret Weapon Wash W001 Soft Body Black diluted with a drop or two of water. It brought back the recessed details and helped to blend the layers of red together.

Demon lady in red.

The results are alright, but aren't as neat as I'd like. Dry brushing works, but isn't particularly tidy. If I were to do this project again, I would try a more controlled approach to layering on the red for a cleaner result. No big deal, though. Learning new things is the point of experimenting. This demon lady will menace dungeon delving adventuring parties just fine as she is.

Monday, September 27, 2021

Reaper Bones 77114 Faceless Horror

Autumn is here, October is around the corner, and Halloween is on the way. Being in the mood for cosmic horror, I decided to put paint on this charming critter. It came into my collection by way of the first Reaper Bones Kickstarter as part of the Mythos Monsters add on.

I'd hate to see the Faceless Horror's dental bill.

The Faceless Horror is a gooey mess of eyes, mouths, and flesh. It might be based on the Gibbering Mouther - a monster introduced in the AD&D module C1 The Hidden Shrine of Tamoachan (1980) by Harold Johnson and Jeff R. Leason. Which, in turn, may have been influenced by H.P. Lovecraft's Shoggoth, which featured most prominently in "At the Mountains of Madness" (1931).

The details on this model were difficult for me to see before painting. The stark white of Bones plastic doesn't provide much contrast. My solution was to use washes early in the process to bring out those details. The scheme is similar to the one I used for the Khurasan Miniatures Parasachnid Warriors, but modified for use on Bones plastic.

The remains of a human victim are sculpted into the largest maw. I didn't notice until the first coat of wash.

Preparation
A post on my usual approach to working with a Reaper Bones miniature is on the other end of this link. In this case, I mixed Formula P3 Menoth White Base with the FolkArt Glass & Tile Medium to provide a good first coat.

Base
The Faceless Horror is an odd size. Nothing smaller than a three inch round plastic base (Reaper 74037) would work. Unless there's a company that offers two-and-a-half inch round bases that I'm not aware of.

Highlight and Teeth
I brushed on a little Formula P3 Morrow White on the figure's raised areas to provide more contrast. The same color was used for the teeth, which was a bit of a chore.

"Never tangle with anything that's got more teeth than the entire Osmond family." - Arnold Rimmer, Red Dwarf

Inner Surface Wash
The interior surfaces got a generous coat of Citadel Baal Red wash. It produces a good color for the inside of a mouth when used over Formula P3 Menoth White Base. I also brushed some on the roots of the teeth to give them a bloody appearance.

Outer Surface Wash
The exterior surfaces received a coat of Citadel Ogryn Flesh wash. It combines well with Formula P3 Menoth White Base to create a fleshy tone.

Eyes
I initially used Reaper 09294 Alien Goo with Citadel Thraka Green wash brushed over it for the eyes. Unfortunately, they ended up looking like pustules from some extraterrestrial skin condition. Highlighting the eyes with Reaper 09287 Neon Yellow didn't help. The fix was Secret Weapon W015 Blue Wash. It shifted the color away from yellow and darkened down the tone to something more resembling the eyes of some preternatural creature.

Rear (?!) view.

The Faceless Horror turned out to be more of a challenge than I expected. The level of detail is surprisingly high. Painting the eyes and teeth took awhile. Overall, I had a good time with it and am pleased with how it turned out.

Thursday, September 23, 2021

Khurasan Miniatures PLA-11 Dethroids Repaint

Repainting these figures was a quick project after a weeks-long spell of getting very little done hobby-wise. The one thing I did accomplish during that time was a long delayed reorganization of my home office/hobby space. I came across these figures during that process. Unfortunately, the metallic paint job I originally used didn't age well. The shine seemed dull and there were some marks marring the surfaces. I considered retouching the paint, but decided that a fresh start would be a better approach.


I commented on the appearance of these models in my previous post from back in 2014. Briefly, they seem to be inspired by two sources. One is a certain group of aliens who dress in pepperpot shaped murder machines and enunciate every syllable of their lines. The other are the autonomous reconnaissance drones deployed by a particular galactic autocracy for searching out insurgent bases.

Paint Removal
An overnight soak in a 50/50 mix of water and Simple Green has been by go-to for stripping paint from miniatures for awhile now. It also removed the sand and glue mix I used for basing. There were a couple of stubborn spots, but a stiff brush and a little elbow grease took care of them.


Primer
A couple thin coats of Krylon ColorMaxx Paint + Primer in Matte Deep Gray provided good coverage.

Paints
I started with Formula P3 Menoth White Base on the upper bodies. The dangling appendages received a coat of Citadel Colour Codex Grey. Everything got dry brushed with Formula P3 Morrow White to increase the contrast between the raised areas and the rest of the figures. The bases were painted with Citadel Colour Chaos Black. This is a departure from my usual approach of applying a sand/glue/paint mix for basing. It looks good, but I'm not sure how it will hold up - the edges are already starting to show wear.

Washes
I brushed on two layers of Army Painter Warpaints wash over each model. Dark Tone to bring out the recessed details. Strong Tone to blend the colors together and weather the models.


I like the dirty, worn appearance better than the paint job I originally used. It makes them look like machines that have been in the field for awhile.

Tuesday, July 20, 2021

30 Minutes Missions Alto Option Kits by Bandai - First Impressions

This post continues a look at 30 Minutes Missions. The previous post with my first impressions of the Alto itself can be found by clicking this link. Here I'm examining two of the options kits available for the Alto.

Original recipe Alto compared with optional face plate, shoulder armor, and chest armor.

The option kits came as a bundle when I ordered the Dark Gray Alto on Amazon. Frankly, I'm not sure if I would go that route again. The cost of the bundle was only slightly cheaper than ordering the items from an import site like Hobbylink Japan. It also took about the same amount of time to ship. On the other hand, the bundle did have matching colors for the Alto and Option Armor kit, so that's nice.

Both kits are made specifically for the Alto. This makes sense for the armor, since the parts have to fit the shape of the model. However, I'm not sure why the weapons wouldn't work with other models. They are mostly handheld or fit on parts that should be universal within the 30MM line.

As before, I cut the parts off the runners and assembled them without any further tidying up.

Rosie examines the Alto's knee while Sarah looks on.

Option Armor for Long Range Sniping (Alto Exclusive/Dark Gray)

This kit comes in a bag containing the instructions and a single runner. A little disappointing, but the kit is only a couple of bucks USD before factoring shipping costs. Given the prices I've seen for a similar amount of plastic in the form a single miniature, that's not bad.

Shield option attached to the arm and shoulder.

The runner has parts for:
  • A replacement face plate. It pulls off the appearance of some kind of telescopic sensor array, which fits the "Long Range Sniping" theme. A sticker for the lens would have been nice - I'll have to see about painting it sometime.
  • Replacement armor plates for the chest and shoulders. These are more beefy than the ones that came with the Alto. I'm not sure why a sniper would need additional protection in these areas. The shoulder parts don't seem to have the snug fit of the originals - they pop off more easily.
  • A shield that can attach to an arm or shoulder. I'm not sure why a sniper mecha would need a shield that looks like it could double as a melee weapon. Maybe I'm not part of the intended market for these things?
The chest and shoulder armor, combined with the shield, offers up the appearance of a brawler rather than a sniper. The original Alto face plate works to complete the close in fighter look. The sniper face plate works well with the Alto's original armor plating.

Roy Roy drone undergoing trials while an evaluation team in light duty vacc suits looks on.

Option Weapon 1 for Alto

This kit comes in a small box holding a pair of runners. The variety of parts offers a satisfying selection of firearms and melee weapons.

Submachine gun, assault rifle, and long rifle with telescopic sight and grip.

The choice of firearms starts with a duplicate of the submachine gun included in the Alto kit. The other firearm parts attach to the pistol grip/receiver of the submachine gun, replacing the short submachine gun barrel with one resembling an assault rifle with an underslung grenade launcher or a long barrel suitable for precision shooting. There are also two sights available - the one that come with the submachine gun (resembling a reflex sight) and a larger one that looks like a telescopic sight. Finally, there is  grip that can be attached to the side of either rifle.

Empty hand, stabby hand replacement, axe hand replacement. I tried the sword, but it just looked silly.

The melee weapons are based on the knuckle weapon included in the Alto kit, using it as a handle/hand guard. A duplicate of the knuckle weapon appears in this kit, allowing for dual wielding. The melee options include a combat knife, axe, and sword. They can be attached to the knuckle weapon or to a part that replaces a hand. There is also a shaft that can be combined with the melee options to create a variety of polearms.

Axe and sword attached to the polearm shaft.

Something I Forgot from the Last Post - The Roy Roy

This is a small robot that comes with the Alto kit. Not including it in my previous post was an oversight on my part. It works as a drone for either 15mm or 28mm scale. The body of the Roy Roy can be attached to the top of the Alto as an insectoid looking head alternative.

Roy Roy and Roy Roy head.

The option kits make the Alto more versatile, allowing it to be customized to better fit a particular role or setting. Combining the chest and shoulder armor with a submachine gun and melee weapon makes the Alto into a nifty close combat unit. Of course, outfitting giant stompy robots with pointy and stabby things doesn't fit every setting. In Battletech, for example, melee weapons for 'Mechs exist, but are an unusual design choice compared with guns, energy weapons, and missiles. However, 30MM is clearly more inspired by settings like Gundam, which feature melee weapons as standard issue for mobile suits. It really depends on the game - a giant robot with an equally big sword fits right into some, but is over the top for others.

I wasn't kidding about the look of the sword hand replacement.

The various guns should fit into a wider variety of settings. There are enough parts to build a pair of submachine guns, if dual wielding isn't just too much for the game in question. The assault rifle is a good choice to give the Alto the look of an infantryman. The long rifle with the sensor face plate sends the message that something in the neighboring time zone is going to get an unwelcome surprise. Again, it depends on the game.

Sunday, July 18, 2021

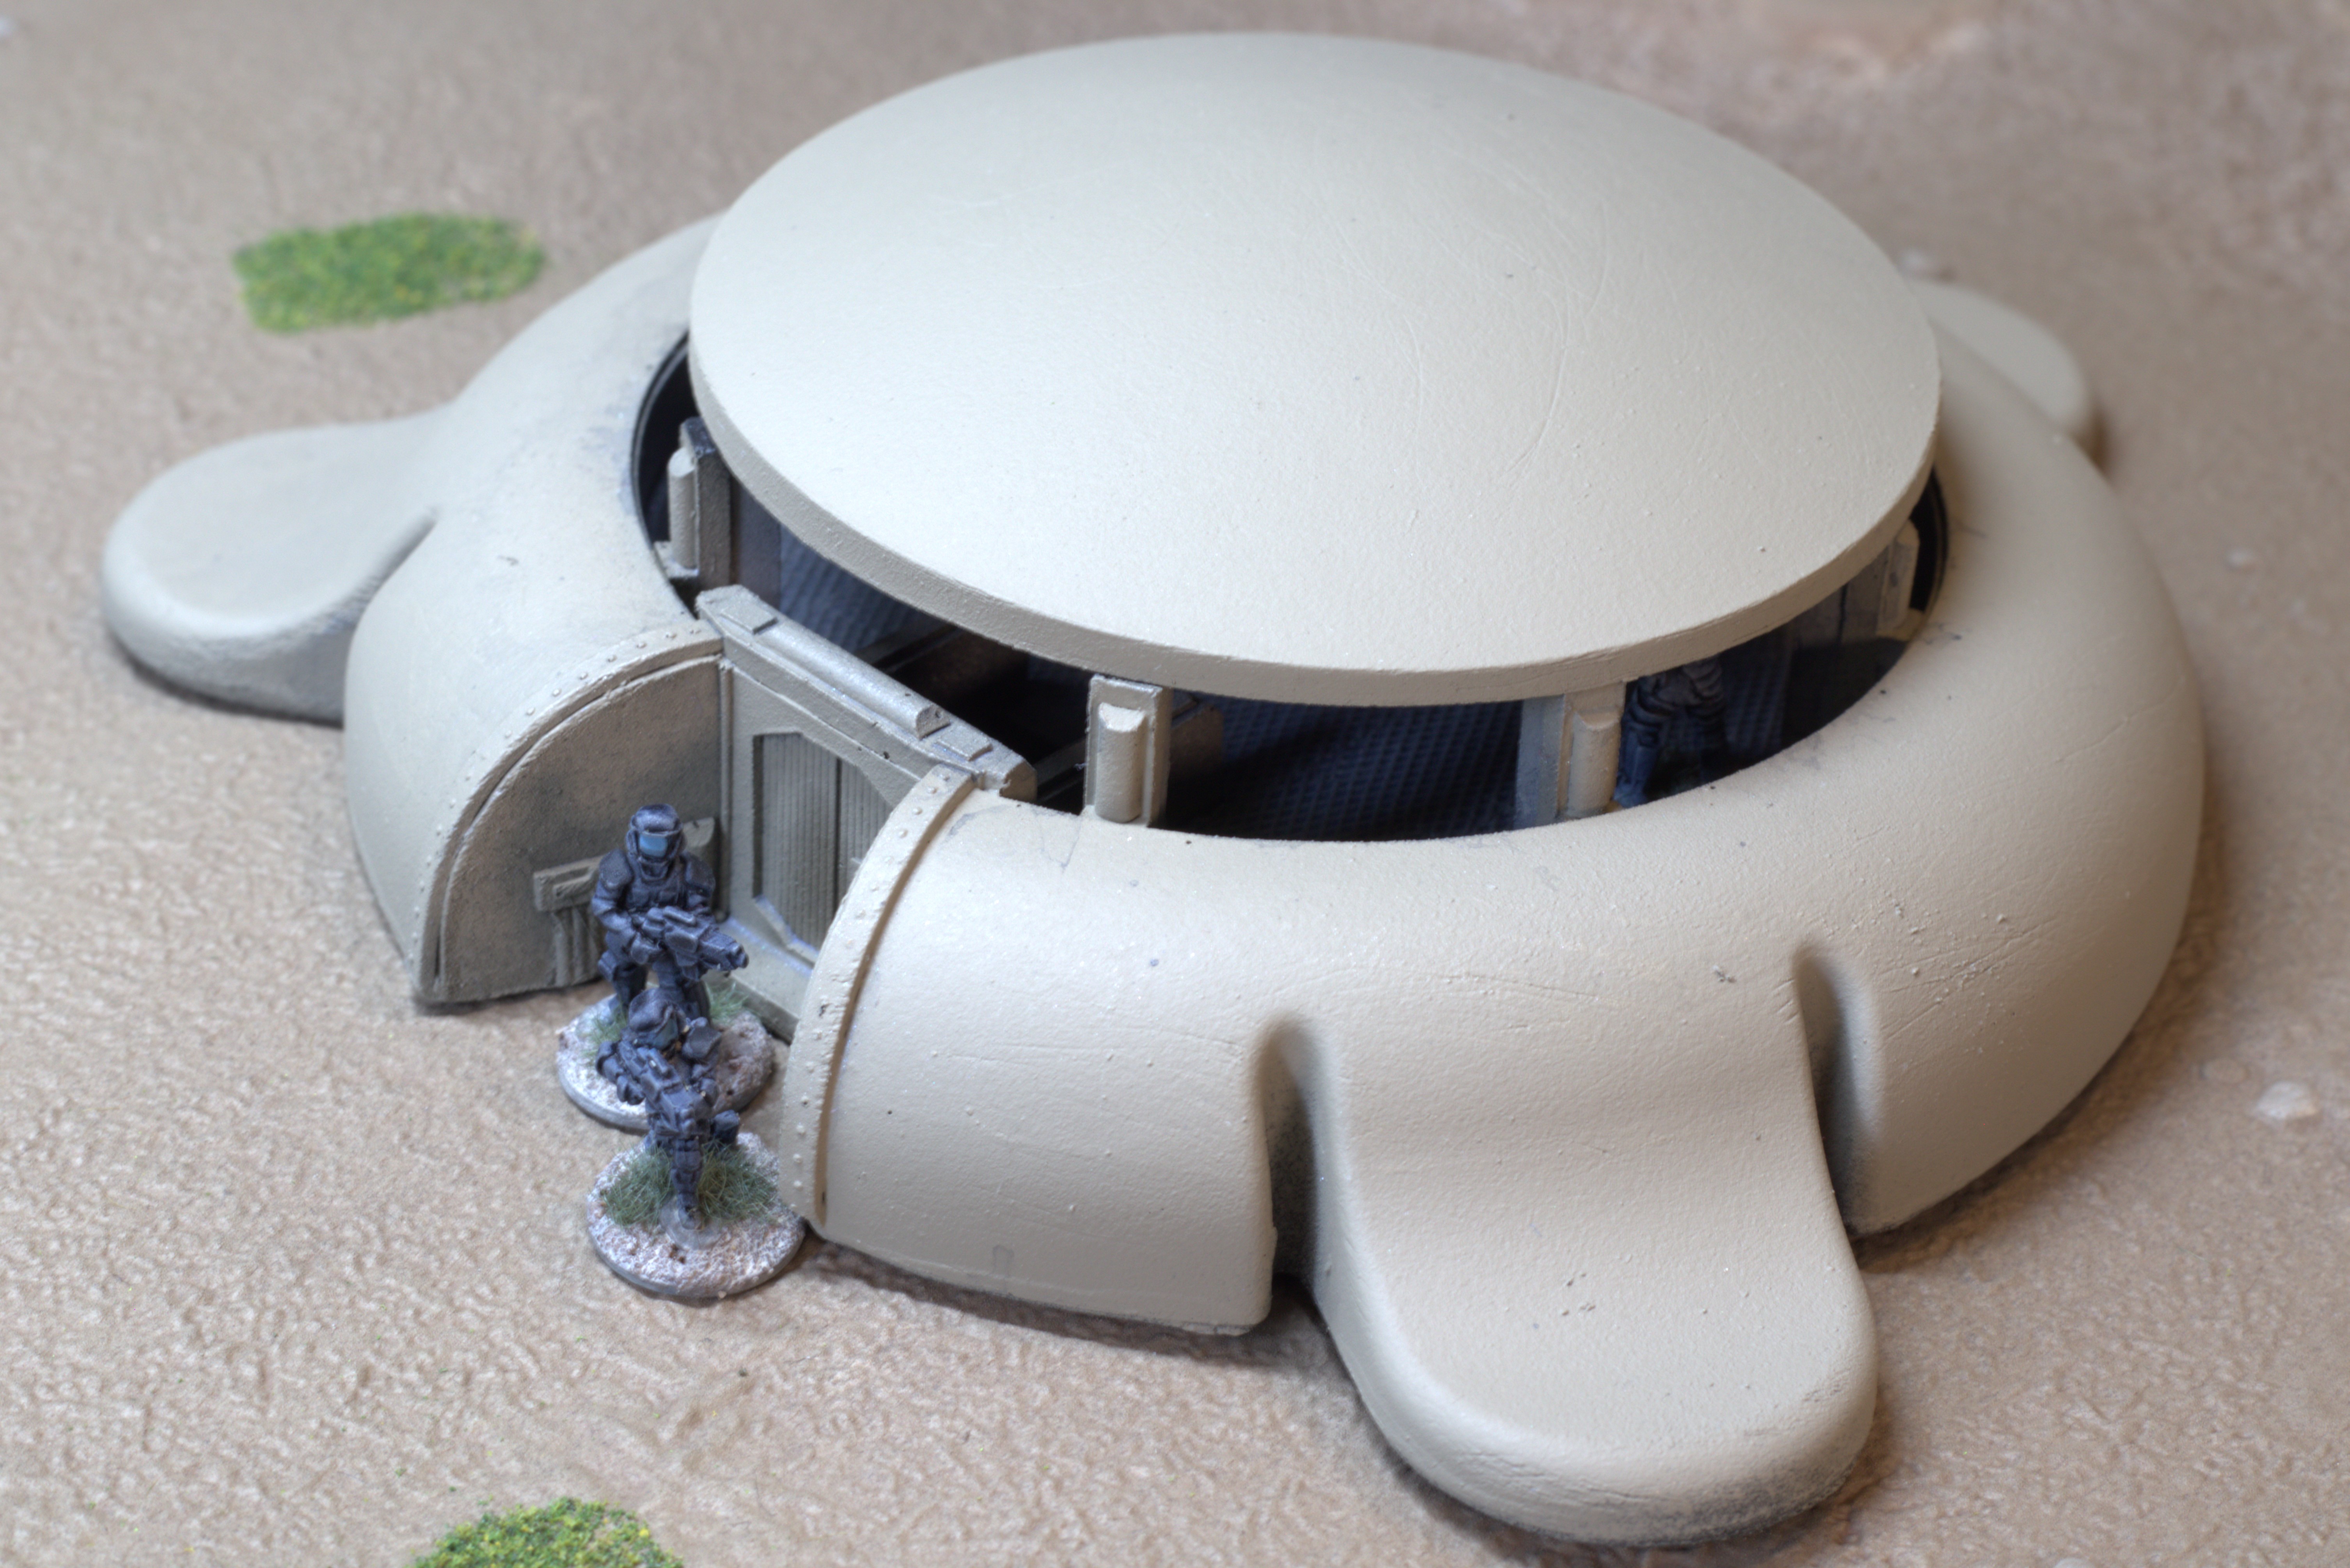
Brigade Models B15-1001 15mm SF Bunker

This is another product that I bought ages ago, stored away during my tabletop gaming interregnum, and rediscovered while looking for something else. I decided on a paint scheme just in time for weeks of rain and humidity levels too high for spray painting. My patience was rewarded once I was able to get started - the work was quick. Unlike much of my unfinished product pile, this is actually still available for purchase from the manufacturer.


The curved appearance of the bunker puts certain Star Wars visuals in mind. Not the sharp edges of Imperial design, of course. Rather, the rounded architecture seen on some planets away from the core - places like Tatooine and Naboo.

This product comes in two pieces - the main body and a cover. The main body includes a sculpted interior including floor grating and steps down to the entrance. The other piece is a simple round cover for the interior. The two pieces do not lock into each other - there is nothing holding the cover on the main body.


Sanding
The bunker is cast resin and needed some sanding to remove some rough edges and flash. There is also some chipping near the bunker entrance, but it's not particularly noticeable when the piece is sitting on the table. Besides, it adds to the worn look I was going for. I also roughed up the surfaces of the piece due to concerns about the paint bonding to the smooth resin. I wore a respirator during the sanding process, having been warned about inhaling resin dust awhile back.

Cleaning
The next step involved soap, warm water, and a brush. Taking the time to clean what I'm working on is a habit for me at this point.

Spray Painting - First Layer
I sprayed the underside of both pieces and the interior of the main body with Krylon COLORmaxx Paint + Primer in Flat Black. I was planning on a dark gray or metallic for the interior, so black works well as an undercoat. The goal of painting the undersides is simply to put down a layer to protect the resin.


Spray Painting - Second Layer
The base color for the bunker is Krylon Camouflage Ultra-Flat Khaki. A sandy color isn't unusual for a concrete surface, especially one that's been exposed to the outside for awhile. Besides, I've been on enough military bases - mostly American - to know that khaki is a common color for buildings like the bunker.

Interior
The floor got a coat of FolkArt 2561 Steel Gray brushed over the black Krylon. I applied some Craft Smart Premium Wax Silver Metallic Finish over the gray paint to give the floor a hint of metallic shine.

Wash Layer
I still have a bottle of black wash that I mixed for a long-ago project. It's come in handy for terrain projects like this one. I applied a layer of wash over all of the interior surfaces and allowed it to pool. The floor is deeply textured with a grate pattern and I wanted the wash to settle into it. I also brushed a layer of wash over the exterior of the bunker, but I wiped off the excess to prevent pooling on those surfaces.


The bunker is a hefty piece of solid resin. It will likely hold up well to handling, but I'm reluctant to subject it to an unplanned drop test. The interior is a nice touch and holds a fair number of 15mm miniatures - the exact count depends on the size of their bases. It was a good value at $12 USD when I purchased it and is a better deal now, although shipping costs may offset currency exchange rates.

Thursday, July 15, 2021

30 Minutes Missions EEMX-17 Alto (Dark Gray) by Bandai - First Impressions

I purchased this model kit to see how it looks with 15mm scale miniatures. Also, building scale models is something I've been wanting to get back into and big stompy robots are as a good place to start as any. This is an initial look with general product information, a description of the build process, and a few comments on its potential for tabletop gaming. I also have a couple of accessory kits for this model that I plan on featuring in a follow up post.

Alto covering 15mm "Earth Exploration Team" members.

Bandai's 30 Minutes Missions (30MM) line is intended as a starting point for getting into Gundam models. The kits in this line are priced lower than comparable Gundam models since they aren't tied to that franchise and its associated licensing fees. A selling point of 30MM is the relative speed and ease of assembling a kit without sacrificing quality.

Bandai created its own lore for 30MM, based around an alien invasion. I'm not versed in Gundam lore, but I have picked up the broad strokes of the franchise over the decades it's been around. Even I can recognize that the Alto is loosely based on the concept of the GM - a mass produced unit deployed in quantity by an Earth-based military against a threat from space.

30MM is named for the amount of time it's supposed to take to assemble a kit. I took closer to an hour. Inexperience played a role, but I also found myself going slow to savor the process. Note that I still need to clean up the nubs left from clipping off the parts.

Close up of backpack. Note the holes where accessories can be attached and the melee weapon in the left hand.

The sprues (or runners) are laid out intuitively. Each runner holds parts of a particular color or type of plastic. Parts that go together on the model are grouped together on the runners. This reduces the need to squint and hunt for parts spread around a runner.

I choose the dark gray and black color scheme as something that would be plausible for a unit with a low observable coating. Military colors - green and tan - are available. These also come in brighter colors. I'm tempted to get the Alto's counterpart - the Portanova - in red or blue. I may see how well the plastic takes spray primer and paint sometime down the road.

Trying a more daring pose to test the articulation.

Although the Alto is a 1/144 scale model, it works well enough with 15mm miniatures using an eyeball comparison. It looks like there should be just enough space for a cockpit big enough for a 15mm scale pilot in the chest. It might be a tight squeeze, though - certainly not as roomy as some mecha cockpits I've seen in various media. I'll have to dig out more of my 15mm collection for further comparison.

Of course, the whole issue of "where's the cockpit?" can be dodged by declaring it a remotely piloted or AI controlled drone. That might be enough justification to make it work with 28mm scale miniatures. It might work as a major threat to a band of adventurers in a sci-fi RPG game.

The Alto is well articulated and stays in a pose without "drooping" - at least, when the joints are new. There is a good amount of detail, considering that this is supposed to be a starter model. The holes are attachment points for additional parts. That offers the ability to customize the model for a particular role - sniper, command vehicle, close combat variant, etc. Two option kits came in the bundle that I ordered - I'll post a follow up after I get a chance to assemble and play around with them.

Tuesday, July 13, 2021

Out of My Wheelhouse - Bandai Hobby HG 1/144 #39 Ptolemaios Arms "Gundam Build Divers"

This kit caught my attention while shopping around on Amazon. It looked like it had potential as a "ship of the week" for games like Star Trek Adventures and as a miniature for spaceship combat games. Eaglemoss Star Trek ship models look great on the tabletop, but the price tag means that I only use them for the player characters' ship and those operated by major gamemaster characters. Wizkids offers less expensive options, but I've run into scaling issues. This model would fit a lower technology culture - either pre-warp or early warp drive. For spaceship combat games - well, it's always nice to have more variety on the tabletop.

I'm not familiar with Gundam or Gunpla, so I have no idea what anything on the box means.

I'm not a Gundam fan, but I gather that this ship - the Ptolemaios or Ptolemy - is a mothership that first appeared in Mobile Suit Gundam 00. The ship also made a cameo appearance in Gundam Build Drivers. This model kit is part of the Gundam Build Drivers line. And that's a far as I'm willing to research. The last thing I need is another long running series to binge watch while painting miniatures.

Ptolemaios encounters USS Thunderchild. The Starfleet crew advises caution around cube shaped spaceships.

The main selling point of this kit is how it can be broken down into its components. These are intended to be attached to other 1/144 scale Gundam models to customize their appearance. My interest is using them to depict smaller spacecraft on the tabletop. There are four easily removed components on the main body that resemble shuttles or transports. The completed model is about four inches long and the shuttle components are about an inch in length. I'll need to experiment to see how the engine sections and main body can be reconfigured.

Shuttles detached!

Building the kit was a pleasure. Everything in the box came neatly sorted and bagged. The instructions were clear enough, but I did end up squinting at a couple of things until what I was supposed to do finally clicked. All of the parts fit smoothly and cleanly. There was no need to force or "convince" them together. I completed the build in about 45 minutes, but that's largely due to my taking my time and my inexperience with this kind of model kit. There are even a few unused parts left on the sprues - additions to my bits collection are always welcome!

Still a few morsels left on these bones.

Ptolemaios is shown here without paint, wash, or panel lining. I also have to go back and clean up the bubs left from cutting the parts off the sprues. Spray priming and painting will have to wait until the humidity dies down around here.

The one thing I don't like about this kit is the lack of a stand. I'm aware that this is common to Gunpla, but it's still annoying. I had to improvise a stand with a clear plastic cup for the photos in this post. Maybe I'll hunt down a compatible stand for Ptolemaios sometime.

Ptolemaios encounters a cube shaped spaceship.

The cost of this kit varies. It retails in Japan for the equivalent of about $8 USD. However, importing the kit adds considerably to the overall price - doubling it in some cases. I opted to pay $15 USD on Amazon, but that's with free shipping.