Showing posts with label miniature. Show all posts

Wednesday, October 15, 2025

Orcpocalyse Orctober Spa Treatment

October is half over and I'm way behind on this project. I get the feeling that I'll still be painting Orcs around Xmas time. On the other hand, I'm way ahead of where I was when these miniatures were still in their packaging. I'll take some progress over no progress.


The Problem

Early Reaper Bones miniatures are made of a white, vinyl-like plastic that's infamously finicky to work with. It repels water, including acrylic paints. It reacts badly to rattlecan primers and paints, even those specifically formulated for use on plastics. It stubbornly resists attempts to straighten out bends. And it almost always arrives bent or bends in storage. Fortunately, Reaper Miniatures has moved away from this particular material over time.

Unfortunately, these orcs are all from the Reaper Miniatures Bones: An Evolution of Gaming Miniatures Kickstarter. That's Reaper Miniatures' very first Kickstarters and the one that launched the Bones line. All of these orcs are made of early Bones plastic by default.

Straightening out bent parts and preparing the surfaces to accept paint requires planning and work. And it took longer than I was planning due to personal stuff delaying things. That's the nature of a hobby - it's on the bottom of any reasonable priority list.

Orc spears before heat treatment.

Orc Steam Bath and Cold Plunge

The tried and true method of unbending Bones plastic requires the application of heat. Some plunge their Bones miniatures into a jacuzzi of boiling water. I improvised a steamer with a pot and a basket, avoiding the issue of fishing out miniatures from scalding water. I don't recommend either approach due to the mess and hazards involved. A heat gun is going on my wish list for the next time I tackle a project like this.

Regardless of the heat source, the idea is to use heat to soften the plastic and make it malleable. In some cases, the plastic will "spring back" to its original shape just from being heated. Otherwise, the softened plastic is easy to reform into its correct shape.

Getting the plastic to stay in its unbent form calls for rapid cooling. The easiest method is a cold plunge. Dunking the plastic in cold water hardens it in its unbent state. Quick cooling seems to be the key. A container of ice water is my preferred choice.

Even after all that, the process is not perfect. "Good enough for tabletop" is the goal here. A slightly bent sword or spear is better than one that's twisted into a pretzel shape.

Finally, Reaper Bones miniatures are glued together. The hot/cold treatment could weaken those bonds. There might be an audible cracking sound when the miniatures go into the cold plunge. That's the glue letting go. Check the water for any parts that may have fallen off.

Orc spears after heating, reforming, and cooling.

Orcs Like the High Proof Stuff

With the orcs as unbent as they're going to be, the cleaning process could begin. I sprayed down all the orc miniatures with isopropyl alcohol. Full immersion would've been better, but I didn't have that much of the stuff around at the time. The purpose of using isopropyl alcohol is to begin breaking down any residue from the manufacturing process still on the surface of the miniatures.


Bath Time for the Warband

Cleaning finishes up with an old fashioned scrubbing with warm soap and water. A sturdy toothbrush with firm bristles works well to get into all those orc nooks and crannies. A soak and a rinse in cold water should get rid of anything left on the surfaces. Check the wash and rinse waters for any loose parts.


Next: It's all about those bases.

Wednesday, September 24, 2025

Orcpocalyse Orctober

"Orctober" is around the corner and it's time to consider the possibilities. Actually, I should be well into the planning phase at this point. But what's the fun in that?

A box of plastic orcs, not quite ready to be painted.

To fit the theme of this orc-based October project, I am tackling the over two dozen orc miniatures I got from the Reaper Miniatures Bones: An Evolution Of Gaming Miniatures Kickstarter. Yes, that was roughly forever ago. Reaper's first Kickstarter is truly the gift that keeps on giving for me.

The "Orcpocalypse!" option of that Kickstarter added 20 Orcs to the 5 Orcs and Warboss already available as part of the "Vampire" pledge level. Here's the break down:
  • 77042 Orc Marauder (Sword and Shield) - Plate armored orc armed with a sword and shield. x5
  • 77045 Orc Hunter (Spear) - Plate armored orc armed with a spear. x5
  • 77051 Orc Stalker (Two Weapons) - Plate armored orc armed with dual swords. x5
  • 77056 Orc Sniper (Archer) - Mail armored orc armed with bow and dagger. x5
  • 77059 Orc Berserker (Two Handed Sword) - Plate armored orc armed with a great sword. x5
  • 77064 Kavorgh, Orc Warboss - Big plate armored orc leader armed with an axe and shield. x1
That's 26 orc models made of the white, vinyl-like plastic used in early Reaper Bones miniatures. I'll have to straighten bent spears and clean up the surfaces before I even think about putting paint on them. And I'm still mulling over paint schemes because I don't want to spend all October painting green.

Maybe this is a good time to learn how to use an air brush?

Monday, September 22, 2025

Citadel SKULLS First Impressions

DISCLAIMER: I bought this box of Citadel SKULLS with my own money. I have no connection to Games Workshop except as a customer. The opinions expressed in this post are entirely my own brand of snarky nonsense.

Surprise! It's a box of skulls.

This product is exactly what I expected - a box containing four sprues of 28mm scale plastic skulls. It's from our hobby's leading authority on molding skulls on models - Games Workshop. The Imperium of Man in 40K is a prime example. Just look at the sheer number of skulls they slap on everything that can't run away fast enough. Armor? Gear? Vehicles? Industrial machinery? Buildings? Skulls, skulls, skulls, skulls, and skulls. No need to ask if they're the baddies! They are.

The back of the box claims there are 340 skulls contained therein. Closer inspection reveals that 20 of the models are, in fact, jawbones. However, I don't think that the jawbones are included in the 340 skull count. Even if they are, that's still over 300 skulls. That's plenty of skulls for all but the most ambitious projects.

Four plastic sprues of skulls. All kinds of skulls.

Variety is pretty good in this product. Roughly half the models appear to be based on human skulls. The larger models are skulls of various non-humans. A fair number of the skull models are specific to Games Workshop properties. The Kroot skull models are pretty distinctive and may need modification to fit another setting. On the other hand, few are going to quibble about using "Ork" (40K, sci-fi) skulls as "orc" (fantasy) skulls.

This is the kind of product that most will slowly use up over several years. One or three skulls dressing up a miniature's base gets the point across. Even a pile of skulls to dramatically pose a miniature on will only use a dozen or so. I don't foresee the need to buy another box for myself coming for awhile. Unless I get an idea for some project that needs hundreds of 28mm scale skull models. Like a wall of skulls or something.

Okay. I need to leave that train of thought behind before it gets me into trouble.

Price? It's Games Workshop, a company that takes exceptional pride in their products and only lets others play with them if they part with substantial amounts of money. If there are more cost effective products that serve the same purpose, please let me know. I don't know how much products from the UK are going to end up costing here in the US over the next few years.

TL;DR: This is a good option for folks who need a few hundred 28mm scale plastic skull models, but check around for less pricy alternatives first.

Tuesday, October 29, 2024

Reaper Bones 77046 Bat Swarm

As far as I can recall, it's been a year since I last slapped paint on a miniature. There was a couple of terrain projects during that time, but that's not quite the same kind of painting. "Tabletop standard" has a different meaning when applied to miniatures versus terrain. People pick up miniatures, hold them up to their faces, scrutinize the things, and ask about the lack of painted on eyes. Terrain only needs to be painted well enough to get the point across.

It's been way too long.


What did I have to work with? Wiping the dust off my wet palette revealed it to be fine. Surveying my paints had mixed results. The dropper bottle stuff seemed fine, but all needed a through shaking. The sheer incompetence in plastic form that are Games Workshop paint pots was another story. About half of it dried up, leaving nothing but hard flakes and wasted potential. My brushes are all fine, being stored well out of reach of my daughter's cats.

I decided to start with something straightforward. Something that would look fine with a base coat, some shaky brushwork, whatever highlighting I could muster, and awash to cover up my mistakes. That all added up to a Reaper Bones miniature from my pile of shame.

This miniature depicts a swarm of bats flying around a grave marker. It fit the season and didn't seem too demanding of my rusty skills. A nighttime scene limited the colors I needed - it's all dim lighting and shadows.

I described my process for preparing and basing Reaper Bones miniatures in this linked post.

For my first attempt, I painted the whole thing black and went overboard with drybrushing it gray. Trying to recover with a black ink only made it worse. I covered it all up with a black base coat again to reset and start over.


Paints used:
  • Reaper Master Series Pure Black 09037 - used because the last of my Citadel Colour Chaos Black died in the bottle.
  • Citadel Colour Codex Grey - still clinging on to life.

Instead of jumping straight to a medium gray, I used a mix of black with a little gray for the first drybrush layer. I added more gray for each following layer, getting less aggressive with the drybrushing each time.

I highlighted certain areas with an even mix of black and gray. I paid particular attention to the edges of certain bat wings, the grave marker, and a skull on the ground.

The final touch was to reintroduce shadows. Some areas that didn't need it got hit with the previous drybrush layers. I watered down the black paint remaining on my palette and used it as a wash. The wash was applied selectively. Only the areas that would be in shadow and needed to be darker got hit with the wash.

The end result is a serviceable miniature. More importantly, it a start to get me back into miniature painting. I'll likely ease back into it with another Reaper Bones miniature or three before tackling something more exciting.

Saturday, November 5, 2022

Wizkids Star Trek Deep Cuts Klingon Bird of Prey

Thanksgiving is around the corner here in the United States, so I wanted to do a bird themed project. A green bird wasn't the first thing to come to mind, but it would be handy for our Star Trek Adventures game. The hardest part of painting this Klingon battle turkey was dialing in a satisfactory green for the hull.

A Klingon Bird of Prey flying over the black felt of space.

The Klingon Bird of Prey first showed up in Star Trek III: The Search for Spock. The model was built by Industrial Light and Magic, who did the effects for the film. The Star Wars influence appears in the exposed guns (most weapons on Star Trek are understated and recessed into the hull), lack of prominent warp nacelles (just where the warp drive on this thing isn't obvious), and greeblies protruding from it (Star Trek ships outside of TOS aren't completely smooth, but lack the chunky details seen in close ups). The outline of the ship - a command pod connected by a long boom to a broader main body - evokes prior Klingon ships. The feather details on the wings and cloaking device imply a Romulan connection.


Overall Appearance

This model is close enough in terms of detail. The overall shape is right, but it is not screen accurate. That would be overkill at this scale. Many of the details of the studio models (physical or CGI) wouldn't be visible on a model this size. On the other hand, some of the shapes just don't match any of the reference materials I was using. I feel that one more detail pass on the sculpt would have pushed this from "good enough for tabletop" to a display piece.

Side by side comparison with Eaglemoss USS Phoenix.

Scale

Wizkids made no effort to scale its Star Trek miniatures with each other. This model is enormous compared to the Cardassian Galor I painted awhile back. (See that post for a comparison of the two still in their boxes.) However, it looks pretty good alongside my Eaglemoss USS Phoenix. It's still too large for something commonly depicted as a scout, raider, or small cruiser. However, Star Trek scaling isn't consistent. This is especially true of the Klingon Bird of Prey.


Preparation

Deep Cuts miniatures come pre-primed, so I was able to skip that step. I had to remove some flash with a hobby knife. There's also some mold lines on the edges of the wings that I wish I spotted before painting. This was a disappointment since the Cardassian Galor I painted last year was ready to go straight out of the box. It might be the more complicated shape of the Bird of Prey or just that I got one from a bad batch.


Paint Scheme

The colors of the studio models seemed to be different on almost every image I saw during my research for this project. The best single source I could find was a page on Ex Astris Scientia. On screen, the Klingon Bird of Prey ranges from green to yellow-green. I decided that an olive color could be close enough and convey a military feel.

Side view.

Hull

This took some experimentation.

My first attempt - a mix of Reaper 09011 Leaf Green and Reaper 09009 Lemon Yellow - produced a bright green. The color seemed too cheery for a Klingon warship. However, I will keep it in mind for any forest, elvish, or Christmas themed projects in my future.

Further trial and error produced the following mix:
Reaper 09177 Camouflage Green (2 parts)
Reaper 09074 Palomino Gold (1 part)
Reaper 09291 IMEF Olive (1 part)

The Camouflage Green and Palomino Gold produced a bright yellow-green. The IMEF Olive darkened it down, but the yellow hue was still strong. More green or less Palomino Gold would've produced a color closer to what's on screen. However, I was planning on hitting the model with a coat of wash later. That's when the decision to stick with the brighter, more yellow mix paid off - a more screen accurate color would have ended up too dark with a wash over it.

Three quarters view.

Underside Feather Pattern

Reaper 09070 Mahogany Brown (first coat)
Reaper 09072 Rust Brown (second coat)

Used for the feather pattern on the bottom of the wings and the circular band around the command pod. The Mahogany Brown provides a good base coat for the following layer of Rust Brown.


Technical Details

Reaper 09088 Stormy Grey

I picked out the hinge-like cowling at the top of the model and a few other details in Stormy Grey. Some renditions of the Bird of Prey use gray to break up the feather pattern on top of the wings. I might have put in that effort if this was intended to be the main ship of our Star Trek Adventures game. A "hero" version of this miniature might be an interesting project for another time.


Wash Coat

Army Painter Warpaints Quickshade Dark Tone

No subtlety here - I slapped a coat of slightly diluted Dark Tone over the whole model. It darkened down the bright yellow-green hull color into an olive. It also brought out details like the feather patterns on the wings.

Aft view.

Impulse Engine

Reaper 09070 Mahogany Brown (first coat)
Reaper 09279 Fresh Blood (second coat)
Reaper 09009 Lemon Yellow (final coat)

Used for the impulse drive. These were layered on top of each other, leaving some of the previous coat showing towards the "cooler" areas. A better job blending the colors together or a coat of red wash might have helped with the gradations, but what is on the miniature is good enough for tabletop.


Conclusion

This was an inexpensive option for getting a Klingon Bird of Prey on the tabletop, but seems to be harder to find these days. I'm not sure if Wizkids has discontinued the line or if stocks are just low. I like how mine turned out and will likely pick up another if I can source one.

Sometimes the interests of allies don't align.

This particular one will represent a sometimes helpful, sometimes not complicating factor in our Star Trek Adventures campaign in the starting campaign year. Things will get a little more confrontational after 2372 rolls in.

Sunday, October 30, 2022

Finishing the Pack - Alternative Armies EH03 Space Brains

October is a good time for horror themed projects. I painted up one of these figures last year for that very reason. Then I forgot about the rest of the pack until I was looking for a horror-themed painting project as this Halloween loomed closer. B-movie horror is still horror, so I finished the other four.

A brainy bunch. Last year's test model is in the middle.

Alternative Armies sells these floating, gun-toting brains in packs of five. They work as gray matter extracted from enormous, mutated, alien conquerors in a variety of scales. Their ability to fly could come from their cybernetic augmentations or be some psionic power from their vast, cold, and uncaring intellects. Their cybernetic enhancements otherwise seem to be limited to weapons and the sensors needed to navigate and find targets. Each figure in the pack is a distinct sculpt with its own configuration of cybernetics and arms.

Close up of the different robotic appendages.

I used the test model from last year as a guide. The improvised flight stands are the same. The paint job is almost the same – there were two exceptions because I couldn't resist tinkering. The squishy thinking bits got a layer of highlighting using a mix of white and the Reaper 09281 Brains Pink that I used as a base color in those areas. The cerebral areas also got additional coats of wash. It gives those areas a raw and bloody look. I kept the dark look of the cybernetics - they remind me of Borg implants and add to the menacing appearance.

Last image from some remote outpost or a bunch of cybernetically enhanced brains dropping an album?

Now I need to consider when these will hit the table. Five Parsecs From Home? Or do I send them after the crew of USS Phoenix in our Star Trek Adventures campaign first?

Friday, October 21, 2022

Reaper Bones 77037 Medusa or How a "Warm Up" Project Comes in Handy

I suspect that this miniature - packing a bow and quiver while featuring the lower body of a snake from the torso down - was inspired by the Medusa in Clash of the Titans (1981). This is the white plastic version. I received mine as a backer reward from the first Reaper Bones Kickstarter.

A quick miniature painting project is the best way for me to get back into crafting tabletop gaming stuff after a break. Using a Bones fantasy monster miniature is ideal. Bones miniatures tend to be inexpensive and getting paint on one knocks down the pile I still have from the Kickstarter. Since I'm coming back after a break, I'm more likely to make mistakes. I'd rather do that on a model that will only be on the table long enough for the player characters to remove it violently. Unfortunately, I ran into more problems than I could have anticipated and a "quick" project turned into a "longer than I thought it would take" project.


Planning and Preparation

Most of the Medusa miniatures I've seen online are a shade of green. I decided to be different and go for a brown color scheme.

I posted my usual approach to preparing a white plastic Bones miniature elsewhere on this blog. Short version: I clean the miniature thoroughly with warm soap and water. Then I glue it on a one inch steel fender washer. Finally, I hit it with a mix of FolkArt Glass & Tile Medium and either brown or black paint. This acts as a primer coat. For this project, I went with brown.


First Paint Pass

This was supposed to be the only paint pass, but things didn't go as planned.

Tail and Hair
FolkArt 231 Real Brown
FolkArt 479 Pure Black

The first coat was a mix of Real Brown with some Pure Black to darken it a shade or three. Real Brown was used over that as a highlight. This really brought out the scales on the tail and torso.

Skin
Reaper 09221 Olive Skin
Reaper 09041 Tanned Skin

Base coated with Olive Skin with Tanned Skin used over it as a highlight.

Bow and Quiver
Reaper 09041 Tanned Skin

The Tanned Skin color works as wood and worn leather as long as a wash is used over it.

Bracelets and Other Metallics
Citadel Colour Tin Bitz
Citadel Colour Shining Gold

I used this over the bracelets and pretended that the bare breasts were really sculpted bronze plates worn over the breasts. The dark brown metallic base color is a little too dark, but the brighter metallic brushed on as a highlight makes it look like its catching more light in some areas.

Wash Coat
FolkArt 231 Real Brown diluted with water

There were a few spots that needed some help after I was done painting. A wash sometimes works as a quick fix, but wasn't enough in this case.


The Problem

The issue I kept running into was the paint running off the raised areas and exposing the bare plastic underneath. Early production Bones miniatures used a white material that sometimes repels water and water-based paints when painted right out of the package. (More recent Bones miniatures use a grey plastic and may not have this issue.) A good cleaning and a coat of FolkArt Glass & Tile Medium usually solves the problem, but didn't seem to be as effective on this project. Looking back, using craft paints instead of higher density artist or miniature paints may have contributed to the difficulties I was having.


Second Paint Pass

My new plan was to hide all the mistakes and patchy spots of the first pass with another coat of wash. Then I could brush on highlights over the wash coat and nobody would know unless they read this blog post.

Wash Coat
FolkArt 231 Real Brown
FolkArt 479 Pure Black
Liquitex Matte Medium
Water

This is a much darker wash than the one I used at the end of the first pass. It also holds together better due to the Matte Medium keeping the pigments in suspension.

Tail & Hair Highlights
FolkArt 231 Real Brown

Skin Highlights
Reaper 09221 Olive Skin

Metallic Highlights
Citadel Colour Shining Gold

The wash caused the previously applied colors to blend together. Here I tried to make the raised areas stand out again.

Basing
Mix of sand, FolkArt 231 Real Brown, PVA glue, and water
FolkArt 420 Linen

My usual approach to texturing and coloring the base of miniature is covered in more detail elsewhere on this blog. Once the mix was dry, I brushed on the Linen to bring out the rough texture.


Final Paint Pass

The second pass fixed most of the areas where the paint ran off during the first pass. There were still a couple of raised areas were much of the paint flowed off, leaving them significantly brighter. Worse, the details on the miniature were getting lost. Using Real Brown as a highlight over a mix of Real Brown and Pure Black works under a bright lamp, but is too subtle a difference to notice in other lighting conditions. I needed one more pass to highlight the details further and cover up the last remaining spots.

Highlighting Layer
FolkArt 420 Linen
FolkArt 231 Real Brown

Straight Linen would be too bright on its own, so I added a touch of Real Brown to darken it slightly. I used this mix over all the non-metallic areas to bring out the raised details and highlight certain areas. It also served to cover up the remaining spots.

Wash Coat
FolkArt 231 Real Brown
Liquitex Matte Medium
Water

Even darkened down with a little Real Brown, the highlight mix was still a little too bright when I was finished with it. I brushed on Real Brown diluted with water and Matte Medium to blend the layers together.


Wrapping Up

I tend to be more prone to making mistakes after a break. This makes "warming up" with something like a Bones miniature worthwhile for me. The process of engaging with a project can come back to me while working on something that only has to be good enough.

As for the Medusa, this miniature will do fine when it goes on the tabletop. All it has to do is menace the player characters until it runs out of hit points.

Monday, August 1, 2022

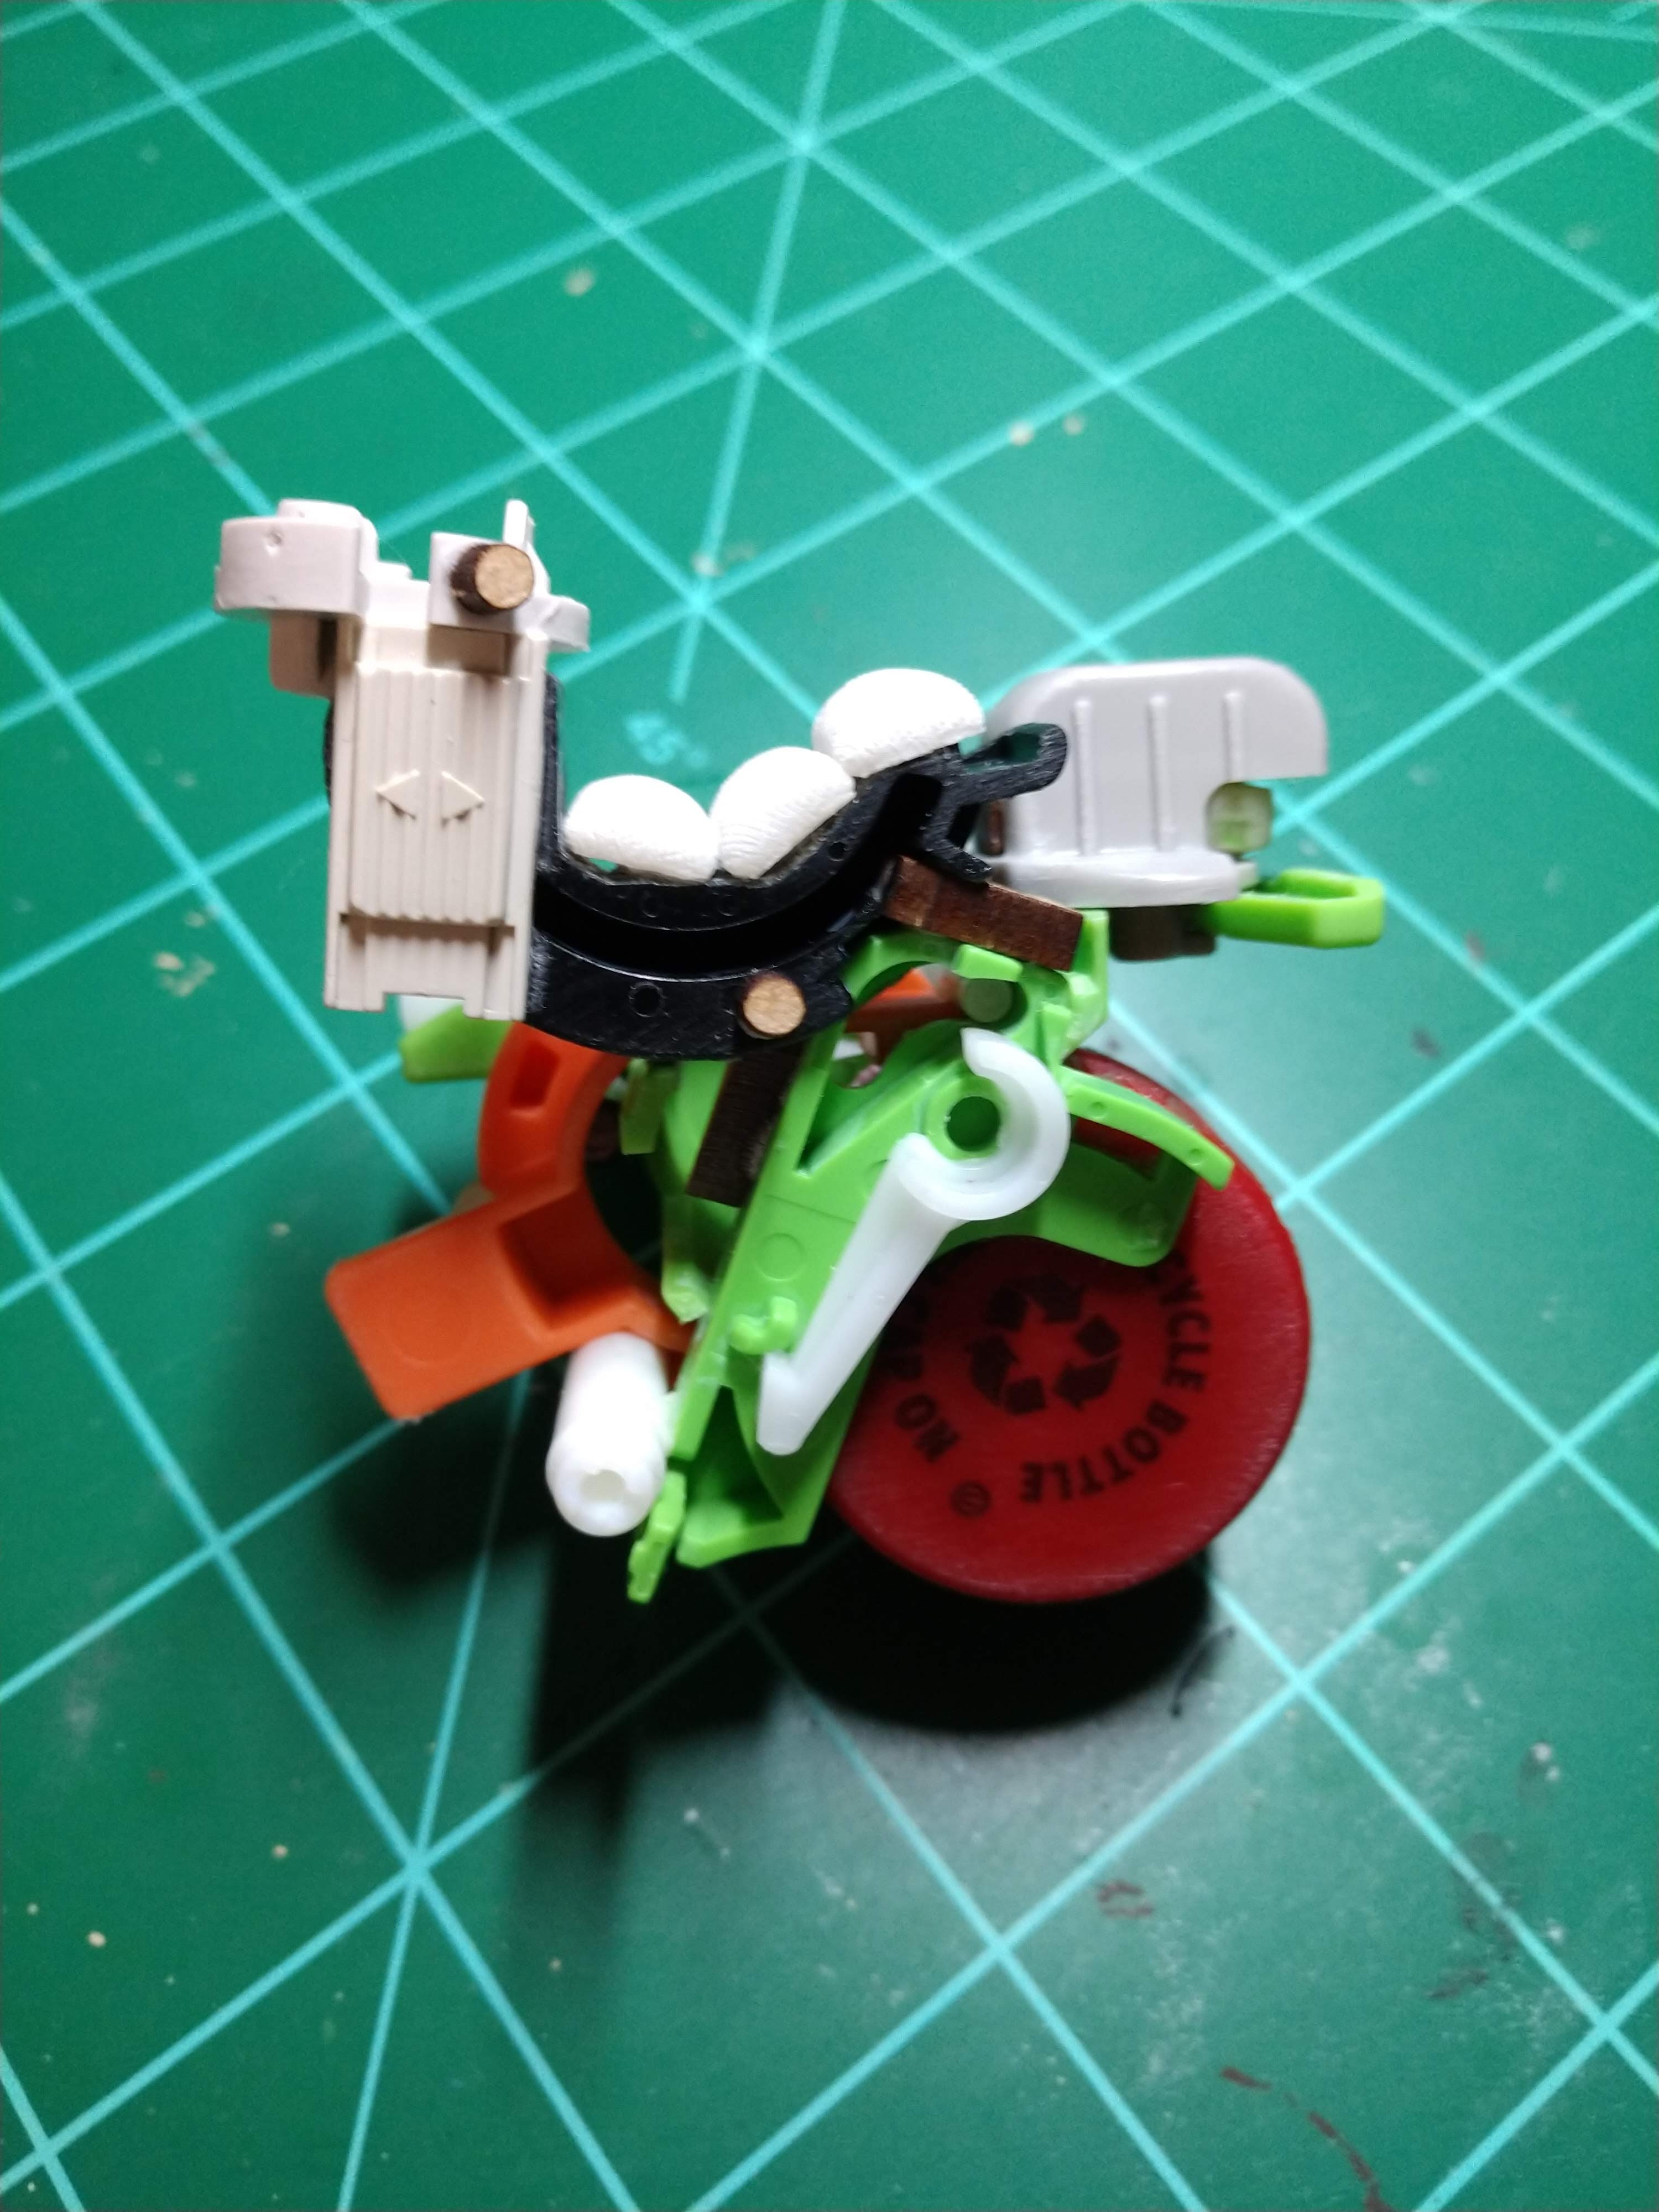
Trash Bash Monowheel Cycle FINISHED

Here's a monocycle model I cobbled together from reclaimed materials. It started off as an experiment with making a wheel with a pair of plastic soda bottle caps and grew from there. When I last posted about this project, all I had left to do was put it on a base and paint it up. Finding my way forward took awhile.

Rosie inspecting some Atmospheric Water Condensers during her frontier days.

Basing

I started by attaching the model to a round plastic base with Gorilla Super Glue. This bond was only intended to hold everything together long enough to apply texturing mix to the base. The mix of sand, PVA glue, paint, and water that I favor sets like concrete once dry. The combination of Gorilla Super Glue and texturing mix produces a strong and durable bond.


Spray Re priming/Base Coats

Krylon Fusion All-In-One Matte Coffee Bean Paint + Primer
Krylon Camouflage Ultra-Flat Khaki

At least one more coat of spray primer proved necessary when I ran into problems painting the wheel black. The Tamiya Surface Primer didn't seem to bond properly to the plastic soda bottle cap. The Krylon Coffee Bean covered well and provided a flat, dark brown base coat. I followed up with Khaki sprayed in a zenithal pattern.

A little dirty and dusty, but still purrs like a kitten.

Painting

Wheel

FolkArt 479 Pure Black

A couple of coats over the entire wheel surface to represent rubber or some sci-fi substitute.


Body

FolkArt 437 Lipstick Red
FolkArt 932 Calico Red

I considered yellow or orange for the body, but went with red for the speed boost. Lipstick Red works as a dark base color and Calico Red as a highlight color.


Clean Up

FolkArt 231 Real Brown

I changed my mind about where some of the red went and gave those areas a coat of Real Brown. The dark brown produced a good undercoat for the metallic and cloth areas.


Metallic Areas

Citadel Colour Boltgun Metal
Citadel Colour Mithril Silver

I don't know how, but these old bottles are still going strong. The Boltgun Metal coated the areas representing bare metal parts with Mithril Silver lightly brushed over as a highlight.


Cloth

FolkArt 420 Linen

Linen seemed like a good choice for the sandbag seat cushions and the bags in the stowage area.

The only thing kept clean on this ride is the holographic projector for the HUD.

Weathering

FolkArt 479 Pure Black (diluted with water)
FolkArt 231 Real Brown (diluted with water)
FolkArt 420 Linen

The monocycle is supposed to be made of salvaged parts – much like the actual model - and used in the wastelands of some frontier world. A showroom new appearance didn't seem like the right move. The diluted Pure Black and Real Brown were each applied as wash coats. A heavy brushing of Linen produced a dusty appearance. If I do another project like this, I might use a Silver Sharpie to add some chipped paint and other details before applying the washes and drybrushing.


Base Clean Up

FolkArt 231 Real Brown
FolkArt 420 Linen

I needed to cover up some of the red paint that ended up on the base. This step also ties the ground colors to the weathering colors.


Wire

Adding a wire to connect a couple of the parts together was always part of the plan. Unfortunately, I forgot about it until everything was painted, but before I started weathering the model. Fortunately, the wire color works with the rest of the model and the wash coats help to tie it in.


Heads Up Display

The final step was to attach one of the Warsenal Fluorescent Scifi Screens I purchased way back in 2020 to the part representing a holographic projector.

Rosie: "Now where did I pack that screwdriver?"

Fictional Background

Let's wrap up with another Kessler's Catalog entry. I often think of how elements of a model would fit into a fictional setting while working on it. Writing these thoughts up into a backstory gets them out of my head.

This monowheel vehicle is representative of those used in remote regions of thinly settled worlds throughout the frontier sectors. Such vehicles serve a variety of operators such as couriers, surveyors, salvagers, and scouts. Packs of similar vehicles see use in conflict zones as raiders.

The chassis is built on the remains of a planetary survey probe. The wheel was salvaged from the landing gear of a heavy interplanetary transport. The other components originated from sources to varied to be listed here. Reliability is surprisingly high, but some maintenance tasks are described as "a bit tricky" by our technical staff. Performance is good, but handling "takes some getting used to" according to our test drivers.

The wheel is a plastic drum with a synthetic rubber coating and a metallic core. It is electromagnetically suspended and rotated when the vehicle is in operation. Stability and control are provided by a variety of counter gravity and mass manipulation systems. While these systems reduce the effective mass of the vehicle while operating, true flight is not possible due to their limited output.

Energy storage is provided by a series of repurposed power packs distributed throughout the vehicle. These packs are tied into a single system and can be replenished at any standard recharging station. The large solar energy collection arrays standard for planetary survey missions are missing - likely removed and repurposed long ago.

Auxiliary power is supplied by an internal combustion engine designed for planetary exploration and colonial applications. The engine can burn a variety of hydrocarbon fuels, but is most efficient when using high octane synthetic gasoline or alcohol. There is evidence of another auxiliary power system based on a nuclear generator, but most of the components are absent.

- Kessler's Upcycling Sales Catalog

Tuesday, July 19, 2022

D&D Beholder Miniature Rebasing

I was reminded of a problem with this Beholder miniature after using it on the thumbnail for the "The AD&D Monster Manual (1979) A - Z: Episode 3: "B - Baboon to Beholder"" video. Basically, the material used for the base is too soft for the job.


Replacing the base was a quick and fun project. This video provides an overview of the process.

Wednesday, June 15, 2022

Reaper Bones 80008 Rosie, Chronotechnician

It's been months since I did anything with my Five Parsecs From Home campaign. Sizing things up, there's three things I need to continue and a substitute miniature for Lin is the easiest to check off the list. Lin, previously represented by Rosie, Chronotechnician from Reaper's Chronoscope line, failed to repair her signature Brutal Melee Weapon and will be wielding a more conventional weapon for the next fight. Fortunately, I received the Bones version of her miniature as a reward from the first Reaper Bones Kickstarter.

I didn't want to simply reproduce my previous paint scheme on this figure. First, it's boring. Second, a quick change of clothes along with the weapon makes sense for the character. Third, it would allow me to use the figure as a different character later on.

Lin's got a loaner weapon until her big wrench gets fixed.

Base

I glued the integral base to a spray primed steel fender washer. The gap was filled after painting the miniature with a variant on my standard basing mix. This variant adds black rather than brown craft paint to a mix of sand, PVA glue, and a little water to improve flow. Some gray drybrushed on after the basing mix dried completes the industrial look of the base.


Preparation

The same approach I use for all white Bones plastic. Details are at the end of this link.


Skin

Menoth White Base

This with a wash creates a pale skin tone. I've never been happy with this approach and moved away from it, but used it here to match the Chronoscope version I painted before.


Shirt

Reaper 09017 True Blue

This is a bright blue that coats well. As the shirt is a small, flat area, I didn't feel the need to paint any highlighting over what the wash I applied later would provide.


Weapon

Citadel Colour Chaos Black
Citadel Colour Codex Grey
Army Painter Warpaints Quickshade Dark Tone

Not the neatest or fanciest approach, but one that brings out the mechanical details.


Overalls

Reaper 09158 Olive Drab
Reaper 09177 Camouflage Green

These are darker and lighter versions of an olive green camouflage color. They work well paired as a base and highlight.


Leather

Reaper 09284 Lonestar Leather
Reaper 09110 Oiled Leather

This is the same combination I used for the leather on the metal version and has become my go-to for a base and highlight combination.


Hair

Reaper 09183 Cloud Pink
Citadel Washes Baal Red

Again, the same combination I used for the metal version. To my surprise, the Baal Red was still perfectly viable, but most red washes should work fine.


Wash

Army Painter Warpaints Quickshade Strong Tone

Everything except for the hair and weapon got a coat of this wash slapped on it. Again, this reproduces my approach to the metal version and remains how I paint Bones plastic.

Bones (plastic) version on the left, Chronoscope (metal) version on the right.

Chronoscope and (Early) Bones Comparison

This is a chance to compare the metal and plastic versions of the miniature. To my mild surprise, I haven't actually painted the same sculpt in two different materials before.

The details of the Chronoscope version are sharper and better defined when compared to the Bones version. This is the expected finding. The soft white plastic used in the initial waves of Bones doesn't seem to be able to retain fine detail like metal or the harder gray plastic that Reaper switched to later on. The difference in detail is significant. The face is less detailed and the goggles are a muddy mess. It made for a less pleasant painting experience as I kept hunting for details that I knew were there on the metal version.

A comparison between the metal and plastic versions is incomplete without discussing pricing. Here are the prices in USD at the time of this writing:

Reaper Bones 80008 Rosie, Chronotechnician $3.99 (USD)
Reaper Chronoscope 50016 Rosie, Chronotechnician $5.99 (USD)

The plastic version can be picked up for two-thirds the price of the metal one. However, two bucks isn't a huge price difference in absolute terms. It comes down to personal preference. Is the difference in detail worth paying a little extra? The Bones version wouldn't be my first choice as a hero miniature or display piece. Which material is the buyer more comfortable working with? Metal and plastic demand different approaches. A painter set up for one material may not wish to adapt to the other.

Bones (plastic) version on the left, Chronoscope (metal) version on the right.

Bones - even early Bones - do have a place. Most of my Bones collection is from the first Kickstarter and is therefore the white plastic from the beginning of the line. All of the ones I've painted are serviceable when painted to a tabletop standard. The majority of the figures are monsters or other opposition that will only be on the table as long as the players allow them to survive. Also, a Bones figure makes for a fun "rainy day" painting experience. The work goes quickly since I don't stress much about getting the best results possible like I might with a metal, resin, or higher quality plastic figure.

In the end, comparing this figure to its metal counterpart didn't change my option on early Bones miniatures. They are a cost effective option for the kinds of miniatures meant to be used in bulk. Orcs or zombies? Oh, yeah, I'm going for the white plastic Bones versions. Likewise, large miniatures are much more practical in any form of plastic when compared to metal. However, I'm happy to shell out a little more for a centerpiece miniature of metal, resin, or higher quality plastic that I'm painting to look the best I can manage.

Thursday, June 9, 2022

Trash Bash "Astromecha" WIP

Something I threw together the other day. I was digging around in my bits collection for something else, noticed how well these parts fit together, and spent about twenty or thirty minutes building this robot miniature. Then I set it aside and got back to what I was doing in the first place.

Arms raised in threat, surrender, or just stretching?

In my defense, I've been considering cobbling together a trash bash robot for awhile now. I even collected a few images for inspiration. Maybe my brain seized on the first opportunity it came across.

Going from the bottom up to the top, the parts are:
  • A 25mm plastic slotted base. Pretty standard in the tabletop miniatures world. This particular one is from Games Workshop.
  • A pair of metal weights from a gaming mouse. Intended to customize the mouse to the exact specifications of the user. Salvaged after the mouse in question stopped working.
  • A plastic button from either a telephone or a fax unit. Again, salvaged after the unit they were once attached to stopped functioning. The plastic protrusions were clipped down so the mouse weight "wheels" would fit properly.
  • Three white plastic bits - the "arms" and "head" are separate parts. Printer salvage. I'm not sure, but I think they were paper feed roller parts from two different devices. How well the "head" fit on to the button "body" is what started this unplanned project.
  • The plastic "head" is hollow, so I glued in a flat sided plastic bead to partly fill the space.
Maybe not the droid she's looking for.

Everything is held together with Gorilla Super Glue. The bond with the base will be reinforced with my usual choice of basing material (sand, glue, paint, and a little water to improve flow) after the detail pass. The stuff sets like concrete. I'll just have to remember to tape the slot closed beforehand. Yes, I've made a mess by forgetting that step before.

The basic form is done. I've put off hitting it with a coat of spray primer until I can dive back into my bits collection and give it a detail pass. I'm hoping for an antenna or some access ports. Maybe something additional to fill in the empty "head" space. Until then, it's just not quite ready for painting yet.

Rear view showing the bead partly filling the space in the top piece.

More after I finish what I was working on in the first place and get back to this project.

Tuesday, June 7, 2022

Tin Man Miniatures Princess Livia

Presenting her royal highness, Princess Livia from Tin Man Miniatures. Tin Man Miniatures is best known for producing 28mm-32mm scale figures based on the Barsoom planetary romance series written by Edgar Rice Burroughs. This is the non-"A" version of the figure. The "A" version represents the same character, but wearing less than what is seen here.

Extraterrestrial beach attire.

Figures representing women clad more in concept than reality don't regularly feature on this blog, but this one has been in my unpainted pile for more than long enough. I picked her out of the pile since I was in a swords and sorcery mood after an involuntary month long break. Although "sword and planet" might be a better description here.

My first attempt ended with Livia taking a bath in Simple Green. I tried out a different spray primer and found that it went on too thick and obscured the finer details. Then the nozzle broke and I threw out the can. Worse, I didn't like how the paint scheme I picked out - pale skin and gold metallics - blended together.

Sometimes a fresh start is the best option. Besides, I need more practice with painting flesh tones. This wasn't the end of the challenges I ran into with this project, though.


Preparation

This figure required nothing other than the warm soap and water cleaning I give to all of my miniatures as a first step. I wasn't able to find any mold lines or flash.


Base Assembly

I decided that the small integral base is not fit for the purpose of keeping the figure standing upright. My solution is the same one I use for Reaper Bones miniatures - gluing the figure on a steel fender washer.


Color Scheme

I opted to paint this figure as a human rather than a Red Martian. No offense intended to Edgar Rice Burroughs, but I felt that I would get more utility out of a swords and sorcery appearance for this figure.

The warm colors of the figure's skin and hair contrast with the cold metallics of the figure's outfit and jewelry. The small amount of blue cloth continues the warm/cold contrast.

Hair flowing in the winds of an alien desert.

Spray Primer

Tamiya Surface Primer (L) Gray
Tamiya Surface Primer (L) White

Sprayed in a zenithal pattern. This worked much better for preserving the details of the model.


Skin

Reaper 09041 Dark Skin
Reaper 09221 Olive Skin
Reaper 09260 Bronzed Skin
Secret Weapon W005 Flesh Wash

I built up a tanned appearance from the Dark Skin base layer to the Bronzed Skin highlights. All of these paints work well as various skin tones. The wash added surprisingly little and I'll skip it the next time I use this recipe.


Hair

Reaper 09221 Olive Skin
Reaper 09257 Blond Hair
Secret Weapon W005 Flesh Wash

Using Olive Skin as a base layer meant one less paint bottle to dig around for. The wash was much more useful here, bringing out the flowing hair sculpted on the figure.


Metal

Citadel Colour Codex Grey
Citadel Colour Boltgun Metal
Citadel Colour Mithril Silver
Formula P3 Armor Wash

Metallic paints don't always coat well, so I started with a non-metallic base layer. Even applied as a highlight, the Mithril Silver overwhelmed the layers it was sitting on. The wash toned down the shine and brought back the details of the metallic areas.


Cloth

Reaper 09017 True Blue


Basing

The basing material is my usual mix of sand with water, PVA glue, and FolkArt 231 Real Brown to fix it in place. Next came a dry brush of FolkArt 420 Linen to give the surface a drier, sandy appearance. I used Citadel Colour Chaos Black for the rim and - judging by the photos - I'll need to touch it up.

The base still needs a little work, but good results overall.

The initial set of photos I took of this miniature revealed all of the flaws in my paint job. This wasn't the first time I ran into this issue, but it was the first time it was bad enough for me to go back, fix things, and reshoot. Most of the flaws were with the cloth and skin tones. Also, it was at this point that I applied the wash to the metallic areas since the reflections were giving my camera fits.

This project turned out to be more of a challenge that I anticipated. This is not the fault of the figure, which is well sculpted and cast. An unplanned month off from painting left me a little out of practice. Perhaps something else might have been a better choice for a first project back. On the other hand, I did come out with new recipes for painting skin tones and metallics. Overall, I enjoyed the process of finding solutions for the problems I ran into and extracting a figure from the unpainted miniatures pile.

Wednesday, April 27, 2022

Trash Bash Monowheel Cycle WIP

This started off as an experiment with making wheels for sci-fi models out of soda bottle caps. Then it turned into a unicycle robot build. It ended up as a monowheel cycle when I cobbled together a seat and threw on some stowage. Now that I see what it looks like with a coat of primer, I'm thinking of adding some wires and a couple more details after some initial painting.

Side view after priming.

Big Wheel Keep On (Not) Turning
The wheel is a pair of soda bottle caps glued together. The edges were sanded down a little so the two pieces fit flush and to give the glue a rougher surface to work with. The ends were also sanded in preparation for painting. The overall shape and the pattern molded into the plastic creates the appearance of a wheel and tread pattern. The idea will come in handy the next time I need wheels for a sci-fi ground vehicle, robot, or in the landing gear of an aerospace craft.

Rear three quarter view before primer.

Unicycle
I was intrigued by the possibilities of the model wheel in my hands. The idea of a single wheeled robot or vehicle has been in the back of my mind for awhile now. A little digging around the bits collection turned up a number of parts that either fit or could be convinced to fit around the wheel. I was initially going for a robotic probe equipped with sensors to explore some unknown world. That's a concept I may return to, but that's not the direction this project went.

Rear three quarter view after primer.

Monowheel Cycle
As I piled things on, the project's appearance diverged from the lines of a purpose-built planetary probe towards a vehicle built from salvage. I started deliberately going for the look of a custom vehicle built by someone who had to scavenge the parts. Greeblies suggesting an engine exhaust and suspension add mechanical plausibility. Some stowage and fuel containers from a Tamiya 1/48 Jerry Can Set give the impression of an owner on the move.

Top down view showing stowage and seat cushions.

The Seat and MDF Reinforcement
Adding a seat was a challenge. With no ready made options at hand, I built one from various plastic parts and used resin sandbags for the cushions. Unfortunately, glue alone wouldn't be strong enough to hold it in place. I used some small MDF pieces to reinforce the seat and add details. These were popped out of laser cut parts from previous projects. Using super glue between MDF and plastic creates a strong bond suitable for structural support.

Top down view after priming.

Priming
Tamiya Surface Primer (L) in Gray spray for full coverage. Priming a project like this is an almost magical moment. The chaotic mix of different colors and shapes turns into a single object, unified under a coat of flat gray.

Side view during assembly. A couple details were added before priming.

Moving Forward
I've got some ideas for putting this project on a plastic base, but there's some testing to be done first. After that, I might brush on some paint to see how it looks with some color on it. Final details will be added after that - I have some wire that will join together some of the mechanical details. And, of course, a couple of wash coats to bring out the details and add weathering.

Thursday, March 17, 2022

Throwback Project - More Wargames Factory Shock Trooper Test Pieces

Back in April 2021, I assembled and painted one of these models to test out a color scheme suitable for the whole box. That test worked well, but I had a couple of other ideas that I wanted to try before I started painting in bulk. Other things caught my attention and, with no immediate need for the figures, I shelved the project.

"It's been almost a year since this blogger made progress on this project?" "Time flies."

I recently pulled the box back out with a few goals in mind:
  • Getting more time working on multi-part 28mm scale plastic models. I'm in need of miniatures suitable as "Psychos" for my Five Parsecs From Home campaign. The strongest candidates in my current collection are box of Necromunda Eschers. However, I'm reluctant to start on them without more experience with assembling plastic miniatures.
  • Testing out a couple of military color schemes for the Wargames Factory Shock Troopers box. They will all likely end up in my Five Parsecs From Home campaign at some point, so moving forward with this project serves that end as well.
  • Developing techniques suitable for speed painting armies. I'm used to painting miniatures individually, but that approach is impractical for groups of thematically related figures. Projects like this, the Reaper Bones Zombies, and the Reaper Bones Nova Corp are helping to build up my experience in that area.
Changing My Choice of Adhesive
I switched from my usual Gorilla Super Glue to plastic cement for this product. This gave me more time to get the arms in the desired position while everything set. I'm planning on using the same stuff on the Eschers based on my experience here. I did use super glue in one area - attaching the models to the metal washers I used as bases.

They seem to be holding together well.

Thoughts on Flame Throwers
I understand that historical soldiers using flame throwers had a lower than average life expectancy in combat. A flame thrower is a relatively short ranged weapon with limited ammunition, requiring the operator to close with the target. The discharge of a flame thrower tends to attract attention and rifle rounds. While the risk of taking a round in the fuel tank is overstated, drawing fire is generally unhealthy. I kept these notions in mind while picking out bits for the model.

Olive Drab Flame Trooper - Assembly
The fuel tank on this particular flame thrower design is tiny. Given the limited ammunition, it made sense to issue this trooper a sidearm. A shotgun would have been my preference, but I made do with one of the holstered pistols in the kit. I also added a water canteen since operating a flame thrower has got to be at least as hot as grilling a meal for the family in Texas on Independence Day. The choice of head was based on which one appeared to offer the best protection from both heat and small arms fire.

Not much ammunition in that tank, I imagine.

Olive Drab Flame Trooper - Paint Scheme
The sight of assembled trooper evoked far away memories of plastic green army men carrying M2 flame throwers battling it out in the back yard. Inspired, I settled on an olive color scheme.
  • Primer coat: Krylon Fusion All-In-One Matte Black. Sprayed for full coverage.
  • Base coat: Krylon Camouflage Ultra-Flat Olive. Sprayed in a zenithal pattern.
  • Highlight layer: Reaper 09177 Camouflage Green. Dry brushed on the upper surfaces.
  • Gray areas (weapon, mask, boots): Mix of Citadel Colour Codex Grey with a little Chaos Black.
  • Wash coats: Army Painter Dark Tone and Strong Tone Quickshade Inks. Each layer was applied separately and allowed to dry completely before the next.
Khaki NCO - Assembly
Basically, I wanted to use the pointing arm. Pairing it with another arm holding a pistol and a dagger fit the theme of some kinda unit leader. The choice of a head came down to the one wearing a garrison cap and the one with tentacles. I didn't spent long making my decision. Even if I eventually get rid of rest of the box, I'll be keeping the tentacled heads around in my bits collection for as long as they last.

These came from an extra sprue, so I have a box of eighteen to go.

Khaki NCO - Paint Scheme
The steps using spray coats substituted Krylon Camouflage Ultra-Flat Khaki for the Olive, but were otherwise identical to the Olive Drab Flame Trooper. The gray areas used the same mix of Citadel Colour Codex Grey with a little Chaos Black. The wash coats were also used the same products as the Olive Drab Flame Trooper.
  • Highlight layer: Reaper 09292 Bathalian Chitin. Dry brushed on the upper surfaces.
  • Head: Reaper 09233 Bright Skin. This color is a little too pink to be a realistic skin tone for a human, but works fine in this case.
Basing
The assembled plastic models were glued to one inch steel fender washers before painting. I used the same techniques for texturing the base as I do for Reaper Bones miniatures.

Decisions, decisions.

These turned out well. Which leaves me with a problem. I can't decide which paint scheme to go with for the box! Maybe I can divide up the remaining troopers into teams, each in a different color? I'll have to think it over.