Showing posts with label terrain. Show all posts

Tuesday, May 30, 2023

After Easter: Plastic Egg Sci-Fi Scatter Terrain

I ended up with a significant number of plastic eggs this past Easter.

Lacking ideas of my own, I posed the question of "how can I use these for tabletop gaming terrain" in various places online. There were plenty of helpful suggestions and I'll be exploring those ideas for as long as the supply of plastic eggs holds out. I'm grateful to everybody who took the time to reply.

Needing a quick and easy project to get back into the swing of things, I picked out one that came with a detailed build guide. Dice Mechanic Games has a comprehensive "Micro Reactor" tutorial on their website. The tutorial includes needed tools and materials in addition to build instructions. One thing that's not clear at first glance is that this build requires plastic eggs that are a bit on the small side.

Rosie scores more salvage.

Construction

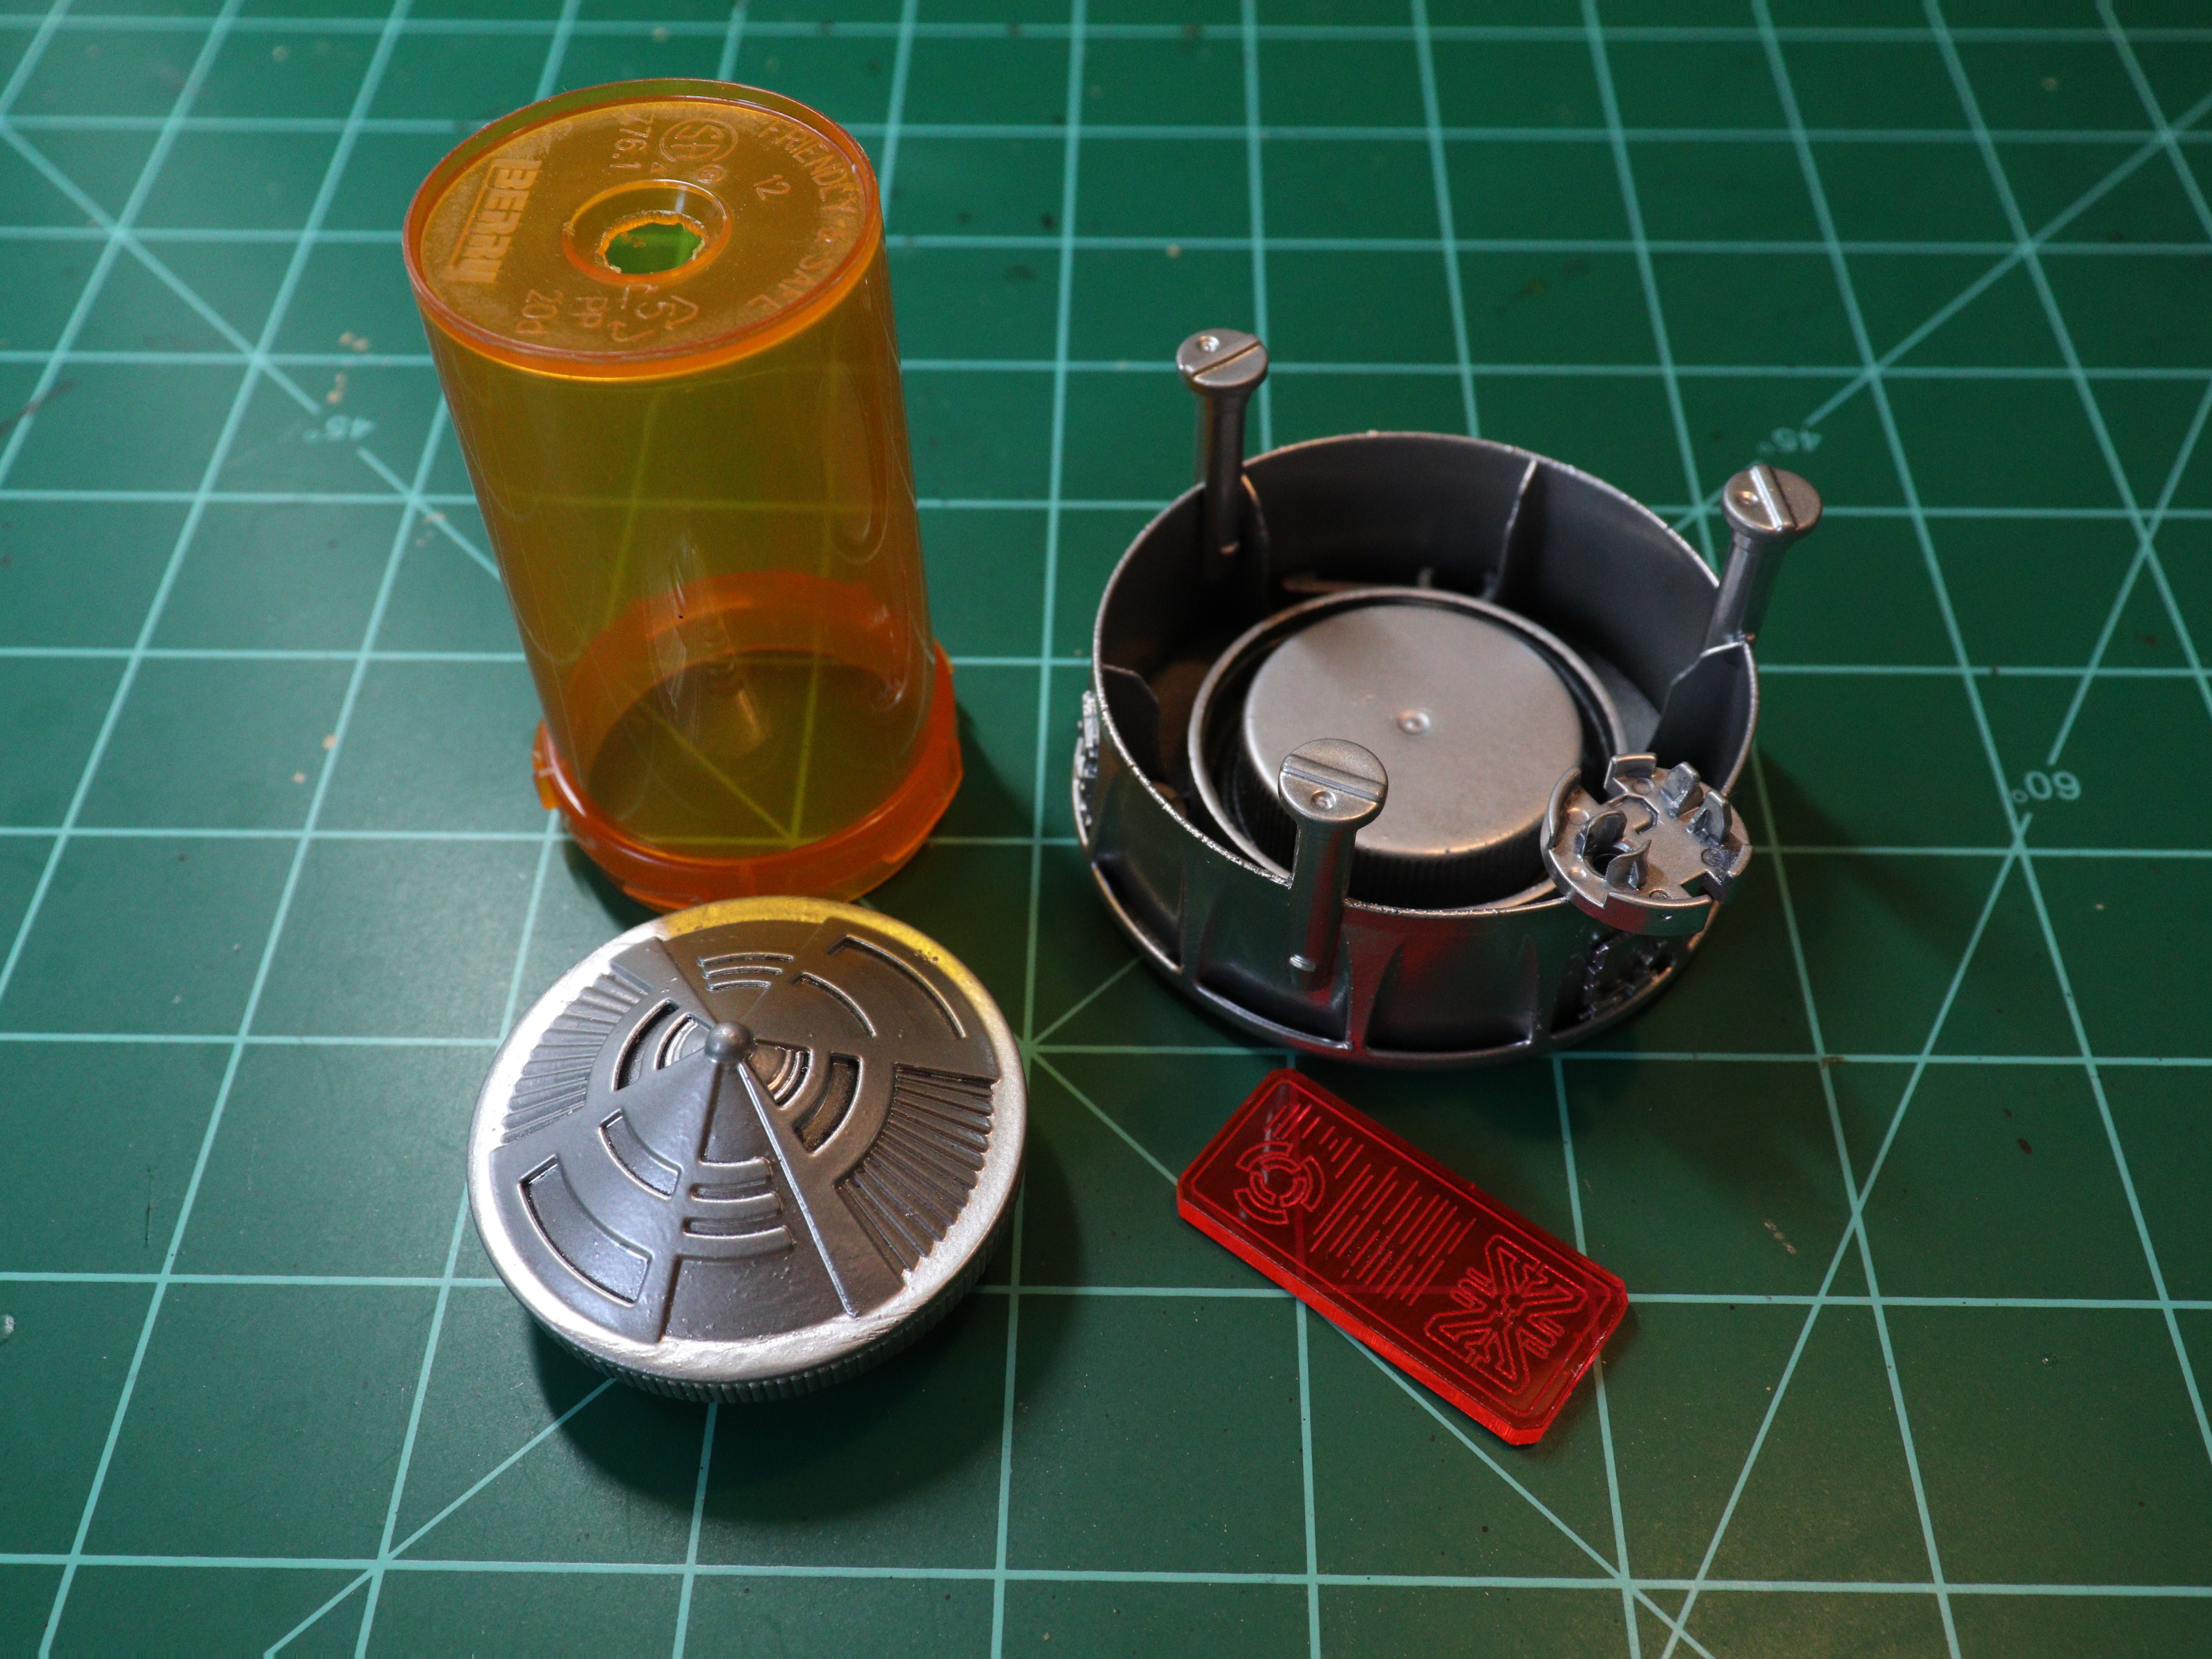
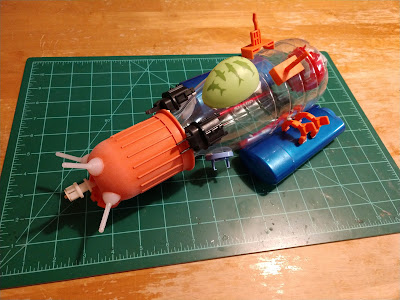
The basic idea is to glue an egg half on top of a plastic bottle cap. Handling the egg halves can get tricky - the plastic is prone to cracking, but I avoided breaking either of them. This uncomplicated process results in an interesting shape that can be enhanced with any greeblies that might be on hand. I ended up playing around a little to see what techniques I could carry forward to future projects.

I might have overdone the wires, but it's good practice.

The blue one is an experiment in using short lengths of salvaged electrical wire to represent cables or hoses. The wires were added after priming and painting. The terminals and connectors are plastics beads from the craft store. It is a good way to add mechanical complexity to a model by connecting various parts.

To be honest, I'm not sure which is the front and back on this model.

I attached a few stickers to what would become the red one to represent after market panels covering up improvised "improvements" and repairs. Looking at it now, the panels seem too uniform to be convincing, but the idea works well enough. If I were to build something of more ramshackle construction, I might go for covering much of it with overlapping stickers.

The "hat" on top of the red one is the plastic valve from a bag of coffee. Here's a short video on how I wrestled it out:


Priming and Painting

I spray primed both pieces with some black Krylon from a can that I'm trying to finish off. That got followed up with some Tamiya Surface Primer (L) in gray, sprayed in a zenithal pattern from the top. Masking off the sections that would later be painted metallic, I reached for a couple more cans of Krylon I was trying to use up. The blue is Krylon ColorMaster Paint + Primer Satin Iris and the red is the same brand in Matte Poppy Red.

Don't let the name fool you - this stuff comes in all kinds of colors.

The metallic sections offered me a chance to try out something new to me. FolkArt Treasure Gold came to my attention thanks to one of the many hobby YouTubers I follow. I brushed a coat of 5554 Antique Silver over the black primer, being careful to leave some black showing in the recesses. A little 5552 Platinum worked well as a highlight layer on the metallic areas. I also brushed on both metallic paints on various places to simulate scratches and other wear.

FolkArt Treasure Gold, despite the name, comes in a variety of colors. It works well for dry brushing and similar techniques, but seems a little thick for using as a base coat. I'll have to use it some more to get a better feel for how to use the stuff.

The pieces still looked too pristine. This called for a coat of wash. I mixed up some Liquitex Matte Medium, Liquitex Soft Body Payne's Grey, and water. Despite wiping off the excess, I still spotted some pooling when I took a look at the photos I shot for this post. It's one of the dangers of photographing miniatures - every flaw becomes obvious after clicking on the photo and seeing on the screen.

"The energizer's bypassed like a Christmas tree, so don't give me too many bumps."

Wrapping Up

This was a great little project to get me back into the hobby after an involuntary break. These will make good scatter terrain for my next sci-fi game. No idea what kind of machinery they're supposed to represent, though.

Tuesday, March 7, 2023

A Taste of the Future: Finding Noodle Shops for an Urban Sci-Fi Terrain Board

I've been slowly putting together a sci-fi terrain board partly inspired by the cityscapes of movies like Blade Runner. Currently, I'm short on office buildings, although I do have other structures that can fill in. I do have some suitable scatter terrain, but more would be ideal. I have enough tiles for a small board, but more would expand the playing area and to provide more variety. And my plans for inner city rail are on hold while I mull over how I'm going to build it. However, there's one thing I'm missing that particularly vexes me for some reason.

I got signs advertising burgers, pet replicants, and milk, but not what I've been looking for.

Blade Runner (1982) established the look of gritty sci-fi. It's influence is strongest in cyberpunk, but it can be seen any time a sci-fi production needs a futuristic dystopia as a backdrop. Brightly glowing signs drenching scenes with colors rarely found in nature. Stark, functional structures filling the background. Decaying infrastructure co-existing with cutting edge technology. It's a very 80s vision of the future.

Early in Blade Runner, we're introduced to Deckard as he sits down for a cheap, but filling bowl of noodles. The place resembles the neon lit street bars of Asia. These are little shops where a customer can step off the pavement, belly up to the bar, and order an inexpensive meal after a hard day at work or a hard night of overindulgence.

I'm looking for something to represent such a place for my sci-fi board. Things like this would give it a lived in look. People have to live in the tiny slice of cityscape represented by this board. Where do they go to work. To eat? To rest and relax? To shop? Not every urban terrain board needs to be a slice of city life, but I enjoy entertaining questions like these and coming up with answers in the form of terrain.

Building something from scratch demanded a clearer concept than "bar seating" could offer. A little poking around revealed some possibilities from online vendors. I'm still considering options, but I thought that sharing what I've found so far might help others looking for similar terrain. There's also every possibility that someone reading is aware of something I haven't seen yet.


The "Fast Food" Stall from Zen Terrain

I almost bought this one immediately after coming across it. The price is hard to beat and - except for the lack of an awning - it looks like the kind of food stall I had in mind.
  • The price is reasonable, but shipping from Poland adds significantly to the total cost.
  • This terrain piece is 90mm long. I would prefer something with more of a presence on the table.
  • The curved back is cardstock, raising concerns in my mind about its durability.
I might add this to a larger order from Zen Terrain - some of their buildings would work well for the board - but it's not something I'd order on its own.


The FoodBooth 9000 and RIBD_4 Street Bar from Warmill

Warmill from the UK makes a couple of promising products. The look of the FoodBooth 9000 leans more towards "fast food joint" than what I'm looking for, but I'll keep it in mind if I need a sci-fi burger place. The RIBD_4 Street Bar better matches what I have in mind, although it is marketed as serving beverages rather than food.
  • Both items are out of stock at the time this post is going up.
  • The cost of shipping packages across the Atlantic.
I'll be keeping an eye out if availability changes. This isn't terrain I need right now and I can use the time to keep looking.


The SciFi Street Shop from Terrakami Games

This is a basic design that offers flexibility for those who own multiple copies of it. Three of these can be placed corner to corner to provide seating for a larger shop. There's even the option of an acrylic sign advertising noodles with chopsticks.
  • The issue of transatlantic shipping costs rears its ugly head again.
  • I dislike ordering single items, so I'd have to find other things to bulk up the order. Of course, the maglev train pieces that Terrakami offers would solve my inner city rail problem...
I'll have to keep this one in mind.


New Ceres: Sushi Shack Bundle and Odinheim: Pop Shop Bundle from Death Ray Designs

The New Ceres: Sushi Shack Bundle is a modular terrain piece that can comes with ladders, platforms, and other features that can be configured in a variety of ways. The acrylic sign advertises sushi rather than noodles, but the look is otherwise close to what I envisioned. The modular features add tactical options for movement, elevation, and cover during play.

The Odinheim: Pop Shop Bundle is cheaper than the Sushi Shack Bundle and has a sign with a bowl of noodles, but lacks exterior bar seating. Other than the sign, it looks like a fairly generic shop.
  • Neither is quite what I have in mind. If I get both, I wonder if I could switch the signs between them?
  • Either of these bundles are somewhat more expensive than the other products on this list.
  • The higher prices are mitigated by lower shipping costs since Death Ray Designs and I are in the same country.
Death Ray Designs has some other products that appeal to me. Maybe I'll save up and put one or both of these in a larger order from them.


I haven't made up my mind at this point on which one I'll be buying, but the offerings from Death Ray Designs are the strongest contenders at this point. Feel free to share your own thoughts and point me in the direction of any other possibilities!

Wednesday, October 12, 2022

Lightyear Hyperspeed XL-07 Modest Modifications

A quick update on this project. September 2022 was not a good month for me. I couldn't cobble together any hobby time until last weekend.

Not as much of a conversion as I first planned, but sometimes less is more.

Finding parts to add a few more details proved more challenging than I counted on. The usual approach of digging around for model kit parts and searching the bits collection wasn't fruitful. Most of the things I found were just too big or looked out of place.

One thing that did work was a round plastic bushing. I used it to add detail to the blank area inside the thruster. This was the spot that was bothering me the most for some reason. The bushing will be nothing but a vague shape in the darkly painted interior when I'm done, but even that will give the impression of mechanical workings.

Rear view. Note the plastic bushing filling out the thruster and the MDF blocks on the sides.

A scaled down approach was in order for the rest. My collection of tiny bits isn't as extensive as the rest. I found most of what I needed in the leftovers from the various MDF terrain pieces I've built over the years. Some of the terrain had fine details that were exposed by pushing out the MDF left after laser cutting. Most are simple shapes that are handy for projects like the monowheel cycle I scratchbuilt earlier this year.

MDF and many plastics form a solid bond when joined with CA glue. I stacked the deck a little more in my favor by using some trusty Gorilla Super Glue.

She may not look like much now, but she's got it where it counts.

A couple of angled MDF parts form canard-like additions to the sides of the fuselage. These would be absurdly small on any other craft, even at this scale, but they don't look out of place compared to the size of the actual wings.

Two rectangular MDF parts hide some mold lines on the rear. They extend the existing shapes and should blend in after painting.

A pair of cylindrical MDF parts suggest sensors or the business ends of weapons protruding from the twin noses of the spacecraft. They give it a slightly more aggressive appearance than before.

Front view. Note the MDF "gun barrels" and canards.

I could add more details, but the work I've done fills in the blank areas and mold lines that I wanted to fix. I'll be spray priming it next. Painting may have to wait until I decide on a color scheme. Do I want a sporty civilian flyer, a rugged scout ship, or military light attack craft?

Saturday, September 10, 2022

Lightyear Hyperspeed XL-07 Pre-Conversion

I'm planning on adding some details to this toy, slapping on some paint, and putting it on the tabletop as a 28mm scale sci-fi terrain piece. This post takes a look at the toy in its pristine state right out of the box. This is for the benefit of other folks contemplating similar projects by giving them a look at what they would be working with.

Front profile view before I start gluing stuff to it.

It Would Be Nice If I Was Being Paid For This, But No

The toy represents a spacecraft from the Disney Pixar movie Lightyear and was made by Mattel. It retails for $12.99 USD. I probably should have waited for a sale, but I couldn't tune out the little voice in my head telling me that what I really need right now is another project. This post isn't sponsored, by the way. Nobody at Disney, Pixar, or Mattel is that crazy.


On Appearance and Customization

There are other spacecraft toys in this line, so anyone thinking of picking one up will have a selection to choose from. I choose this one for a couple of reasons. First, the larger cockpit canopy compared with the others offers a little more wiggle room for scaling. Second, if I squint and tilt my head, this one kinda reminds me of the Earth Defense Directorate "Thunder" fighter from Buck Rogers in the 25th Century television series (1979-1981).

The general appearance of this toy is generic enough to fit into a variety of sci-fi settings. While it is part of a movie released by a major studio, it isn't as iconic or recognizable to sci-fi fans as a Star Wars TIE Fighter or Star Trek shuttlecraft. It wouldn't look out of place as a static terrain piece in any sci-fi setting with single-seat aircraft or spaceships. A fresh coat of paint will only help to conceal its toy store origins.

Landing gear close up.

There's a good amount of detail on this toy right out of the box. The solid shapes are broken up with panel lines and other mechanical looking details. The cockpit opens to reveal a detailed interior. There is also a set of retractable landing gear for the toy to sit on. Frankly, I wouldn't blame someone for just weathering one of these with a coat of dark wash and calling it a day.

Still, I just can't resist giving it another detail pass before reaching for the paint. The round exhaust nozzle looks good, but the interior isn't deep enough to convey that it's there to generate thrust. I'll likely end up gluing something in there to represent some kind of rocket plumbing. There's also a couple of spots where I could add gun barrels, sensor arrays, or other mechanical details to further customize it.

Close up of rear thrusters.

On Scaling

I shot a couple of photos for scale comparisons.

Rosie rarely gets to work on anything brand new.

One features my Reaper Miniatures Rosie (28mm scale) standing next to it. Sliding into the cockpit wouldn't be too tight a squeeze for her, but a model scaled for the heroic end of 28mm or 32mm might be a snug fit. On the other hand, a 15mm model might get lost in there.

15mm GZG, pilot figure that came with the toy, 28mm Reaper.

The other photo compares the pilot figure that comes with the toy with Rosie and a Light-Duty Vacc-Suit model from Ground Zero Games (15mm scale). The pilot figure slides nicely into the cockpit, so its safe to state that it's scaled with the toy. An eyeball comparison places the pilot figure somewhere around 25mm scale.

I'd say that the toy is close enough to work with most 28mm scale models with the understanding that this toy represents a small vehicle. Think of something like a Rebel Snowspeeder or an A-Wing from Star Wars - basically a cockpit bolted onto a propulsion system. It could be used as a larger spacecraft in 15mm scale if the canopy is painted opaque and kept closed to conceal the interior details.

Rear profile view as I think about a paint scheme.

Wrapping Up

$12.99 USD for a sci-fi terrain piece isn't bad, but I completely understand waiting for a sale or discount. A static spacecraft terrain piece is nice, but most tables don't need more than one or two. Unless someone decides to build a hangar bay diorama with a squadron of these, of course.

Now I just need to pick through my bits collection and figure out a paint scheme. Maybe red?

Tuesday, August 30, 2022

Outta Storage & Off the Workbench: Brutal Cities Eternity Lab Module C

I'm at the stage where I'm happy with how this looks, but kinda tempted to give it another weathering pass...

Anyhow, this is part of the same modular line of sci-fi office buildings as Module A from awhile back. Both modules were assembled and spray painted at the same time and using the same methods and materials. Life decided to get in the way of my hobby after I completed Module A and the accessories that came with both kits - the doors and air conditioner unit. Module C sat in storage until I got back to it. I decided on a simpler approach for a cleaner appearance and in the name of Getting It Done.

Sarah keeps watch while Rosie figures out what's wrong with the air conditioner.

Spray Coats
See Brutal Cities Eternity Lab Module A post.

Highlighting
Khaki areas: FolkArt 420 Linen diluted with water.
Blue areas: FolkArt 520 Dark Hydrangea diluted with water.

Diluting the craft paints allowed me to build up subtle gradations in the corners and other areas that would be more exposed to light.

First Wash
Mix of Liquitex Soft Body Payne's Gray, Liquitex Matte Medium, and water.

My goal was to augment the shading effect already in place from spraying the base coats in a zenithal pattern. This wash was applied over the entire surface and was allowed to pool in the recesses while the excess was wiped away.

Side view with A/C unit on top.

Second Wash
FolkArt 479 Pure Black diluted with water.

The shadows didn't quite look dark enough after the first wash coat. I brushed this darker mix into the areas between the Khaki and Blue areas and other recesses such as those on the ladder.

Lights
FolkArt 520 Dark Hydrangea
FolkArt 480 Titanium White

Here I reproduced the techniques used on Module A. The Dark Hydrangea got stippled on and around the light. I mixed some Titanium White in the Dark Hydrangea and stippled it on a slightly smaller area within the first one. More Titanium White was added in each following layer until I was working with an almost pure Titanium White.

Module A stacked on Module C and accessories (doors and A/C unit).

This project illustrates the benefit of a more streamlined approach and the issue of putting a project on hold. I was able to get Module C to a tabletop ready standard with less work than Module A, even through this is a larger piece. On the other hand, the two pieces don't quite match due to the different techniques used. Any more Eternity Lab Module kits I purchase from Brutal Cities will likely get the simplified and faster approach I used from Module C. This leaves Module A as the odd one out, but I'm okay with that.

Still thinking about one more weathering pass...

The post on Module A has my thoughts on the build, product quality, etc. Long story short - Ryan at Brutal Cities makes good stuff. Sturdy, well thought out, and can fit a variety of settings from modern to cyberpunk to space opera. The cost of shipping from Australia is higher than I'd like, but I can't fault Brutal Cities for the realities of the international shipping. I'll just resort to my usual remedy of waiting for a sale to offset such costs.

Monday, August 15, 2022

Trash Bash Sci-Fi Fuel Drum

This was a quick and dirty proof of concept I threw together over a hot summer afternoon. The goal was to see what else I could do with a couple of plastic soda bottle caps other than make another wheel for a sci-fi vehicle. It could be almost any kind of sci-fi widget, but I'm going to develop it as a sci-fi fuel drum for 28mm tabletop gaming. The execution needs more refinement before I crank out a bunch for scatter terrain.

One thing I can't complain about is the cost of the parts.

Parts List
  • Plastic soda bottle caps x 2
  • Coffee bag valve x 1
  • Plastic beads x 3

Preparation

The soda bottle caps and coffee bag valve got a good scrubbing with warm soap and water. Then I sanded down the edges and tops of the soda bottle caps. The edges were pretty rough and I wanted to improve how well they fit together. On the other hand, the tops were too smooth and I was concerned about how well glue, primer, and paint would bond to the surface.


Assembly

Pretty straightforward. I formed the main body by gluing the pair of soda bottle caps together. The coffee bag valve and beads were glued on what I arbitrarily decided was the top.


Spray Priming

Krylon Fusion All-In-One Matte Black

Coated all surfaces, including the underside.


Spray Painting

Krylon ColorMaster Paint + Primer Metallic Aluminum

A single coat. Since this was a proof of concept, I didn't feel the need to go further with the paint job. Later iterations will get a coat of wash and some details painted with a brush.


Moving Forward

It's good enough for a proof of concept, but there are some issues that I'll need to fix in the next iteration. I didn't notice the lettering on the coffee bag valve until after spraying on the metallic coat. That will have to get removed next time. I might play around with the number of beads and find something else to add as a detail. Reducing the number of beads from three to two would match the number of openings on a real world fuel drum. Adding an angular bit would contrast with all the curves everywhere else. Finally, I'd like to try another color for the base coat.

Saturday, June 11, 2022

Trash Bash Pill Bottle Stasis Tube

Awhile back, I made some Stasis Pods using pill bottles as a quick and dirty project. The idea behind this terrain is to be able to place a 28mm scale miniature inside and still see it through the transparent pill bottle. The original set met a sudden need for the campaign I was running at the time, but I knew I could do better. This is my second try at the concept.

Final test fitting. Just waiting for its first patient. Or victim.

Top Cap
This is a McDonald's Happy Meal toy from ages ago. I'm pretty sure it's a Star Wars themed spinning top. I wiped it down and realized that the protrusion would get in the way of mounting it on the pill bottle. I didn't relish the idea of cutting through the tough plastic of the toy, so I did the other thing.

Stasis Tube Body
A transparent pill bottle with the labels removed and cleaned with warm soap and water. I drilled a hole to accommodate the top piece's protrusion.

Mounting Hardware
The bottom piece is the cap from a juice bottle. I removed most of the threading to improve the fit of the pill bottle.

Initial test fit prior to painting.

Mounting Hardware Internal Platform
I glued a bottle cap inside the juice bottle cap to cover up some markings. It also raises up any figures placed inside the tube.

Display Panel
From a set of Fluorescent Scifi Screens from Warsenal. I purchased these awhile back to add exactly this kind of detail to my terrain projects. Not sure about the color, though. I'll try the blue and green options before gluing anything down.

Various Mounting Hardware Details
The towers are plastic clips of some kind. I don't recall the source. The round piece that I used to mount the display panel is a salvaged printer part. The square details were recovered from a nonfunctional keyboard. Finally, the parts glued inside to add some internal detail are the same as the ones I used as arms for the "Astromecha" robot. I may add some wires to simulate hoses running between them at some point.

Test fit after black spray coat.

Painting
The top cap and mounting hardware were spray painted black and then metallic. I then applied a dark wash, wiping off any excess with a sponge.

Major components after painting and prior to assembly.

Assembly
The spinning top and pill bottle fit together perfectly. It's almost snug enough to not require glue. Almost. The fit of the display panel is also good, but it will also be glued in place once I settle on the color. The pill bottle sits evenly in the juice cap and can be easily removed so that a miniature can be placed inside.

Tin Man Miniatures Princess Livia recovering from a beach trip.

I'm content with the results. but I still think I can do better. It's a more convincing terrain piece than the originals. It's missing something, though. I'll have to give it some thought and make another attempt later.

Wednesday, May 4, 2022

May the 4th - More Atmospheric Water Condenser Terrain

I wanted a project that tied into May the Fourth Be With You, but I also didn't want to just pick up a Star Wars miniature or model. Instead, I looked through my mess to see if there was anything Star Wars inspired I could do. While last year's Atmospheric Water Condenser Scatter Terrain didn't start as such a project, it went that way after I slapped on a worn desert themed paint job. So I decided to make a couple more.

Original terrain piece in the middle for comparison. Rosie included for scale.

And I immediately ran into the problem of not having all the parts and paint to replicate the original Atmospheric Water Condenser exactly. The others could represent different models or field modifications using after market parts. In any event, discussing the original parts and their replacements might be instructional for those tackling their own projects.

Core parts from left to right: dial, hub, pull tab. Original terrain piece in background for comparison.

The circular section of the original terrain piece was assembled from a selector dial, a pull tab, a ballpoint pen part, and an upside down keyboard button. I had more dials and pull tabs, but didn't have the same pen parts or buttons. What I used instead were alternate pen parts and cylindrical bits that I can't remember the origins of. It was fortunate that I had some left, but I was prepared to use plastic lids, bottle caps, or other round parts for the dial.

The central tower is the hub of a paper feed roller from some model of printer. I found more in my collection. However, I had the idea of substituting the pump from a liquid soap dispenser or spray bottle while digging around for the hubs. All that was really needed was a tall section for the middle of the piece.

Alternatives to the core parts that I considered, but didn't have to use.

I built the circular sections, but did not attach the towers to make spray priming and painting easier. After priming everything in black, I ran into the next issue. My supply of Krylon Camouflage Ultra-Flat Khaki was down to a single, almost empty can that I've been reserving for another project. I substituted a gray for the khaki on the circular sections. This ultimately resulted in a less earthy tone to the finished pieces. It works fine, but I prefer the warmer color of the original. They were looking a little flat, so I brushed on some FolkArt 480 Titanium White over them to produce some highlights and weathering. For the towers, I went in an entirely different direction - metallic. A coat of Krylon ColorMaster Paint + Primer Metallic Aluminum over the black primer contrasted nicely with the dull gray circular assemblies.

Next, I attached the towers to the circular assemblies. Gorilla Super Glue wouldn't be enough to keep the towers in place by itself. The original used a mechanical solution that I repeated here. I drilled out the bottoms of the hubs and used an existing hole in the dials for a screw. I still applied a little glue to the hub as a backup.

I applied a dark wash. Unfortunately, it turned out to be way too dark, even after wiping off the excess. Correcting the colors involved brushing on some Citadel Colour Mithril Silver over the tower and more FolkArt 480 Titanium White over the circular assembly. I left the wash still showing in the recesses.

Original terrain piece in the middle.

And there they are. Some more scatter terrain that is reminiscent of Star Wars while not directly copying anything from the franchise. Doing Star Wars stuff was fun! Maybe I could do more this month?

Monday, May 2, 2022

Warsenal Comanche Tower Lamps

These are the final Warsenal terrain pieces from last year's Black Friday/Cyber Monday haul. These sci-fi street lamps come three to a package and are mostly a combination of MDF and acrylic. A short coil of black coated wire is provided, but I decided to go with something more colorful.


MDF Parts Assembly
The instructions are a single page of exploded views available for download from the Warsenal site. I glued together all the MDF parts with PVA glue. White glue isn't my first choice in many cases, but the bond is strong enough when joining MDF. I left the acrylic parts and wire off until after painting.

Primer Coat
Krylon Fusion All-In-One Matte Black.


Base Color Coat
Krylon ColorMaster Paint + Primer Metallic Aluminum. This gives a shiny metallic appearance with minimal effort.

Dark Wash Coat
FolkArt 479 Pure Black mixed with Liquitex Matte Medium and diluted with water to improve flow. Applied evenly over all surfaces. Brushed on paint and washes tend to bead on Krylon, so I wiped off the excess wash with a sponge to avoid pooling and spotting. The main goals were to dark down the bright metallic a little and bring out the recessed details.


Acrylic Parts Assembly
I was concerned about frosting the clear plastic by using CA glue, so I reached for my bottle of PVA glue during this step. I'm a little dubious about the strength of the bond, but it seems to be holding up well enough.

Wire Detail Assembly
I used a spool of red coated wire I salvaged from some dead electronics awhile back instead of the black wire that came in the package. The red wire is a little stiffer and I wanted a brighter color to stand out from the rest of the pieces. I applied a drop of CA glue to one end, inserted it into the provided hole, wrapped the wire around the piece I was working on, cut off the length of wire I needed, and glued the other end to the second hole provided.


These work well for adding a touch of verisimilitude to an urban sci-fi board. It can be argued that the cable and battery pack shouldn't be exposed, but they add some interesting visual detail. The tower lamps might not work for a sleek sci-fi setting where technology is hidden behind clean lines and smooth panels. However, they would fit into a setting with a cobbled together aesthetic.

Monday, April 25, 2022

Zealot Miniatures Magic Portal (Blue)

This is another resin terrain piece using a translucent plastic insert to represent an inter-dimensional passageway. In this case, the popular circular shape was chosen for the generating mechanism. I purchased this piece at the same time as the Demon Gate late last year. The plastic insert is available in blue or red.

Remember: It's a portal, not a gate. Very important.

Preparation
The resin required nothing more than a scrubbing with warm soap and water. I had to remove and sand down a tab on the clear plastic insert. The insert has a significant flaw, but it doesn't stand out (much) at tabletop distances.

Planning
The Magic Portal comes in four parts - the two halves of the circular portal, the platform, and the insert. I decided to prime and paint everything before assembly. Painting the assembled piece would require trying to keep paint off the insert. That seemed to be a great deal of trouble for no real benefit.

Rosie considers another piece of hardware she's been asked to fix.

Plastic Insert
The insert was a little underwhelming out of the package. The swirling details weren't really visible in the clear plastic. There was also the flaw in the material. I decided to apply a wash to bring out the details, hide the flaw, and protect the plastic from the fogging effects of the glue I would be using later on. The initial layers of Secret Weapon W015 Blue didn't coat to my satisfaction. The follow up layers of Secret Weapon W016 Green covered this material better.

Primer Coat
Tamiya Surface Primer (L) in Gray sprayed over all resin parts.

First Paint Coat
As with the Demon Gate, I applied a layer of FolkArt 479 Pure Black diluted with water to darken up the Tamiya Gray and fill the recessed details on the resin parts.

Second Paint Coat
FolkArt 480 Titanium White brushed on the upper areas as a highlight and outward from the inside of the portal.

Magic Portal and Demon Gate comparison.

Source Lighting
A mix of FolkArt 720 Cobalt Blue and Sargent Art Cadmium Green lightened with FolkArt 480 Titanium White as needed. The circular generator would block some of the light from the magical portal, so the glow effect didn't need to be as extensive as on the Demon Gate. I started by brushing on the Cobalt Blue/Cadmium Green mix over all areas that would be touched by light from the portal. Each following layer covered a slightly smaller area closer to the portal. I mixed in a little more Titanium White with each layer until I was using almost pure white right next to the portal.

Touch Up
I ended up overdoing the glow effect in some areas. I brushed on some FolkArt 2561 Steel Gray to bring back an approximation of the base color.

Assembly
This was a straightforward matter of gluing the two halves of the circular gateway around the plastic insert. I had to clamp the halves together to give the Gorilla Super Glue time to work. Then I glued the assembled portal to the platform and clamped that together until everything was solid.

Does this remind anyone of anything?

There is a visible line around the circular resin piece. This is one of the resin halves overlapping the other. I considered sanding it down and repainting the edge, but decided against it. This would remove some the details on the edge and the line isn't as noticeable at tabletop distances.

Close up of the seam between the two halves of the circular portal generator.

It's ironic that this was the piece that I was most looking forward to while the Demon Gate was an afterthought. The Magic Portal works with 28mm scale miniatures, but a 32mm figure might have to duck down a bit to fit through. It would fit in fine if used for 15mm scale games. Together, the Magic Portal and Demon Gate give me options whenever I need an extradimensional passage to and from another space and time. Overall, though, I like the Demon Gate a little more than its rounder counterpart.

Monday, March 14, 2022

A Trash Bash Weekend!

I spent this weekend's hobby time making things out of junk. Like many craft projects, it started with something simple and ended up consuming hours of time. Still, the process of fitting things together is always soothing, even if I'm not sure what to do with a couple of the results.

The only thing I spent on this was time.

"Trash Bash" isn't new. I've done it often enough to add it as a tag on this blog. Brian S. Roe champions the practice on his blog and on the Trash Bash International Facebook Group. There are older examples to be found in Games Workshop's "How to Make Wargames Terrain" books (1996, 2003). The appeal is the reduced cost compared to purchasing terrain. Plus, there is a certain satisfaction in repurposing materials otherwise destined for a landfill or recycling bin.

Big enough to fit a 28mm miniature inside.

This weekend's adventure in Trash Bashing began with a discovery. I found out that this pill bottle fits this juice bottle cap. The threading isn't compatible, but the pill bottle locks in place with minimal convincing. It might be handy for a future stasis pod or containment tube terrain project. I set the parts aside since I have no immediate need for such a terrain piece, but the bug had bitten me.

Aft view. I'm not sure about how the engine nacelles will hold up.

This spaceship is intended for use in my Five Parsecs From Home campaign, but I imagine that it will be handy for a variety of sci-fi games. The body is a coffee creamer bottle. I used tacky putty to attach the parts while trying different configurations. The nosecone was originally built for a project that proved unworkable, but its antenna array works as the forward sensors of an exploration ship. The engine nacelles are that staple of Trash Bashing – deodorant containers. The layout resembles a Star Trek shuttle. I'll likely play around with it a little more before committing to glue the parts together.

Needs more greeblies.

This is another spaceship, but on a different scale. The core part is half of a broken plastic laundry clip. I just added various parts from my collection until I had sometime kinda spaceship-like in my hands. It could work as a frigate with more details and a flight stand. Alternately, I might use it as a flying robot or rework it into a hover bike.

My Easter themed project?

This one was inspired by a variety of images and projects I've seen online. The curve of the spoons fit well with the form of the plastic egg. This could represent a reconnaissance drone, space probe, or a compact single occupant aerospace vehicle. I'm planning on pushing ahead and getting this one done as an Easter themed project for next month. The biggest issue will be finding ways to disguise the distinctive shape of the spoons. The solution for that will involve a deeper dive into my bits collection.

Looks like a racer.

I'll follow up with the ones I pursue further. The Easter egg project looks fun and I should have it done in time for April. I want to play around with the parts and putty on the others before applying any glue on them.

Sunday, March 6, 2022

Brutal Cities Eternity Lab Module A

Here's one of the Brutal Cities terrain pieces that showed up last month. Brutal Cities is a one-man operation in Australia producing 28mm scale MDF sci-fi terrain. As the name suggests, brutalist architecture is a strong influence, giving the company's terrain a distinctive appearance that isn't associated with any specific setting.

My finished piece and the card showing the color scheme used by Brutal Cities.

The Eternity Lab Module examples on the Brutal Cities website are painted in a striking combination of orange and white. I decided to use the same pattern, but in different colors. The color choices were purely pragmatic. I had spray cans of blue and khaki sitting on the shelf for awhile and wanted to use them up.

Assembly
Putting the piece together was straightforward. The instructions available from the Brutal Cities were clear and there weren't any unexpectedly tricky steps. I regard the REM Shack and Garbage Dumpsters from Warsenal as more challenging builds compared with the relatively simple structure of the Eternity Lab Module A. All parts were assembled using PVA glue.

Rosie (for scale) considers an office for her workshop.

First Spray Coat
Krylon Fusion All-In-One Matte Black. Sprayed on all surfaces including the interior.

Second Spray Coat
Krylon Camouflage Ultra Flat Khaki. Sprayed on all external surfaces. I left some of the Matte Black showing to emulate the appearance of shadows under the cladding.

Third Spray Coat - Cladding Only
Krylon ColorMaster Paint + Primer Satin Iris. I masked all the areas that would remain Khaki. This coat was sprayed on the cladding and ladder.

Rosie inspects the air vents.

Highlight Coats - Khaki Areas
A mix of FolkArt 480 Titanium White and 420 Linen. I started with pure FolkArt 420 Linen and added 480 Titanium White to each layer, highlighting up to pure 480 Titanium White in the corners. In addition to adding more depth to the Ultra Flat Khaki coat, it also covers up areas where the blue spray paint got under the masking tape.

Highlight Coats - Blue Areas
A mix of FolkArt 480 Titanium White, 520 Dark Hydrangea, and 720 Cobalt Blue. The darkest areas got a layer of FolkArt 720 Cobalt Blue. I transitioned from that to FolkArt 520 Dark Hydrangea, mixing the colors as I went from the shadows to the corners. I used the same technique for the lights, but highlighted up to 480 Titanium White.

Weathering Pass - Metallic Wear
Silver Metallic Sharpie marker. I worked with the assumption that the cladding is metal and the structure underneath is concrete or some sci-fi equivalent. With this in mind, I marked up a few spots to simulate paint wearing off and exposing bare metal. I limited this step given how heavy I went with this technique on the Warsenal REM Shack. It looks alright, but I may go back and add a little more later.

Close up of the laser cut etching on the roof.

Detail Work
The laser cut details on MDF pieces like this one sometimes get obscured as layers of paint fill them in. A coat of wash can help, but isn't a completely satisfactory solution. I tried out a new fix for this project. I stabbed the problem. Using a craft knife, I followed the laser cut lines. This removed the paint and made the lines a little deeper and easier to see. I recommend a fresh blade for this and all craft-related stabbing.

Wash Coats
I mixed a dark and brown wash for this piece. The dark wash used a little black craft paint in addition to the Payne's Gray I usually reach for. This resulted in much darker streaking and shadows than I normally get - something that would be visible on the darker blue areas. I applied the dark wash first, wiping off the excess with a sponge with a downward motion, and waited until it was completely dry before adding an additional dark wash coat. Finally, a layer of brown wash added a little dirt to go with the shadows and grime. I paid particular attention to the recessed details like the vents.

"Anybody there? I gave at the office!"

Door
The door that can be glued onto the building or kept separate. I recommend the versatility of keeping the door a separate piece, but bear in mind the gremlins that steal loose parts. Assembly as simple as gluing the two parts together. I painted the door by spraying on a coat of Krylon Fusion All-In-One Matte Black followed by a coat of Krylon ColorMaster Paint + Primer Metallic Aluminum. Finally, I applied a coat of the same dark wash I used on the main piece.

Even I should be able to remember where to order more of these signs.

Signs
I decided to have a little fun playing around with the acrylic signs I also ordered from Brutal Cities while shooting the photos for this post. I can't recommend putting this many signs on a single side of one building, but I wanted to compare how the different colored signs looked. Not all of the signs I ordered were used - a couple were a bit too long to really fit a building of this size. I'll break those out when I get around to my Eternity Labs Module C.

Signs advertising burgers, pet clones, and a milk bar.

Ryan of Brutal Cities put careful thought into the design of this building, both as a tabletop terrain piece and from an architectural perspective. Models on the roof have cover. There is both a ground level doorway and a hatch etched on the roof to permit access to the interior. A ladder provides plausible access to the roof for models on the outside of the building. Vents to provide air flow to any occupants are modeled on the side. It has the appearance of a functional building while still being usable as tabletop terrain.

Overall, I like this piece. It looks good and the interlocking MDF construction is strong. I may have overdone it with the dark wash, though.