Friday, November 26, 2021

Bombshell Miniatures 36020 Science Officer Helen Salinger

Here's another 32mm pewter figure from Bombshell Miniatures. I'm pretty sure that Science Officer Helen Salinger is inspired by the lead character of a certain sci-fi franchise featuring hive creatures with parasitic life cycles and two sets of toothy smiles each. Note that I didn't follow up on the idea of a homage to that character when coming up with a paint scheme.

"Sign here."

There's more detail than I expected at first glance, particularly on the suit. The figure should fit into a variety of sci-fi settings. Although the pistol does have a "ray gun" appearance.

I used a mix of techniques on this figure. Some areas were painted in a darker base color with brushed on highlights. Others got my more usual approach of a lighter color darkened with a coat of wash. 

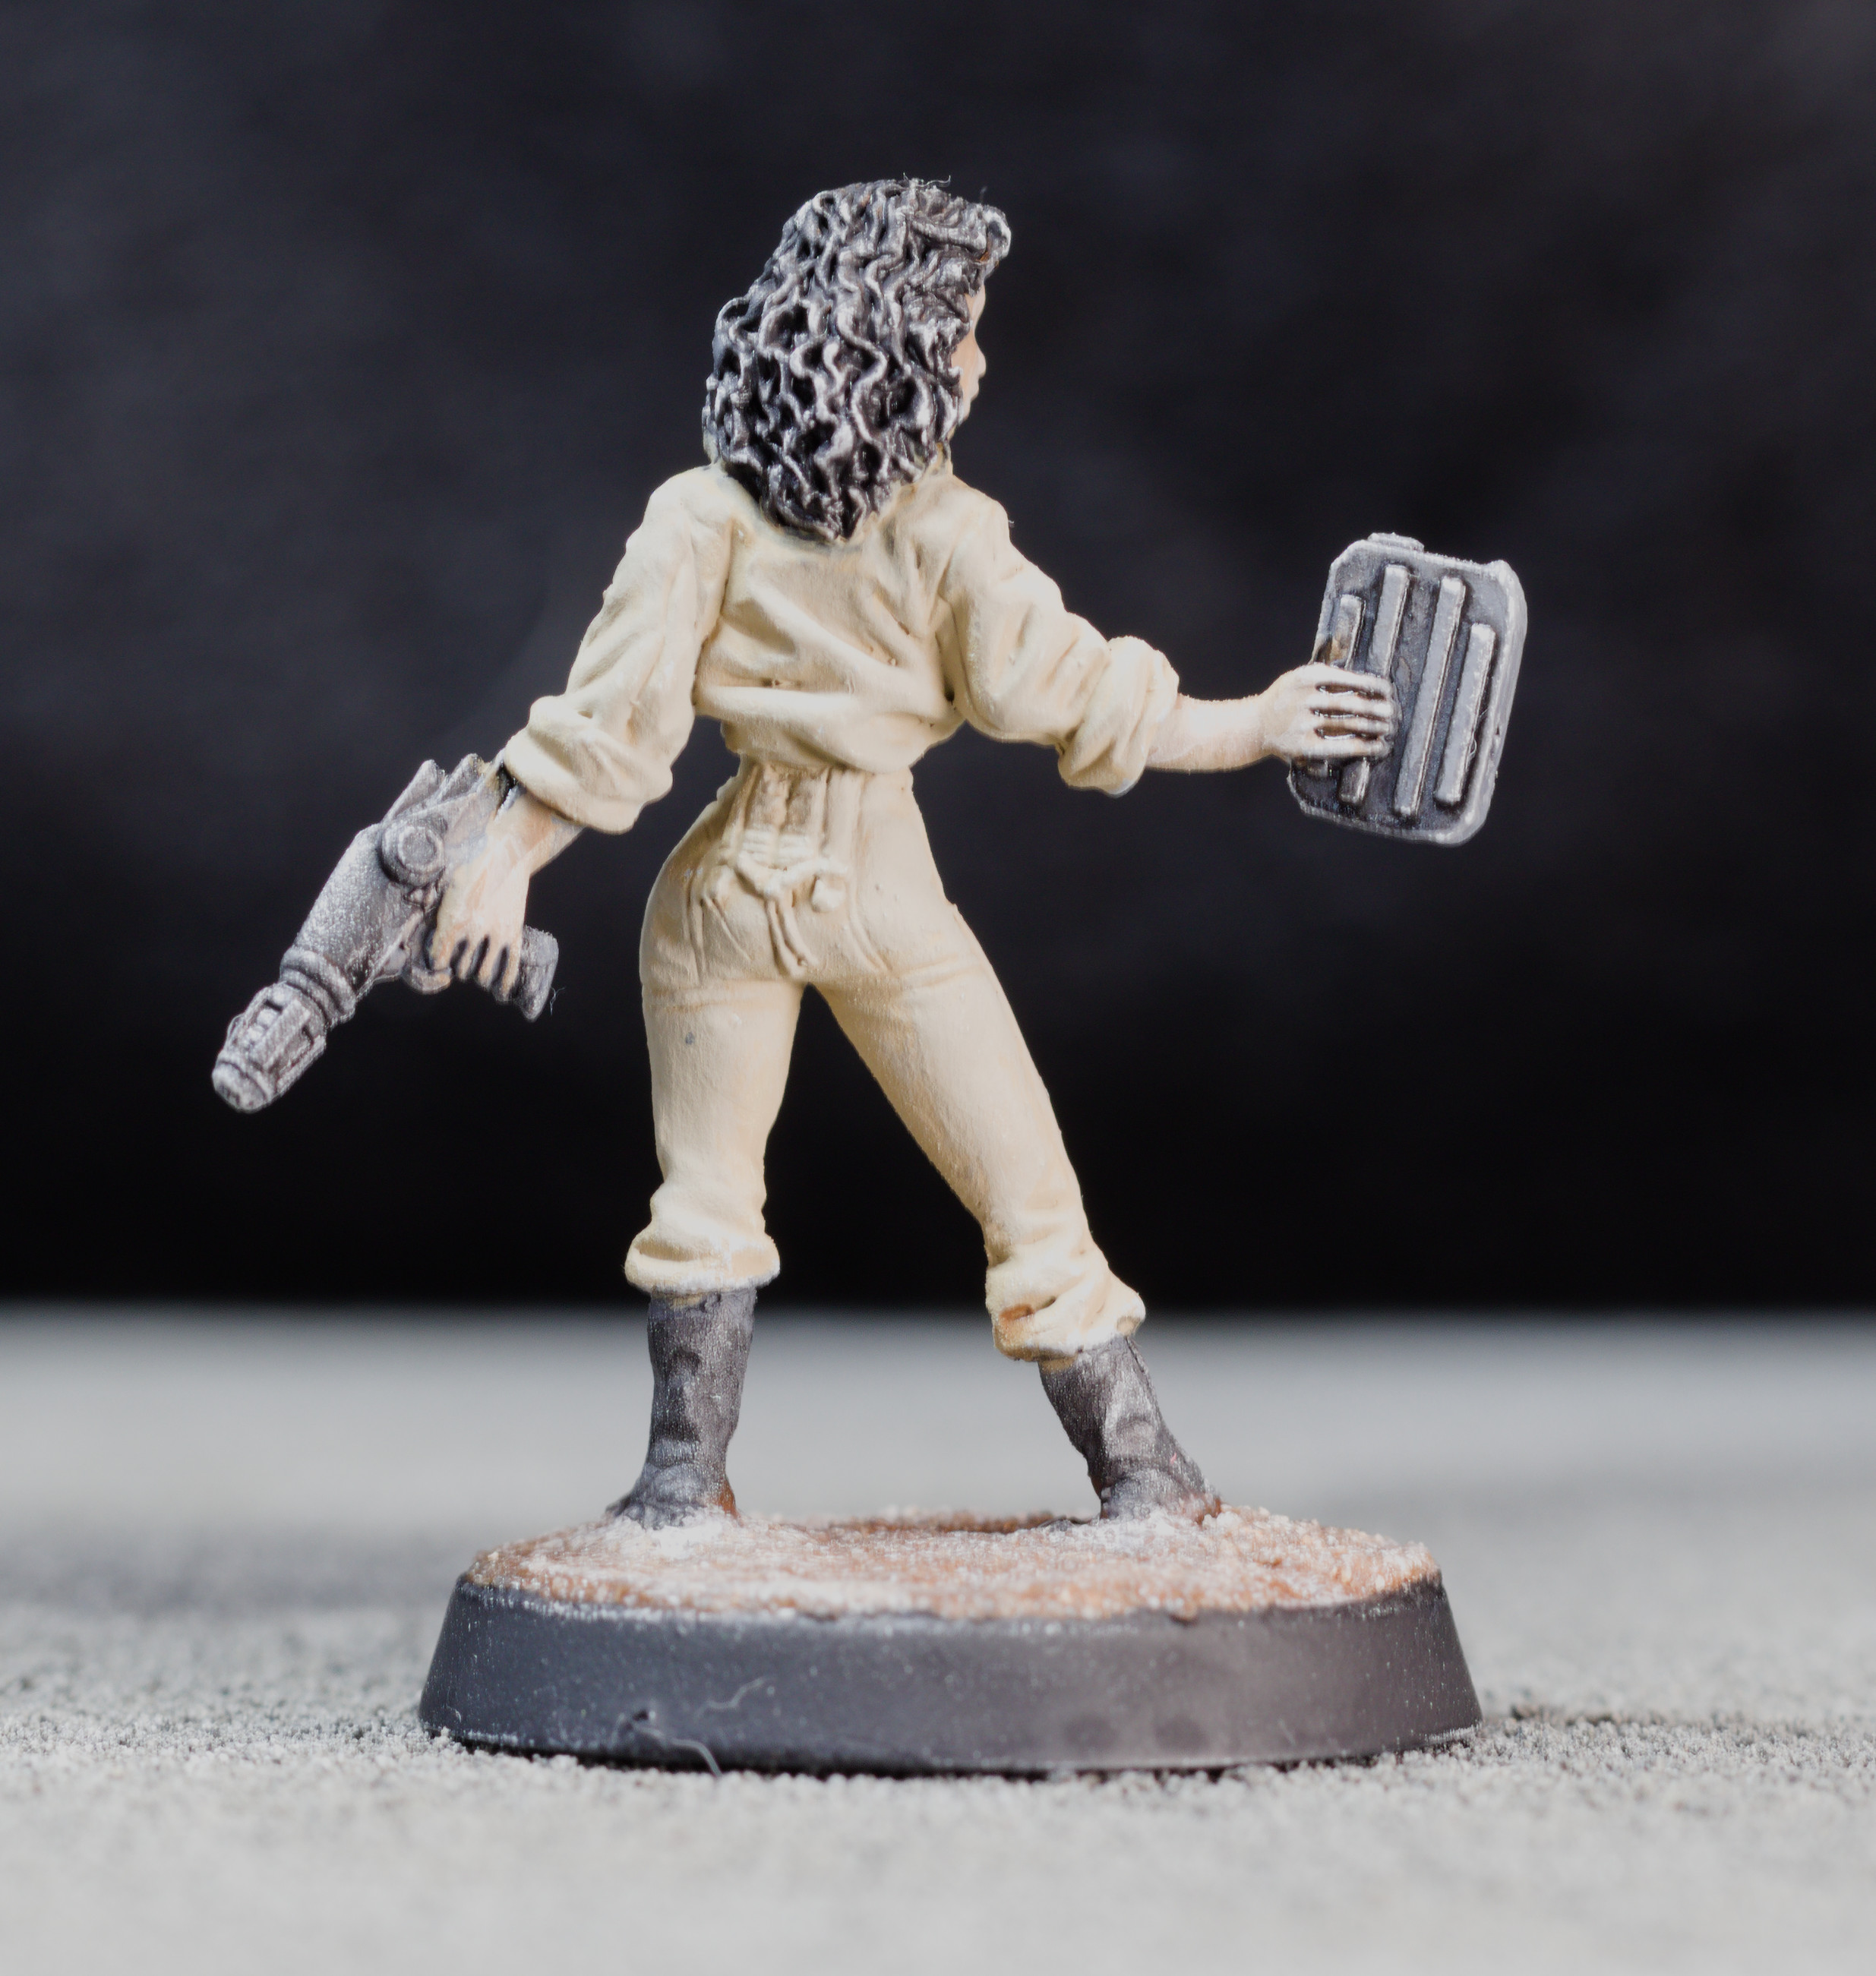
"I shouldn't need to ask you twice."

Priming
Zenithal spray priming using Tamiya Surface Primer L in Gray and White.

Skin Base Color
Reaper 09221 Olive Skin. I wanted to experiment with this color.

Skin Highlight Color
A mix of Reaper 09221 Olive Skin and Reaper 09047 Fair Skin.

Shirt Base Color
Reaper 09183 Cloud Pink. A bright color chosen to stand out from the rest of the scheme.

Shirt Highlight Color
A mix of Reaper 09183 Cloud Pink and Reaper 09281 Brains Pink.


Flight Suit Base Color
A mix of Reaper 09122 Terran Khaki and Reaper 09129 Faded Khaki. Terran Khaki resembles brand new khaki cloth while Faded Khaki is a darker color.

Flight Suit Highlight Color
Reaper 09122 Terran Khaki.

Hair Base Color
Reaper 09088 Stormy Grey.

Hair Wash Color
Diluted Citadel Colour Chaos Black allowed to flow into the recesses and darken the overall tone.

Accessories Base Color
Reaper 09088 Stormy Grey.

Accessories Highlight Color
Citadel Colour Codex Grey. Also applied to the screen of the tablet computer.

Accessories Wash Colors
Secret Weapon W001 Soft Body Black Wash. Diluted Citadel Colour Chaos Black was also applied to the boots to darken them further.


Overall, I think the combination of approaches worked well on this figure. Some of the wash flowed out of the areas they were applied to. I was able to correct this, but I might choose one method or the other for specific projects in the future.

Wednesday, November 24, 2021

Bombshell Miniatures 36003 Wanda Whitestar

This 32mm scale pewter model is from Bombshell Miniatures and is part of their Counterblast line. Wanda Whitestar would work in a variety of sci-fi settings, but the retro hair style suggests that space opera might be the best fit.


With retro in mind, I decided on a paint scheme influenced by a piece of 1980s sci-fi. Specifically, the Buck Rogers in the 25th Century television series. Many of the costumes worn by Erin Gray as Colonel Wilma Deering were shiny, brightly colored, and form fitting. I picked the pink one as my inspiration.

Preparation
There was no discernible flash or mold lines. I glued the figure to a 30mm round plastic base, being careful to leave a little room between the base surface and the miniature's feet. This space would later be filled by the sand I used for texturing the base.

Zenithal Spray Priming
Tamiya Surface Primer L in Gray and White. This was less for the zenithal priming to show through and more so that I could have a guide for shading later on.

Skin Base Color Coat
A mix of Reaper 09047 Fair Skin and Reaper 09233 Bright Skin. Bright Skin resembles no natural human skin tone I've ever encountered. It works well for non-human flesh, though. In this case, I mixed it with Fair Skin to produce a slightly darker color.

Skin Highlight
Reaper 09047 Fair Skin.

Hair Base Color Coat
Mix of Reaper 09122 Terrain Khaki and Reaper 09139 Faded Khaki. This produces a color that works for dark blonde hair or light tan clothing.

Hair Highlight
Reaper 09257 Blond Hair.


Body Suit Base Color Coat
Reaper 09163 Cloud Pink. This is a medium tone pink.

Body Suit Highlight
Mix of Reaper 09281 Brains Pink and Reaper 09163 Cloud Pink. This produced a cotton candy pink.

Body Suit Wash Coat
The results of the base and highlight were brighter than I liked and the recessed details weren't as clearly visible as I wanted. I applied a light coat of Secret Weapon W025 Just Red Wash to darken down the color and bring out the details.

Jacket and Accessories Base Color Coat
Reaper 09088 Stormy Grey.

Jacket and Accessories Highlight
Citadel Colour Codex Grey.

Jacket and Accessories Wash Coats
Diluted Citadel Colour Chaos Black on the boots, gloves, and weapons to create a subtle difference in shade between them and the jacket. I followed up with a coat of Secret Weapon W001 Soft Body Black over the jacket and areas previously coated with Chaos Black.

Basing
Mix of sand, tacky glue, brown craft paint, and water in the recessed portion of the base. I painted the edge of the base with Citadel Colour Chaos Black.


Overall, I'm happy with how this one turned out. Although I am still debating the merits of hitting the hair and skin with a wash. It would bring out more of the details, but I don't want to change the colors as they are now.

Wednesday, November 17, 2021

Reaper Bones Nova Corp

These are another backer reward from the first Reaper Bones Kickstarter. I was supposed to receive one of each miniature, for a total of five. I'm not sure how I ended up with a total of nine, but I understand that this happened to many backers.

Expendable, not all that bright, and destined to be shot at.

SKU, name, and quantity of each miniature:
  • 80011 Nova Corp: Guard x2
  • 80012 Nova Corp: Soldier x2
  • 80013 Nova Corp: Female x1
  • 80014 Garvin Markus, Nova Corp Hero x2
  • 80015 Nova Corp: Rifleman x2
The Guard, Soldier, Female, and Rifleman are all available from Reaper in sets of three. Garvin Markus comes all by himself. The sculpts are also available in metal as singles as part of the Chronoscope line.

The Nova Corp represents some kinda cyberpunk megacorp security force. I painted them up for Five Parsecs From Home as corporate security, planetary militia, local police, etc. They will also be handy as opposition in near-future role playing games.

These are intended to be used as a group against "hero" figures. Individually painting every detail seemed to be overkill. I used quick and dirty methods to get them ready for the table - lots of dry brushing and washes.

Priming and Basing
I fell back on my usual approach for Bones plastic for the most part. Reaper 09079 Deep Amethyst was mixed with FolkArt Glass & Tile Medium for priming. I didn't bother with adding sand of other material to the bases. Simply gluing the integral bases to previously spray primed fender washers and painting them later would be enough.

First Dry Brush Layer
Reaper 09057 Ashen Blue. I left much more paint on the brush than I normally would when dry brushing. This resulted in a heavy layer while leaving some Deep Amethyst still showing in the recesses.

Second Dry Brush Layer
Reaper 09057 Ashen Blue mixed with Citadel Colour Skull White. This used standard dry brushing techniques to produce a highlight layer aligned with how light would hit the figures from above.

Weapons, Backpacks, and Bases
Citadel Colour Codex Grey. Used to provide some variation on the otherwise all blue color scheme.

Visor
Reaper 09079 Deep Amethyst. The previous dry brush layers covered up the visors, so I picked them out with a darker blue.

Flesh and Hair
I started by coating the exposed heads with Reaper 09110 Oiled Leather. One figure's hair was painted Reaper 09074 Palomino Gold while the other was left as is. I mixed the remaining Oiled Leather, Palomino Gold, and a drop of Citadel Colour Skull White to produce a pale skin tone for the figure I left with brown hair.

Wash
I used a mix of blue-gray wash I had left over from a previous project with a few drops of Reaper 09074 Deep Amethyst to tie it in better with the other colors. This mix was simply brushed over all surfaces and left to dry.

Base Detail Layers
Citadel Colour Chaos Black diluted with water brushed over the bases. The intent was to produce a dirty, oily appearance and fill in the recessed details. I might have gone overboard, but I don't feel that it worth the effort to go back and fix. This was a quick and dirty project, after all.

The paint job on these figures won't win any awards - I didn't post any close up photos for a reason - but that wasn't the goal. Their job is to get shot at by better painted miniatures. They'll be on the table exactly as long as the dice will allow.

Friday, November 12, 2021

Reaper Chronoscope 50028 Kirby McDowell, Space Privateer

Another metal miniature from Reaper's Chronoscope line. Kirby McDowell has the look of a 1980s action movie star. He's a big guy who favors casual dress and packs a surprise for those who underestimate him.


This is another experiment in painting highlights as an alternative to using washes for shading. As much as I like the ease of using washes, I like having more tools in my kit even more. The results were better this time. I only had to cheat once.

Primer
Zenithal priming with dark gray coat followed by white sprayed from the top.

Skin
Reaper 09260 Bronzed Skin slightly diluted with water to take advantage of the shading already in place. Using the diluted paint as a glaze over the zenithal priming worked well this time.

Pants
Reaper 09285 Demin Blue. Highlighted with Reaper 09057 Ashen Blue. I was careful to duplicate the techniques I used on Jessica Blaze and achieved the same results.

Hair, Shirt, and Boots
Reaper 09088 Stormy Grey. Highlighted with Reaper 09090 Misty Grey. This is the same combination of colors and techniques used on Jessica Blaze before I applied a wash to darken down the colors. The lighter initial results worked better here, so no wash was necessary.


Pistol
I painted this the same as the shirt and added a little Citadel Colour Mithril Silver to the raised areas. This draws attention to the weapon even though it is partly hidden away.

Base Texture
I used a backer reward from the Happy Seppuku Modelworks Base Texture Stamps Kickstarter to produce the look of the base. It is a flat silcone rubber sheet with various textures. I simply placed a little putty on a plastic base and pressed it on the sheet to pick up the desired pattern. In this case, I used Random Steel Plate. Regrettably, Happy Seppuku Modelworks seems to have closed their doors, so I'll have to look elsewhere for more base texturing tools in the future.

Base Painting
Reaper 09088 Stormy Grey. Reaper 09090 Misty Grey used as a highlight. The results matched the other gray areas on the miniature, but looked too faded for the base. I decided to cheat regarding my "no washes" goal for this project. A little diluted Citadel Colour Chaos Black brushed over the base darkened the color and filled in the recesses nicely. The sides were finished with undiluted Citadel Colour Chaos Black.


This experiment gives me another technique to use. There's nothing wrong with washes, but I prefer having more options when tackling hobby projects. And I'm another painted miniature closer to getting a game of Five Parsecs From Home on the table.

Wednesday, November 10, 2021

Reaper Chronoscope 50132 Jessica Blaze, Smuggler

Jessica Blaze is a metal miniature from Reaper Miniatures' Chronoscope line. I bought this figure back in my "it looks cool, I must have it NOW" days of miniature collecting. After putting it off for multiple sci-fi games, I finally put paint on this model for Five Parsecs From Home.


I experimented with shading using highlight layers over darker coats. This technique requires more brush control than my usual reliance on washes. The outcome was mixed, so I ended up using washes on some areas to get the results I wanted.

Primer
The initial coat was a dark gray sprayed to evenly coat all surfaces. A second coat of white was sprayed from above. I recently learned that his technique has a name - zenithal priming. It gave me a better idea of which areas needed to be highlights and which would be shaded.

Skin
Reaper 98982 Golden Skin diluted with water to act as a glaze. The idea was to let the zenithal priming to show through. It didn't quite take, so I followed up with Secret Weapon W006 Parchment Wash.


Hair and Top
Reaper 09183 Cloud Pink. Highlighted with Reaper 09281 Brains Pink. The result turned out more pastel than I intended. Some Secret Weapon W025 Just Red Wash pushed the color over to the bright pink I was aiming for.

Pants
Reaper 09285 Demin Blue. Highlighted with Reaper 09057 Ashen Blue. This actually came out as desired.


Jacket, Boots, and Accessories
Reaper 09088 Stormy Grey. Reaper 09090 Misty Grey used to highlight these areas. The outcome was lighter than I intended. I used Secret Weapon W001 Soft Body Black to darken these areas and fill the recesses. A few spots turned out a little too dark, so I highlighted them with Citadel Colour Codex Grey.

Pistol
The pistol was painted using the same colors and techniques as the Jacket with one additional step. I lightly brushed on a little Citadel Colour Mithril Silver on some of the raised details to represent bare metal showing through the worn paint of a well-used weapon.

Base
I cut the miniature off its slot and glued it to a Champ Industries Industrial Design Base before priming. Even though I am happy with the brand of super glue I favor, I wonder if I should start pinning figures to such bases in the future. The base is painted with Citadel Colour Chaos Black. I diluted it for the top to fill in the recesses while not completely coating the raised areas and used it undiluted for the sides.


My experiment with not using washes turned out to need washes to get the desired results. Still, I did learn a thing or two that I can apply moving forward. And I have another sci-fi miniature suitable for Five Parsecs From Home painted and ready.

Monday, November 8, 2021

Cork Urban Terrain Tiles WIP, Part Two

I had a change of plans with this project. My original idea was to knock out one tile at a time with a post to match. However, I had a breakthrough last week and managed to finish the remaining tiles over the weekend.

The street is strangely quiet now, but I'm sure that will change as soon as I get more miniatures painted.

The major issue I had was figuring out how to cut the cork tiles cleanly. I hid the rough edge on the first tile with the pavement squares, but that wouldn't be an option for all the remaining tiles. More practice resulted in cleaner cuts, but it was still slow going. It was the discovery that I could sand down the edges for a smooth finish that greatly accelerated progress.

Counterclockwise from the bottom left: First street tile (with drain cover), flat tile, courtyard tile, and second street tile (without drain cover).

The Flat Tile
This is a flat tile to support large buildings and other terrain. While a solid cork sheet would be completely functional, I wanted something more interesting looking. I drew diagonal lines over the cork sheet until I found a pattern I liked and cut along those lines. Then it was a matter of gluing the cut pieces down, putting some books on top of it all, and waiting for the glue to dry.

The Courtyard Tile
This is an open area surrounded by a low border. Add planters and it can represent a park. Keep it clear except for a landed spacecraft and it becomes a landing pad. It is essentially a slightly more interesting looking flat tile.

The Second Street Tile
There are some key differences between this and the first tile. There is no drain cover to simplify assembly. The pavement is also streamlined. The result was faster construction, but the pavement on one side doesn't match the first tile. I'm fine with that, given how often I see mismatched pavement and roads while driving around.

Tiles with 28mm scale miniatures and some terrain.

Spray Painting
All of the tiles were spray painted using the same colors and techniques as the first tile.

Finishing Touches - Roads
I wasn't quite happy with the roads, so I brushed some FolkArt 479 Pure Black over them. This validated my choice of using spray paints for most of the painting. The cork, even though it was already coated with Krylon, absorbed far more paint than I expected. The result was a nicely coated black surface with no cork showing though.

Finishing Touches - Concrete Surfaces
The next step was a light dry brushing with FolkArt 480 Titanium White over all areas except for the roads. A few spots came out a little too light, so I stippled a little FolkArt 479 Pure Black over them. The result is an uneven gray color that suggests wear and staining.

All three stackable buildings. Ready to block movement and lines of sight.

Bonus - Stackable Trash Bash Sci-Fi Buildings!
These were finished at the same time as the tiles. I placed the stickers in different patterns to vary their appearances slightly. Otherwise, they are identical to the first. And they still stack for storage and transport.