Sunday, January 10, 2021

Reaper Bones 77047 Goldar, Male Barbarian

Sometimes I need a quick project to keep me from feeling "stuck" when progress is held up on the other things I have going on. Maybe I'm waiting for the weather to turn so I can spray primer or paint. Or work just won't die down enough for me to find some free time. I'm finding that all the Reaper Bones miniatures I have around are handy for not-quite-speed-paints. That way I can tell myself that I'm getting something done.

I picked out Goldar since I was in the mood for something swords and sorcery. A bare-chested barbarian with a big ol' ax seemed a good fit. For no particular reason, I choose to paint this figure in shades of brown except for the metallics. Not a particularly neat job on my part, but good enough for tabletop.

Seems more like a gladiator than a barbarian to me, but I just paint 'em.

Primer Layer

Applied the mix of FolkArt Glass & Tile Medium and brown paint that I usually rely on for Reaper Bones miniatures. The mix brings out the details that are otherwise hard to see in all that bright white plastic. It also made a prominent mold line running across the head pretty obvious. A little work with sharp blade took care of the line and I reapplied the mix in those areas.

Flesh Areas

Goldar seems like the outdoorsy type. Reaper 09044 Tanned Skin seemed to be a good pick.

Accessories

I used Reaper 09284 Lonestar Leather on the boots, fur loincloth, and leather straps.

Cloth

Reaper 09292 Bathalian Chitin reproduces the color of undyed cloth nicely.

Metal Areas

I liked the old school look of the armor on Norgol, so I decided to use Citadel Colour paints for a similar effect on this figure. The armor, buckle, and ax blade all received an undercoat of Codex Grey followed by a coat of Boltgun Metal. I used some Mithril Silver to highlight the upper and raised areas.

Wash Layers

I rediscovered a little treasure while digging through my paint collection the other day - a still viable bottle of Citadel Washes Ogryn Flesh. It pairs well with Reaper 09044 Tanned Skin, adding a brown-red tone and setting in to the recesses. I also applied it to the accessories. Unfortunately, Ogryn Flesh is a little too red for cloth, so those areas got Reaper 09254 Brown Wash. I used Reaper 09255 Black Wash for the metal areas.

Basing

I've gotten into the habit of gluing a one-inch steel washer under the integral base of Reaper Bones figures. It stabilizes the figure by providing a wider and heavier base. I textured the base by gluing on a little sand and applied a couple layers of earth tone craft paints.

Goldar, like most of my Reaper Bones collection, is from the first Reaper Bones Kickstarter. I purchased the metal version awhile back and immediately ran a problem with the ax blade breaking off. The shaft wasn't strong enough to hold to relatively heavy ax blade and too thin to pin or otherwise reinforce. That figure got put into deep storage in my garage. The light and flexible plastic of the Bones version avoids that issue while retaining the detail of the earlier metal miniature.
Friday, January 1, 2021

Star Trek Adventures - Year by Year, Early 2371

This begins what is planned to be a series of posts reviewing Star Trek canon year by year. The intent is to present opportunities for player characters in Star Trek Adventures to locate some trouble to get into. What we see on screen is expanded upon when necessary to provide more details, but I'll try not to wander too far from canon.

Let's start with the first third of the default year - 2371. First is an overview of the situation along the Cardassian border. Following that are entries on noteworthy events in 2371 from a tabletop gaming perspective. Each entry starts with a rough estimate of when an event takes place. Stardates are provided when available. Information that the player characters would have access to makes up the main body of each entry. The last part of each entry are notes for the gamemaster in italics.


The State of the Cardassian Border in the Beginning of 2371

The upper echelons of the United Federation of Planets and Starfleet Command regard the situation on the Cardassian border as a soup sandwich. The peace treaty with the Cardassians was supposed to deescalate tensions and make the area more defensible. The Demilitarized Zone established a buffer between the Federation and the Cardassian Union. The treaty also reduced the number of Federation colonies that Starfleet would have to defend in the event of renewed hostilities. This should have allowed Starfleet to scale back its commitments in the area and redeploy its starships elsewhere. The discovery of the Bajoran wormhole, internal conflicts in the Cardassian Union, the rise of the Maquis, and the growing threat of the Dominion all combined to throw those plans right out the airlock.

The planned draw down of Starfleet assets in the area was been reversed. Deep Space Nine's current arsenal isn't enough to defend the wormhole from either the Cardassians (who attacked the station literally the same day that the wormhole was discovered) or the Dominion (who exterminated the New Bajor colony and destroyed USS Odyssey in what amounted to a border dispute). Assigning USS Defiant to serve as DS9's garrison ship is purely a stopgap measure until the station's defenses can be upgraded. Additionally, the Maquis are becoming more aggressive thanks to experienced leadership provided by defecting Starfleet officers. Starfleet is deploying more starships to the area in response, including the brand-new USS Voyager.

The state of affairs has resulted in a shake up in the chain of command controlling operations in the area. Admiral Nechayev's plan to infiltrate the Maquis in late 2370 backfired when her chosen operative - Ro Laren - ended up joining the Maquis instead. Starfleet has not reassigned Admiral Nechayev from her leadership role along the border, but some have expressed doubts about her ability to control the situation. With Admiral Nechayev's reputation and influence damaged, Admiral Toddman of Starfleet Security is taking a larger role in day-to-day operations in the area. Meanwhile, other flag officers like Admiral Paris and Admiral Patterson see nothing wrong with Admiral Nechayev's ideas. They have authorized Captain Janeway of the soon-to-be-launched USS Voyager to use a similar plan to infiltrate a Maquis cell, but with a more reliable agent to improve the chances of success.

In this environment, Starfleet officers with commands along the border may find themselves receiving orders from different admirals depending on the nature of the assignment. Many field commanders are becoming adept at navigating the politics of higher command as they campaign for support for their plans. Commander Sisko used this approach to get command of USS Defiant and move up plans to upgrade DS9's defenses. Captain Janeway also used her influence with like-minded admirals to advance her plan to infiltrate the Maquis.

Much of this was extrapolated to explain why multiple flag officers were overseeing events involving the Bajor sector. Who Sisko was reporting to and taking orders from changed multiple times in DS9's third season. Any of the admirals mentioned could become patrons or obstacles for player characters serving in the area. The conflict in Starfleet between those advocating covert actions and those preferring a more straightforward approach could play a major role for players interested in political maneuvering or be kept in the background for those who wish to keep it there.


Noteworthy Events

Uniform Change

Some point before Jan 2371.

Starfleet changes its combadge design from a silver arrowhead backed with a gold oval to a silver arrowhead backed by a hollow gold rectangle.

This minor change might trip up Maquis infiltrators or spies from other governments disguised as Starfleet personnel.


USS Equinox Lost

Jan-Feb 2371, before stardate 48315.6 ("Caretaker" - VOY).

USS Equinox disappears during a survey mission along the Cardassian border. Search operations fail to locate the ship or any signs of its fate.

I couldn't find a reference to the exact date that USS Equinox was pulled into the Delta Quadrant, but it had to happen before the events of Voyager's pilot. USS Equinox's disappearance could simply be presented as a background event to reinforce Star Trek canon in a campaign. Alternately, the player characters could be involved with search operations in the area as the lead up to another adventure.


Formal First Contact with the Dominion

Jan-Feb 2371, stardates 48213.1 ("The Search, Part I" - DS9) and 48217.7 ("The Search, Part II" - DS9).

USS Defiant contacts the leaders of the Dominion. The Federation gains an understanding of the Dominion's internal structure - the Founders as distant rulers, the Vorta running day-to-day operations, the Jem'Hadar as an expansionist military force, and everyone else doing what the Vorta tells them out of fear of the Jem'Hadar.

The player characters will only have a basic understanding of the Dominion at this time. Details like the importance of ketracel-white to the Jem'Hadar or the fact that Vorta are clones are presented later in canon.


Starfleet Reopens Traffic Through the Bajoran Wormhole

Feb-Mar 2371, prior to stardate 48301.1 ("The Abandoned" - DS9)

Starfleet bows to pressure from the Bajoran Provisional Government, those within the Federation advocating for further exploration of the Gamma Quadrant, and various commercial interests to resume traffic through the wormhole.

Traffic through the wormhole was suspended in late 2370 ("The Jem'Hadar" - DS9), but has to resume before "The Abandoned" for the plot of that episode to work. Starfleet's caution is justified - the destruction of New Bajor and every ship from the Alpha Quadrant (except for DS9's runabouts) during the events of "The Jem'Hadar" sent a clear message. Starfleet may send a starship through the wormhole to satisfy concerns about the safety of ships going into the Gamma Quadrant. Such a starship may also be charged with the grim task of verifying the fates of New Bajor, USS Odyssey, and the other ships from the Alpha Quadrant.


Jem'Hadar Child Incident

Mar 2371, stardate 48301.1 ("The Abandoned" - DS9)

A shipment of salvage from the Gamma Quadrant turns up a Jem'Hadar infant within a stasis chamber. The Jem'Hadar develops from an infant to a young adult in days. New data on the Jem'Hadar is gathered, but some in Starfleet express disappointment at the missed opportunity to learn more after the Jem'Hadar is released in the Gamma Quadrant.

The basics of Jem'Hadar biology - the fact that they are genetically engineered, their baked-in loyalty to the Founders, and their dependence on ketracel-white - becomes known to the Federation.


Val Jean Lost

Mar 2371, prior to stardate 48315.6 ("Caretaker" - VOY).

The Cardassian warship Vetar, under the command of Gul Evek, pursues the Maquis raider Val Jean, under the command of former Starfleet officer Chakotay, into the Badlands. Vetar is damaged by a plasma storm and breaks off pursuit. Gul Evek provides the last known position of Val Jean to Starfleet. Val Jean never returns to base. Attempts by the Maquis to search for the ship and its crew are hampered by conditions in the Badlands and patrols maintained by Starfleet and the Cardassian military.

Gul Evek makes an interesting foil for Starfleet characters - a little more nuanced and much less slimy than Dukat. He is presented on page 102 of the Alpha Quadrant Sourcebook. The player characters may run into Maquis search efforts while patrolling the area. The Maquis may launch attacks on the Cardassians to avenge the loss of Val Jean. A longer term concern for the Maquis is the loss of an experienced leader, his ship, and his cell. They may step up recruiting and procurement to make up for the loss. An established Starfleet NPC might decide to defect or just quietly slide some equipment and supplies over to the Maquis.


USS Voyager Lost

Mar 2371, stardate 48315.6 ("Caretaker" - VOY).

USS Voyager disappears while on a mission to capture Chakotay and his Maquis cell. Search operations are hampered by conditions in and near the Badlands. Starfleet eventually calls off active searches, but does not declare USS Voyager lost at this time.

As with USS Equinox, the disappearance of USS Voyager could simply be mentioned to tie the campaign into the Star Trek setting. Participating in search operations near the Badlands carries considerable risks. Conditions are likely to result in mounting damage to searching starships. Worse, both the Cardassians and Maquis are looking to settle scores - the Cardassians because of the damage to Vetar and the Maquis due to the loss of Val Jean. Federation starships looking for USS Voyager may find themselves caught in the middle as the Cardassians and Maquis clash right in the middle of the search area. Longer term, the disappearances of two late-model starships may raise concerns within Starfleet about the prudence of operating near the Badlands.


The next part of this series finishes up with 2371.

Tuesday, December 29, 2020

Electrical Box Shelter WIP Part 2 - Theory and Primer

The Christmas break offered me the opportunity to catch up on ongoing projects. The weather was neither too humid nor too cold for spray priming and painting. And it wasn't like I was going anywhere for the holidays in 2020.

Nothing like a coat of primer to tie everything together.

But let's back up a little.

My initial post for this project only touched on the concept of using an electrical box for terrain. Plenty on what to do and how to do it, but not much about discussion about the general idea or why an electrical box is a good choice for a project like this one.

The oldest references to electrical box terrain projects that I can find date back to 2009-2010. I have the feeling that the idea is older than that based on the familiarity that these references have when discussing the topic. I also haven't been able to find out who first came up with the notion of taking one of these boxes of blue plastic, gluing on some bits, painting it up, and putting it on the table. It might be one of those things that doesn't have a single, definitive source. There is the possibility that multiple people independently came up with the concept around the same time.

These things already look like industrial structures. I'm kinda surprised that folks haven't done more with the insides of these things. Something to keep in mind for a future project.

Electrical boxes appeal for sci-fi terrain projects for a number of reasons:
  • Initial appearance. The blocky shape already has enough details to suggest an industrial building.
  • Customizing the look. The flat surfaces offer large areas to add details. Want something that can be used in a variety of games? Use generic details. Does it need to fit into an existing collection of terrain for a specific game? Tie it in by adding details specific to that setting. Skulls, for example.
  • The ability to determine scale. A box could be made into a shed (28mm), a light industrial building (15mm), or a warehouse (6mm). The scale depends on the size of the doors, windows, and other details added to the box.
  • Durability. These boxes are made of tough plastic. The ones I tend to use are PVC. They certainly won't shatter if they fall off a table or get crushed while being transported. The details glued on to them are another story, of course.
  • Cost. These are mass produced products made of molded plastic. The ones I favor run from $2-3 USD. There are more expensive ones, but there are also reasons to avoid them.
The sticker and that protrusion need to go.

It's not all smooth sailing with a project like this. There are some disadvantages to using electrical boxes for sci-fi terrain:
  • They need preparation. Most of these boxes have stickers and protrusions that need to be removed. In fact, the more expensive boxes tend to have more things that get in the way. A contractor might find a nail built into a box handy for mounting it, but a terrain maker might feel differently. I would also recommend sanding the surfaces to allow adhesive and primer to bond better to the surface of the box.
  • Sloped sides. The sides of these boxes - the ones I've seen, at least - aren't at right angles to each other. The subtle slopes can complicate a build. See my comments on gluing on the airlock in my previous post.
Overall, a terrain piece using an electrical box as its core is a good project regardless of skill level. It does require some basic tools and a fair sized collection of bits and parts. The first couple I did taught me quite a bit. For example, a high speed cutting tool does not work well on a plastic with a low melting point. This project is teaching me new things. How to get an even layer of primer on a complex surface is one of them.

What would be a good color for this?

Returning to this project, I finished priming everything this past weekend.

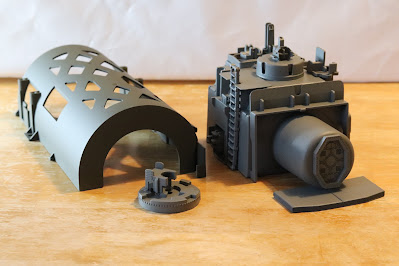
I primed the underside of the "shelter" piece and inside of the electrical box black. This keeps the blue plastic on the inside from showing through the openings. It also provides some basic shading effects that will be handy later.

Not painting the inside of the clear plastic piece I used for the airlock body might be something I come to regret. Any scratches or wear on the paint covering it will look weird. Unfortunately, the idea didn't occur to me until after assembly.

The main layer of primer is a flat gray. I'm not quite sure what colors I'll be using and priming it a neutral color keeps my options open. Areas like under the ladder ended up needing a little touching up.

Now I just need to figure out what colors to use on the shelter. Maybe an industrial color like yellow?

Sunday, December 20, 2020

Reaper Bones 77065 Norgol, Irongrave Knight

This was an unplanned Saturday morning speed paint. I was looking forward to spending Saturday spraying primer and paint on some ongoing projects. Those plans went into the bin when I woke up to the sound of rain hitting the roof. I figured that painting this figure would be a good way to help fill a cold, gray morning.

I'm pretty sure that Norgol doesn't use that ax on wood.

Primer Layer

Norgol got the mix of FolkArt Glass & Tile Medium and an appropriately colored paint that I generally use for Reaper Bones miniatures. In this case, black for the armor and brown for everything else.

Base Layer

I decided to go old school for the armor on this chaotic-looking fellow with some of my surviving Citadel Colour paints. The armor, ax blade, and pommel got a coat of Codex Grey. All other areas were painted with Reaper 09284 Lonestar Leather. The furs did not receive any further layers of paint except for the wash.

Metallic Layers

The armor and other metal areas were painted with Citadel Colour Boltgun Metal and highlighted with Citadel Colour Mithril Silver. I applied a layer of Secret Weapon W003 Armor Wash to bring out the details and tone down the contrast between the two metallic colors.

Cape, Ax Shaft, and Horns

I used Reaper 09292 Bathalian Chitin to provide some contrast with the rest of the color scheme.

Gloves

Reaper 09110 Oiled Leather was used as a highlight to make the gloves stand out from the rest of the browns.

Wash Layer

Secret Weapon W010 Dark Sepia was applied over the cape, ax shaft, horns, gloves, and furs. It worked well, but it is more runny than I'm used to.

Basing

A one-inch steel washer glued under the integral base gives the figure a little more heft. Reaper Bones figures tend to tip over otherwise. Glued on sand provides texture and a couple of earth tone craft paints gives the basing the appearance of dry ground.

That cape and those furs would normally keep in the warmth, but I'm not sure how helpful they could be over all that metal armor.

Norgol is another figure from the first Reaper Bones Kickstarter. I'm planning on picking up the pace on my unpainted miniatures pile in general and my Reaper Bones collection in particular during the coming year. At my current rate, my grandkids will be inheriting unpainted plastic miniatures.

Not my best work, but a fun figure to knock out on a weekend morning.

Tuesday, December 15, 2020

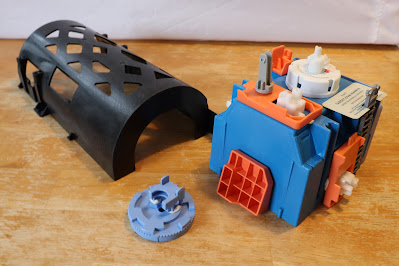
Electrical Box Sci-Fi Shelter WIP Part 1

I decided to give a classic of scratch-built sci-fi terrain - the electrical box building - another try. My previous attempt was way back in 2012. I'm looking forward to applying what I've learned since then.

Test fit with the parts held together with putty.

The concept is a hostile environment shelter with an airlock and external workspace in 28mm scale. The functional and futuristic structures in movies like "The Martian" and video games such as "No Man's Sky" inspired this project. The details represent external equipment that can be monitored from inside the shelter. They could be experiment packages, sensors, or communications gear.

A PVC electrical box is an inexpensive core for a project like this. It looks like an industrial structure straight off the shelf. The flat sides are a blank canvas for adding the details needed to convey whatever look the maker is going for.

Step #1 - Diving into the Bits Bins

This step was mostly digging around my bits collection for the kind of parts that suggest some technical function. I also wanted a consistent appearance - a few bits went back into the collection because they were too detailed. They would stand out from the rest and throw off the look I wanted.

Step #2 - Test Fitting

Next was some trial and error. I used the kind of putty used to mount a poster on a wall to temporarily attach everything. This allowed me to rearrange the parts to find the best fit. A fair number of parts went back to the bins because they just didn't work for this project. I also had to move some things around to accommodate the "garage" piece.

The ladder raised an issue - simply attaching it to the side didn't look right. There's no place for anyone using the ladder to step onto. Cutting down a plastic gift card provided a platform and made the ladder look more plausible.

Test fit rear view with "garage" detached. Note that I already started surface preparation on the garage piece.

Step #3 - Surface Preparation

Electrical boxes need work for a project like this - stickers and unneeded protrusions need to be removed. I sanded all the parts and cleaned them with soap and water. This step makes gluing and painting much easier.

Step #4 - Assembly

I used the photos of Step #2 as a reference when gluing everything together. This is when a couple of previously undetected issues came up. The sides of this particular electrical box slope slightly. This made the "airlock" jut up rather than run parallel with the surface. I used a couple of foam bits and another cut down plastic gift card to create a "porch" to go under the airlock. I also added a few cut down straws to represent pipes and cabling to connect some of the details.

Assembled shelter. Note the "porch" added to support the airlock. The garage piece was already in the priming stage.

Parts List

Laundry detergent cap/measuring cup for the airlock body.
Ladder from Hexagon Construction Kit.
Door from Brian Roe's Trash Bash Bits: Sci-Fi Doors Kickstarter.
Pill bottle cap.
Pull tabs.
Cut down plastic gift cards.
Foam bits from packaging.
Various printer parts.

Upcoming - Priming and Painting

The next step is spraying on a layer of primer. Unfortunately, that depends on the weather. It's been varying between "too humid" and "too cold" if what the label on the can states is true.

Sunday, December 13, 2020

Black Friday/Cyber Monday Haul 2020

As with last year, I took advantage of the post-Thanksgiving sales to pick up a few gaming-related items. This year's sales-inspired online shopping spree was more restrained than previous occasions. Adding to the project pile didn't interest me, so I focused on things that would aid me in finishing the projects I already have lying around.


From Secret Weapons Miniatures

I developed a liking for washes put out by Secret Weapon Miniatures over the past year. Their washes offer specialized effects for specific projects. They act as glazes - shading and providing an additional tint over the base color.

Brighter than I thought they would be.

W015 Acrylic Wash - Blue
W016 Acrylic Wash - Green
W017 Acrylic Wash - Purple
W025 Acrylic Wash - Just Red

Many projects use these colors as a base. I purchased these washes as potential replacements for the old Citadel products Asurmen Blue, Thraka Green, Leviathan Purple, and Baal Red. The name of W025 - Just Red - reflects the number of red washes on offer from Secret Weapon Miniatures. These washes are much brighter than I expected and the Green is more of an aqua - more towards blue than yellow. We will see how these turn out.

A couple of things that looked interesting.

W001 Acrylic Wash - Soft Body Black
W006 Acrylic Wash - Parchment

Soft Body Black is intended to provide shading without too much of a change to the overall color. The other "soft" washes I've encountered tend to be browns, so I'm interested in seeing how it turns out. I got Parchment to fill a niche that used to be filled by watering down Citadel Washes Gryphonne Sepia - shading a color representing paper or an off-white cloth like undyed linen.

Do I own a base big enough for what's in the box?

W008 Acrylic Wash - Baby Poop

I got a couple bottles of Baby Poop with a specific project in mind. This product worked great for the Reaper Bones #77113 Eldritch Demon I finished early this year. The particular green/brown/orange color over a green base provided the "cosmic horror awakened from a long nap in a pit of deep sea slime" appearance that I was looking for. That project tested the color scheme for something I'm planning on tackling next year - Reaper Bones #77194 C'thulhu. I hope that two bottles (plus what's left of the one I already had) will be enough!


From Warsenal

These look a little dull due to the packaging. Note the one on the right where I removed the protective backing.

Fluorescent Scifi Screens - Communication Array in Blue, Green, and Red

I purchased these to provide more detail for the various "bash bits together" projects I have in the works. These were originally made by Warsenal for their Communications Array (the original one, not the one currently available from their site) and they also offer the screens used for their Tech Console. Note that the dull appearance in my photo is due to the protective backing - I removed it from one screen to show the piece's transparent appearance. I have to commend Warsenal for making these available for scratch building.


Kudos to both Secret Weapons Miniatures and Warsenal - both for offering their products for sale and for their customer service. My orders were filled and shipped promptly.

Tuesday, December 8, 2020

Five Turbolift Pitches for Star Trek Adventure Missions

Our Star Trek Adventures campaign is still in hiatus. Bad news for us, but maybe not for y'all. Here are some more mission ideas I've dusted off from my notes. Let me know if these ideas see use in your campaign!

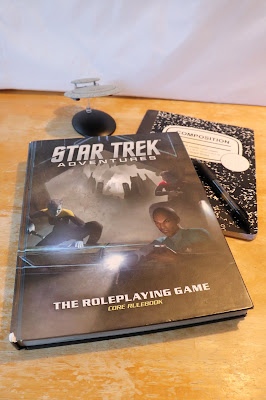
My well loved copy of the STA Core Rulebook, one of my many notebooks, and a starship model from Eaglemoss for inspiration.


Would Anyone on a Federation Starship Know What a Ponzi Scheme Is?

A Federation cultural survey team studying a pre-warp culture sends out a distress signal. The culture they are monitoring is suffering economic collapse. It was triggered by "The Visitors" - aliens that arrived in orbit months ago and only communicate by a mathematical code broadcast by radio. Analysis indicates that the code is similar to various "universal" methods of communications developed for first contact such as linguacode. The Visitors made promises of technology, wealth, and power to various nations, corporations, and influential individuals. All they asked for were certain "trade goods" - refined materials, cultural artifacts, and specific technology. More and more of the planet's economy was tied up with providing the Visitors with what they demanded. However, what the Visitors offered in return was only just enough to fulfill the letter of their promises and keep the flow of trade goods going. The crew must investigate and find a way to undo the cultural contamination while playing lip service to the Prime Directive. Otherwise, the economic disaster will set the development of the planet back decades or even centuries.

How this plays out depends on who the Visitors are. The Ferengi and Orion Syndicate are the obvious choices, but that makes them the first the players will suspect. Independent criminals running a scam are fairly common in Star Trek. Or they could be members of the Obsidian Order or Tal Sh'iar up to something needlessly complicated. They could even be a Klingon House fallen on hard times and needing an infusion of wealth and resources.


"New Life" is Part of the Captain's Oath, After All

A panicked report from a Federation colony states the impossible - one of the local mountain ranges/deserts/forests/oceans/otherwise relatively immobile terrain features has started migrating. The colony's leaders are calling on Starfleet to intervene before it gets to the colony.

Dealing with the strange and weird is part of what Starfleet does. Much depends on what terrain feature is on the move. Mountains or deserts could indicate previously dormant silicon based life - although the mountains might be organic life forms with thick shells. Mobile plants and life forms suspended in water could explain migrating forests or oceans. Or the whole planet could be alive in some sense with different terrain features moving as the adventure upfolds. In any event, the crew has to figure out what they are dealing with and how to either talk to them (if they are sentient) or influence their behavior (if they are not).


Echoes from Minos

Starfleet Security began a records review after the Battle of Wolf 359 and other encounters with the Borg. Their intent was to find any indicators of earlier Borg incursions and opportunities to acquire information on the Borg threat. Rumors from the Lorenze Cluster suggest that the Minosians incorporated some newly acquired technology in their Echo Papa 607 before their own creation destroyed them. The source of that technology is unclear, but the similarities between the Echo Papa 607's ability to counter the means used against it and Borg adaptation are unsettling.

Starfleet left the planet Minos alone since USS Enterprise-D's search for USS Drake ("The Arsenal of Freedom" - TNG season one). A version of the Echo Papa 607 was used during the Ersalrope Wars as a reconnaissance system. The Echo Papa 607 that destroyed the Minosians and was encountered by USS Enterprise-D automatically deployed drones to gather intelligence, capture personnel, and attack targets. The system adapted to any tactics or weapons used to destroy a drone by deploying an improved drone capable of countering the means used to destroy the previous one. The system could manufacture and deploy an improved drone in twelve minutes. An Away Team from USS Enterprise-D was able to deactivate the Echo Papa 607, but not before the system had produced a drone capable of threatening a Galaxy-class starship.

Starfleet sends a starship to Minos with orders to recover any Borg technology incorporated into the Echo Papa 607 for analysis. There might be other autonomous weapon systems still active on Minos, so the starship chosen will either be well armed or have an escort. Even worse, the Federation aren't the only ones with an interest in Minosian weapons or Borg technology.


The Early Distress Call

The crew responds to a degraded distress call with a timestamp indicating that it will be sent hours from now. Subspace communications with the origin of the distress call - a Federation botanical research outpost - indicates that nothing is wrong. Did someone falsify the transmission or does the crew need to brush up on their temporal mechanics?

Is someone trying to lure the crew away from where they are supposed to be with a false distress call? Is something about to happen to the research outpost? If so, what does it have to do with botany?


No Prey, No Pay

The player characters are assigned to deal with pirates operating on the frontier. The pirates have been hitting all shipping in their area of operation. This has made them many enemies, including a few who are willing to overcome any distaste for working with Starfleet to shut the pirates down.

The players are faced with two challenges - finding a way to take down the pirates and dealing with all of the others who also want the pirates gone, but are prepared to be much more ruthless than Starfleet. A successful pirate operation depends on finding easy pickings and selling the loot. Making their targets harder to attack makes turning a profit more risky. Finding out who the pirates are selling to cuts off their profits until they can locate a new buyer. Cunning players may try to set a trap with a tempting target or by ambushing the pirates when they arrive at their buyer. Finally, the pirates will likely have a base of operations to rest, make repairs, and store their loot until they can sell it off.

Who the other enemies of the pirates are depends on the era. While the Federation has many rivals who are willing to ignore or even support raids on Federation targets, even they will not tolerate attacks on their own shipping. Unfortunately, the Klingons, Romulans, or Cardassians won't be too concerned with the risk to innocents in their efforts to wipe the pirates out. One twist is for the Orion Syndicate to aid Starfleet by providing clues and other covert support in dealing with the pirates. The pirates are hindering the movement of all goods in the area - including those shipments belonging to the Orions. Accepting their aid may mean that the Orions will be able to expand their operations after the pirates are gone.


Sunday, December 6, 2020

My Favorite Stuff - 2020 (and 2019)

The end of any year is a time for looking back. The nature of 2020 makes it challenging to find the good among all the bad. Here are some things that I've found helpful in pursuing the hobbies that provided some respite from a hard year. This post is a sequel to a previous post back in 2018. I'm including a couple of things from 2019 since I forgot a follow up post last December. We'll see if I remember to post something like this in 2021. I hope that you find something new to try and find useful.

Some of my favorite things from 2019-2020.

2019

Every Tool's a Hammer by Adam Savage

Adam Savage is best known for his role in the long-running television show Mythbusters. However, he wouldn't gotten that role without a long career behind the scenes in prop making and special effects. He continues to produce videos and podcasts as a member of Tested, which I recommended previously. This is his first book - an effort to impart his experiences as a maker.

The book does present practical knowledge - tools, techniques, and materials. It's a fascinating read just for that, but it's not the thrust of the work.

The real value of the book is Adam Savage's descriptions of the mental processes of handling a project from idea to completion. Using lists, drawings, and mock-ups during planning. Working with deadlines. The value of cooperating and sharing knowledge with others. Maintaining a level of organization that promotes working efficiently.

I got the sense that Adam Savage was doing his best to impart his hard won experience. It would have been easy to just present his successes and triumphs, but he tells of lessons learned the hardest way - bitter and embarrassing failure. The book is the distillation of a lifelong career of making things, but I got the sense that there might be more to tell.


Small Scenes From a Big Galaxy by Vesa Lethimaki

Who knew that anyone could shoot stunning scenes of Star Wars Lego figures?

This is a coffee table book of Vesa Lethimaki's dynamic photos. Falling snow on Hoth. Flying sand on Tatooine. Mist. Fog. The illusion of moving action. I'd love to try my hand at something similar with tabletop gaming miniatures and terrain, but some of his techniques for snow seem a little messy. Of more immediate value are Vesa Lethimaki's comments on lighting and setting up shots on a small scale. Much of it is relatable to shooting miniatures.


2020

Fiskars Fingertip Detail Knife (Loop Design) 163050-1001

Three issues I've long had with craft knives are comfort, control, and setting one down. I always feel like I'm going to loose my grip on the handle or that the blade is going to go flying. And a craft knife isn't something that needs to take flight. Even worse, the pen-like design of many craft knives means that they tend to roll off a work surface if set aside for a moment. This unusual design took a little getting used to, but the grip quickly became comfortable with good control. It doesn't entirely replace the other craft knives I own - there are certain angles that it can't quite get into - but it is the first one I reach for these days.


TaoTronics Dimmable Touch Eye-Protection LED Desk Lamp TT-DL13

A birthday gift from my wife after I decided that I needed a desk lamp for detail work - things like assembling and painting terrain and miniatures. I've grabbed it off the desk a few times when I needed a strong light for photos.

The design is compact and folds out of the way when not in use. The brightness levels range from "dim, but better than what comes out of the overhead room lighting" to "high noon on a summer day" with five levels in between. I generally use the middle couple of the seven brightness settings. The color is also adjustable, ranging from a bluish-white and adding more red for a total of five settings. The USB power port doesn't see much use since it sits in the same area as my PC, but it might be handy if I ever set it up next to a comfortable chair as a proper reading lamp.


Canon EOS Rebel T7i

This was a gift I bought for myself. It is my first digital camera that isn't a point-and-shoot or built into a phone. I got it partly for shooting better photos for this blog, but mostly to do something about my long smoldering interest in photography. The Rebel T7i is a good camera to grow into - I started with the automatic settings and began experimenting with the manual settings as I've grown in confidence. It's been rewarding to build a new skill and learn about ISO, aperture, and shutter speed.


Gorilla Super Glue

So much in this hobby relies on bonding dissimilar materials together. I've developed some preferences:

Bonds quickly, but not instantly. This is a hobby I pursue in my free time. I need to squeeze in as much progress as I can in as little time as possible. Spending minutes holding pieces together as they bond doesn't help with that goal. On the other hand, I also need a little time to adjust the positioning of the parts if they are a little off.

Strong. The finished project has to stand up to regular handling during play, transport, storage, and accidents.

Reliable. Some adhesives work great, but on on specific materials or in certain conditions. I prefer something that works for a variety of projects.

Doesn't go bad in the bottle. Certain brands of cyanoacrylate have the nasty habit of solidifying between one use and the next if the seal isn't quite airtight.

This stuff meets all of those preferences. It works fast, but still gives me a little time for adjustments. The bonds are holding up, but the real test will come when we're all back to face-to-face gaming again. It's glued together everything I've tried it on to date. And the stuff remaining in the bottle is still fluid every time I've reached for it so far. That's a better showing than some super glues I've tried - some didn't even make it through a single project!

Note: This is NOT the polyurethane adhesive that Gorilla Glue Company is better known for. Gorilla Super Glue is a cyanoacrylate like most "super" glues.


Friday, November 20, 2020

Bombshell Miniatures Bug Spray

This is "Bug Spray" from Bombshell Miniatures, based on artwork by Matt Dixon. This 32mm scale miniature was introduced as part of Bombshell's "Babes" Kickstarter back in 2012. It is no longer available for purchase from Bombshell Miniatures.

"Bug Spray" going to work.

"Bug Spray" seems to draw from a variety of genre sources. Sigourney Weaver's Ellen Ripley - particularly her depiction in Aliens - may have been the inspiration. The clothes would not be out of place on Tomb Raider's Lara Croft. And the purple hair (as seen on the original artwork) reminds me of Leela from Futurama.

Painting this figure is part of an ongoing effort to complete the out of production products in my collection. I also wanted a straightforward miniature painting project - no hydrophobic plastic to deal with or parts to assemble. This was also a chance to try out a couple of the Secret Weapon washes I picked up awhile back.

Skin
Reaper 09044 Tanned Skin. A clean, even layer was important to provide a foundation for the later wash layer.

Hair
My initial approach was a base layer of Reaper 09025 Burgundy Wine with Reaper 09024 Amethyst Purple applied as highlight. The results were disappointing. There was too much contrast between the two layers. I applied some watered down 09025 Burgundy Wine to better blend the two colors and darken the overall appearance of the hair. Next time I decide to try for purple hair, I might try reversing the initial process - using 09024 Amethyst Purple with some thinned down 09025 Burgundy Wine as a wash.

I'm not sure if the weapon is supposed to be a flame thrower, a plasma projector, or just a BFG.

Shorts
I went with a clean layer of Reaper 09158 Olive Drab and relying on the wash for shading and details.

Top
Reaper 09074 Palomino Gold with 09009 Lemon Yellow for highlighting. There was a strong contrast between the layers, but I knew that the wash I planned on applying later would bring it down.

Leather Accessories
The boots, gloves, and belt all got a clean coat of Reaper 09284 Lonestar Leather. It is a good color for relatively new leather. I would normally apply another color for a more weathered appearance, but I wanted to see what the wash layer would do.

Band Aid
Preserving this detail from the original artwork was a nice touch on Bombshell Miniature's part. Reaper 09233 Bright Skin is too pink to be useful as a skin tone, but works fine for a plastic adhesive bandage.

Weapon
I dipped into my last bottles of old Citadel Colour metallics for this part. Boltgun for the body. Tin Bitz for some of the details with Shining Gold as a highlight. Again, I was relying on the wash layer to bring things together.

Note the adhesive bandage on the right knee. A nice touch on the sculpt!

Weapon - Wash Layer
Secret Weapon W003 Armor Wash. The black-brown brings out the details and gives the weapon a used look.

Almost Everything Else - Wash Layer
Everything except the weapon, the hair, and the adhesive bandage got a layer of Secret Weapon W005 Flesh Wash. Secret Weapon calls it a "medium orange/brown tint" on their website. The tint turned out darker than I expected, but the dirty look fits the figure. The wash works well with the Reaper 09044 Tanned Skin to produce a sun-kissed tone. There is a shine that I initially found a little annoying, but I realized that it helps sell the idea of sweaty and exhausted woman who is having a bad day.

Wednesday, November 18, 2020

Reaper Bones 77310 Water Weird

This is a Reaper Bones Water Weird glued to a LED tea light. I wanted a straightforward project after the grind late last month of getting Kaladrax Reborn done by Halloween. I didn't quite achieve that goal, but close enough.

The yellow LED works better at simulating fire, but the effect isn't bad on the table.

This figure was introduced as part of the Reaper Miniatures Bones II: The Return of Mr Bones Kickstarter. I deliberately didn't get the core set for Reaper Miniatures Bones II. The amount of miniatures that showed up with the first one left me with little need for more. Instead, I picked out a few that looked interesting. That was the last Reaper Bones Kickstarter that I participated in. These days, I figure I'll pick up whatever Bones miniatures I want after they become available on the Reaper Miniatures website.

This isn't the first time I've used a LED tea light to modify a transparent plastic miniature. I basically copied the process I used for the Large Fire Elemental. As with that previous project, I'm treating the LED tea light as a thick base for the miniature. I considered modifying the electronics to create a shorter base. Unfortunately, that would take the "straightforward" right out of this project. I also like the ease of replacing the battery by unscrewing the bottom.

Water Weird miniature on a conspicuously tall base.

LED Tea Light Base Cover
I removed the plastic flame and the cover from the LED tea light. The plastic flame went to its new home in my bits box. I spray painted the cover black to serve as the base for the miniature. Once the paint was dry, I glued on the Water Weird figure.

Water Weird Well
The well portion of the Water Weird figure got a black undercoat. This was the toughest part due to the LED. I fitted the LED back on after every layer of black paint to make sure that no light would show through the well. It ended up taking four layers of black paint. Only after that did I apply a layer of gray to simulate stone. The Water Weird itself went unpainted.

Basing
The top of the base was textured with a sand/glue/brown paint mix. Once it dried, I lightly brushed on a little sandy colored craft store paint. I brushed on a little of the same paint to highlight the well.

Testing
The final touch was screwing into the electronics and see how everything worked. No light was showing though the well portion of the miniature and the light could clearly be seen. The yellow flickering light produced by the LED works better a flame, but the effect still works.