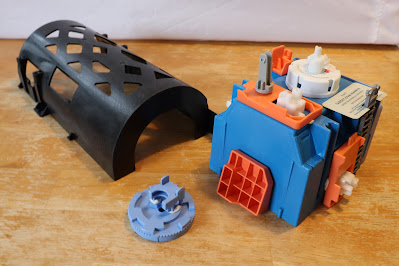
I decided to give a classic of scratch-built sci-fi terrain - the electrical box building - another try. My previous attempt was way back in 2012. I'm looking forward to applying what I've learned since then.
 |
| Test fit with the parts held together with putty. |
The concept is a hostile environment shelter with an airlock and external workspace in 28mm scale. The functional and futuristic structures in movies like "The Martian" and video games such as "No Man's Sky" inspired this project. The details represent external equipment that can be monitored from inside the shelter. They could be experiment packages, sensors, or communications gear.
A PVC electrical box is an inexpensive core for a project like this. It looks like an industrial structure straight off the shelf. The flat sides are a blank canvas for adding the details needed to convey whatever look the maker is going for.
Step #1 - Diving into the Bits Bins
This step was mostly digging around my bits collection for the kind of parts that suggest some technical function. I also wanted a consistent appearance - a few bits went back into the collection because they were too detailed. They would stand out from the rest and throw off the look I wanted.
Step #2 - Test Fitting
Next was some trial and error. I used the kind of putty used to mount a poster on a wall to temporarily attach everything. This allowed me to rearrange the parts to find the best fit. A fair number of parts went back to the bins because they just didn't work for this project. I also had to move some things around to accommodate the "garage" piece.
The ladder raised an issue - simply attaching it to the side didn't look right. There's no place for anyone using the ladder to step onto. Cutting down a plastic gift card provided a platform and made the ladder look more plausible.
 |
| Test fit rear view with "garage" detached. Note that I already started surface preparation on the garage piece. |
Step #3 - Surface Preparation
Electrical boxes need work for a project like this - stickers and unneeded protrusions need to be removed. I sanded all the parts and cleaned them with soap and water. This step makes gluing and painting much easier.
Step #4 - Assembly
I used the photos of Step #2 as a reference when gluing everything together. This is when a couple of previously undetected issues came up. The sides of this particular electrical box slope slightly. This made the "airlock" jut up rather than run parallel with the surface. I used a couple of foam bits and another cut down plastic gift card to create a "porch" to go under the airlock. I also added a few cut down straws to represent pipes and cabling to connect some of the details.
Parts List
Electrical boxes need work for a project like this - stickers and unneeded protrusions need to be removed. I sanded all the parts and cleaned them with soap and water. This step makes gluing and painting much easier.
Step #4 - Assembly
I used the photos of Step #2 as a reference when gluing everything together. This is when a couple of previously undetected issues came up. The sides of this particular electrical box slope slightly. This made the "airlock" jut up rather than run parallel with the surface. I used a couple of foam bits and another cut down plastic gift card to create a "porch" to go under the airlock. I also added a few cut down straws to represent pipes and cabling to connect some of the details.
 |
| Assembled shelter. Note the "porch" added to support the airlock. The garage piece was already in the priming stage. |
Parts List
Laundry detergent cap/measuring cup for the airlock body.
Ladder from Hexagon Construction Kit.
Door from Brian Roe's Trash Bash Bits: Sci-Fi Doors Kickstarter.
Pill bottle cap.
Pull tabs.
Cut down plastic gift cards.
Foam bits from packaging.
Various printer parts.
Upcoming - Priming and Painting
The next step is spraying on a layer of primer. Unfortunately, that depends on the weather. It's been varying between "too humid" and "too cold" if what the label on the can states is true.
No comments:
Post a Comment