Showing posts with label Games Workshop. Show all posts

Wednesday, April 7, 2021

Hasslefree and Effigy - A Couple of Quick and Fun Photos

Two exploration teams encounter each other on the surface of a barren world.

I had a little fun the other day with these figures, a GW Moonscape Crater terrain piece, and my camera.


The Figures

After finishing all three figures in Hasslefree Miniatures' "Retro Sci-Fi Crew" set, I wanted to see how they went with some other figures using a similar paint scheme. The other figures are from the now defunct Effigy Miniatures' "Havoc Girls" set. I painted them a few years back using the division colors of a later generation of space explorers.

Both sets hit some of the same notes. They are both all woman teams. There's a member posing with her sidearm. Another member is equipped with a portable device, although one is a handheld scanner and the other has an input device on the arm and a display visor. Of course, the influences are different - 1960s for one and anime for the other.

The Havoc Girls set did serve as an Away Team in our Star Trek Adventures campaign. They may return to the table when play resumes. Or I might offer to go old school with the Hasslefree Miniatures set. I'll have to give it some thought.


The Terrain

The GW Moonscape Craters are coming in handy. A surprising number of sci-fi miniatures look better on a barren, blasted landscape. I had my misgivings about them, but they are holding up well.

The Camera

I'm hitting the limits of what I can do with my current camera gear - a Canon Rebel T7i, a kit lens, and a EF 50mm f/1.8 STM lens. An inexpensive tripod helps, but there is no way I can justify the expense of a macro lens just for taking photos of miniatures. I've got a set of extension tubes on the way - they attach to lens and change their focal length, allowing the lens to get closer to the subject. They might do the trick with the lenses I already own.

But that's enough fun with the camera for now. I've got miniatures to put some paint on.

Thursday, January 14, 2021

Throwback Project - Games Workshop Moonscape Craters

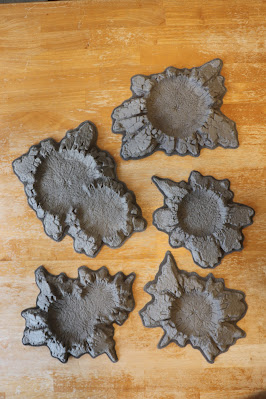
These are Game Workshop's Moonscape Craters. This product appeared around the time of Warhammer 40K's Apocalypse expansion. Big holes in the ground are a fair representation of the damage that super-heavy units could do to the surrounding landscape. Maintaining a nice lawn isn't much of a priority in the grimdark future where there is only shooting, screaming, and stabbing. The reception the Moonscape Craters received at the time was mixed. They are long out of production.

Turning my table into a lunar landscape.

These have been on my "unfinished project pile" for awhile. Like many folks in this hobby, I have a fair number of miniatures and terrain pieces that have barely seen the light of day. I've owned some of them for so long that they have fallen out of production. In mid-2020, I started on finishing some of them just to get them done. Warsenal's PlantersReaper's Kaladrax Rebornother Bones miniatures, and Bombshell Miniatures' Bug Spray were a good start. I'd like to get as many out of production products done as possible in 2021.

With something down the road needing crater terrain, I decided to use these rather than purchase a new product. This project also gave me a chance to experiment with the techniques I am considering for another terrain project later this year. I painted up a couple of these back in 2011. Those were stripped and repainted with the rest. I felt that I could do a better job now and wanted a uniform appearance for the whole set.

Texturing
The edges are smooth plastic with no detailing at all. I glued on some sand to provide texture. I almost wish I didn't bother - those areas stand out from the lack of texture on the craters themselves. I did sprinkle some sand on the craters before priming to add some texture there, but the effect is too subtle to stand out when the craters are on the table.

Close up of crater interior. Sand was added for extra texturing.

Primer
Spray primed with Krylon COLORmaxx Flat Black Spray Paint and Primer In One. I went for complete coverage to provide shading.

Base Color
Spray painted with Krylon Camouflage Ultra-Flat Brown. When Krylon puts "Ultra-Flat" on a can, they mean no reflection at all. Which is desirable for a paint intended to help conceal the surface it is applied to. Also sprayed for complete coverage, but some black showing in the deepest recesses would have been acceptable.

Highlight Color
Spray painted with Krylon Camouflage Ultra-Flat Khaki. I sprayed this at an angle to avoid filling in the recessed areas.

Close up of a crater piece. Note the contrast between the added texture on the outer edge and the rest of the piece. Also note the visible warping - the piece does not sit flat on the table.

The plastic used for these craters is thin enough to have warped. None of the craters sit flat on the table. I'm not sure if they were always that way or if storage took its toll on them.

I considered applying a wash to bring out more details, but decided against it. Close examination revealed that a wash wouldn't make much difference - the details are too muddy. Even the best applied wash can't really bring out details that are barely there.

Overall, I'm kinda regretting the $17 USD (retail price) I spent on these back in the day. They'll do the job of representing craters at a variety of scales, but I can't help but feel that there must be a better product out there.

Thursday, March 21, 2013

Half Price Books Finds #2 - How to Make Wargames Terrain (In Stereo!)

New school from a decade ago and old school from almost two decades ago. The 2003 How To Make Wargames Terrain (left) and the 1996 How To Make Wargames Terrain (right), both by Games Workshop.

I found these awhile back on separate trips and decided to compare them. The two books present some sharp contrasts. While both books cover the same topic, each takes an approach firmly rooted in the trends of its time.

Now, to be clear, this isn't a full review of the books. I do offer some opinions on each book, but the focus is contrasting the two due to the differences in publication date.

The 1996 version is written as an instruction book for someone new to the process of creating terrain. Everything is laid out in logical steps. It starts off with much terrain is needed for Games Workshop miniatures games as they existed at the time, so a newcomer can plan out what he needs. It explains the tools and materials needed for terrain projects. And it presents some simple projects to start off with and continues with progressively more advanced projects as the reader's skill level develops. This approach was necessary at the time due to the lack of alternatives. The vast amount of online resources covering the topic didn't exist back then, after all.

The 2003 version assumes some familiarity with the subject matter. It leads with the need to construct a game table and creating terrain for that table. This is quite a challenge for somebody just starting out, but is a good place for someone with experience to start the planning process. Descriptions of tools and materials is pushed to the back. Most of the book is organized by terrain type: hills, woods, water, buildings, etc. Overall, the book is better suited as a reference work for someone who has already picked up the basics.

The 1996 and 2003 versions reflect very different views on materials. The 1996 presents less expensive materials as a viable option. The 2003 is set solidly in the insulation foam, plasticard, and MDF era. Granted, there are excellent reasons for using the more expensive materials - they look good and are very durable. On the other hand, someone new to the hobby does need to know about the less expensive options. Cardboard and styrofoam may not look as convincing and will not last as long as MDF and insulation foam, but they are more accessible to a hobbyist with a limited budget. Besides, the first few projects for someone starting out will be learning experiences, so why bother driving up the price of materials?

The pictures in each book really bring home the different times they were published in. The terrain in the 1996 book is less detailed, lacking the professional polish of the terrain in the 2003 book. Likewise, the models in the 1996 books are boldly painted with the green bases of the "paint it red" period. The 2003 book's models look more familiar to a current gamer. Each one shows the full panoply of techniques and materials: blending, highlighting, washes, and various basing materials. Neither approach is wrong, mind you. I certainly wouldn't feel comfortable painting a model without washes, static grass, and paints available in triads. But the look of the models in the 1996 version does have a certain charm.

In the end, both books are products of their respective times. Side by side, the two provide alternative views on the same subject. The 2003 version is relatively current. Mastering the materials and techniques in the 2003 version will allow the reader to make quality terrain. The only big change in the decade since the book was published is the growing availability and quality of pre-made terrain, something well outside the scope of this discussion. However, the 1996 presents an alternative view - older techniques using cheaper materials can also produce quality terrain. Will it lack the polish of the terrain in the 2003 book? Maybe, but for many gamers, that doesn't matter. There is good stuff in both books, depending on the project and the situation.

Thursday, November 10, 2011

The Work Bench #1

Here are some recently completed terrain pieces. I put these together for three reasons. One, I realized that I would need more terrain if I was going to try running Tomorrow's War. Two, more terrain is always helpful for miniature wargames and role-playing games. And three, terrain don't need no reason.

These are a couple of craters from GW's Moonscape set. The plastic is pretty thin on these. I'm not sure how well they will hold up on the long term. Getting them tabletop ready was pretty straightforward. I glued down some sand on the smooth edges for texture. Painting consisted of a gray spray primer followed by a brown basecoat, black wash, linen highlight, and brown wash.


Presented below are a few stands of trees. These were Christmas diorama trees purchased on sale after the holidays last year. I'm still working out a streamlined way to get these tabletop ready. This time, I started with a green spray paint to cover up the white snow effects. Flock was applied with brushed on tacky glue. After it was dry, I used a spray bottle to apply a layer of watered down glue to further secure the flock. The original bases were replaced with tree trunks sculpted from two part epoxy putty and mounted on wood circles purchased from a hobby store. I glued down some sand to texture the base and painted the trunk and stand.


Next time, I might try brushing on some paint to cover up the white snow effect rather than spraying it on. Very little of this layer actually shows through the flock and it will save me a trip outside.