Showing posts with label 28mm. Show all posts

Tuesday, September 23, 2025

XL-07 Out of Mothballs and Into a Ditch

The time to drag this unfinished project out of storage has come! It's based on modifying and repainting a "Lightyear Hyperspeed XL-07" - a toy tie-in to Lightyear (2022). That's the Buzz Lightyear movie with Chris Evans and the talking robot kitty. The Lightyear movie didn't seem successful, but it did spawn some toys that work pretty well next to 28mm miniatures. This project smoothly went through customization, priming, and masking phases until I hit a snag with the first coat of paint. It was banished into storage in 2022.

The moment when I found out how good of a masking job I did.

Previous Project Posts:

Lightyear Hyperspeed XL-07 Pre-Conversion
A post about the toy, it's features, and how it scales with 28mm miniatures (answer: quite well).

Lightyear Hyperspeed XL-07 Modest Modifications
Posting about the small details I added to the toy.


Zenithal Priming

I chose three spray primers with an eye towards the colors that would eventually go over them.

Krylon Fusion All-In-One Paint+Primer Matte Black
This went all over the toy as a base coat. Bonded to the plastic nicely.

Krylon Fusion All-In-One Paint+Primer Matte Coffee Bean
A dark brown that I sprayed over the top of the toy. My original intention was to paint the red directly over this, but it turned out too dark. However, it still provides a good undercoat for certain areas such as the cockpit.

Tamiya Fine Surface Primer (L) White
A highlight layer sprayed over the top of the toy. This resulted in a zenithal prime simulating light shining down on it. This stuff is the only reason I'm reluctant to take up an air brush for priming.

Not bad. I've done worse.

Masking and Painting

I next masked off sections of the engines and the canopy. Both are getting metallic coats and I didn't want multiple coats filling in the details. I have enough experience with masking off sections of a model to know how little I know about it. This was good practice as the masked off sections were mostly straight shapes.

Krylon ColorMaster Paint+Primer Matte Poppy Red
This paint delivered good news and bad news. The dark and light underlayers show through the red paint. This makes the bottom noticeably darker than the top with a nice gradation in between. On the other hand, the paint was tacky in spots. I suspect the issue is with the different kinds of plastic used throughout the toy.

This illustrates something about our hobby - the only way to find out how two materials interact is to give it a try. No amount of internet searches, questions posed to online communities, or small scale experimentation will reveal every problem. These steps help, but it ultimately comes down to doing the thing and seeing how it works out.

I monitored the situation for awhile. The stickiness slowly improved, but not to the point where I felt comfortable painting over it. The project went into storage to give the paint more time to cure. That was back in 2022.

The green arrow indicates areas of paint removed with my thumbnail. The blue arrow points to where I gently scratched the paint off with a screwdriver. Note that the primer underneath doesn't seem to be damaged.

Updates

One of my hobby goals for this year is to get back into miniatures painting. With only a few months left in the year, I went digging around for projects to tackle. The red paint finally seemed to have cured which I checked on it. That sent this project back to my dusty work table.

Removing the masking tape revealed some clean work at protecting the sections I didn't want painted red. It's not a perfect job, but it's better than some of my prior attempts at masking. I'll want some more practice before taking on something that requires masking irregular shapes.

I brought out the paint brushes for the next step - the canopy's first coat of metallic color. I chose a new-to-me paint - Vallejo Game Color Metallic Tinny Tin. Basically, it's the replacement for my long dried up pot of Tin Bitz and does a wonderful job. It pops over the undercoat of Krylon Coffee Bean. I'm planning to add gold highlights over it to simulate sheen, but that's for later.

Then I made a mistake. Rather than use a miniature paint for the engine sections, I decided to test out a craft paint over one section - FolkArt Treasure Gold in Antique Silver. It went on thick. The brush marks were obvious and I worried about the details being filled in. I discovered the real problem after it dried. It did not adhere to the surface at all. I was able to remove it with my thumbnail.

At this point, I'll have to remove the FolkArt paint before moving on. Fortunately, I only painted one section with it as a test. I suspect that the FolkArt paint would do better on a more porous surface. I'll test it again when I have a project using MDF, cardstock, or something similar. For now, I have some scraping to do before I resume this project.

Monday, September 22, 2025

Citadel SKULLS First Impressions

DISCLAIMER: I bought this box of Citadel SKULLS with my own money. I have no connection to Games Workshop except as a customer. The opinions expressed in this post are entirely my own brand of snarky nonsense.

Surprise! It's a box of skulls.

This product is exactly what I expected - a box containing four sprues of 28mm scale plastic skulls. It's from our hobby's leading authority on molding skulls on models - Games Workshop. The Imperium of Man in 40K is a prime example. Just look at the sheer number of skulls they slap on everything that can't run away fast enough. Armor? Gear? Vehicles? Industrial machinery? Buildings? Skulls, skulls, skulls, skulls, and skulls. No need to ask if they're the baddies! They are.

The back of the box claims there are 340 skulls contained therein. Closer inspection reveals that 20 of the models are, in fact, jawbones. However, I don't think that the jawbones are included in the 340 skull count. Even if they are, that's still over 300 skulls. That's plenty of skulls for all but the most ambitious projects.

Four plastic sprues of skulls. All kinds of skulls.

Variety is pretty good in this product. Roughly half the models appear to be based on human skulls. The larger models are skulls of various non-humans. A fair number of the skull models are specific to Games Workshop properties. The Kroot skull models are pretty distinctive and may need modification to fit another setting. On the other hand, few are going to quibble about using "Ork" (40K, sci-fi) skulls as "orc" (fantasy) skulls.

This is the kind of product that most will slowly use up over several years. One or three skulls dressing up a miniature's base gets the point across. Even a pile of skulls to dramatically pose a miniature on will only use a dozen or so. I don't foresee the need to buy another box for myself coming for awhile. Unless I get an idea for some project that needs hundreds of 28mm scale skull models. Like a wall of skulls or something.

Okay. I need to leave that train of thought behind before it gets me into trouble.

Price? It's Games Workshop, a company that takes exceptional pride in their products and only lets others play with them if they part with substantial amounts of money. If there are more cost effective products that serve the same purpose, please let me know. I don't know how much products from the UK are going to end up costing here in the US over the next few years.

TL;DR: This is a good option for folks who need a few hundred 28mm scale plastic skull models, but check around for less pricy alternatives first.

Tuesday, October 29, 2024

Reaper Bones 77046 Bat Swarm

As far as I can recall, it's been a year since I last slapped paint on a miniature. There was a couple of terrain projects during that time, but that's not quite the same kind of painting. "Tabletop standard" has a different meaning when applied to miniatures versus terrain. People pick up miniatures, hold them up to their faces, scrutinize the things, and ask about the lack of painted on eyes. Terrain only needs to be painted well enough to get the point across.

It's been way too long.


What did I have to work with? Wiping the dust off my wet palette revealed it to be fine. Surveying my paints had mixed results. The dropper bottle stuff seemed fine, but all needed a through shaking. The sheer incompetence in plastic form that are Games Workshop paint pots was another story. About half of it dried up, leaving nothing but hard flakes and wasted potential. My brushes are all fine, being stored well out of reach of my daughter's cats.

I decided to start with something straightforward. Something that would look fine with a base coat, some shaky brushwork, whatever highlighting I could muster, and awash to cover up my mistakes. That all added up to a Reaper Bones miniature from my pile of shame.

This miniature depicts a swarm of bats flying around a grave marker. It fit the season and didn't seem too demanding of my rusty skills. A nighttime scene limited the colors I needed - it's all dim lighting and shadows.

I described my process for preparing and basing Reaper Bones miniatures in this linked post.

For my first attempt, I painted the whole thing black and went overboard with drybrushing it gray. Trying to recover with a black ink only made it worse. I covered it all up with a black base coat again to reset and start over.


Paints used:
  • Reaper Master Series Pure Black 09037 - used because the last of my Citadel Colour Chaos Black died in the bottle.
  • Citadel Colour Codex Grey - still clinging on to life.

Instead of jumping straight to a medium gray, I used a mix of black with a little gray for the first drybrush layer. I added more gray for each following layer, getting less aggressive with the drybrushing each time.

I highlighted certain areas with an even mix of black and gray. I paid particular attention to the edges of certain bat wings, the grave marker, and a skull on the ground.

The final touch was to reintroduce shadows. Some areas that didn't need it got hit with the previous drybrush layers. I watered down the black paint remaining on my palette and used it as a wash. The wash was applied selectively. Only the areas that would be in shadow and needed to be darker got hit with the wash.

The end result is a serviceable miniature. More importantly, it a start to get me back into miniature painting. I'll likely ease back into it with another Reaper Bones miniature or three before tackling something more exciting.

Tuesday, May 30, 2023

After Easter: Plastic Egg Sci-Fi Scatter Terrain

I ended up with a significant number of plastic eggs this past Easter.

Lacking ideas of my own, I posed the question of "how can I use these for tabletop gaming terrain" in various places online. There were plenty of helpful suggestions and I'll be exploring those ideas for as long as the supply of plastic eggs holds out. I'm grateful to everybody who took the time to reply.

Needing a quick and easy project to get back into the swing of things, I picked out one that came with a detailed build guide. Dice Mechanic Games has a comprehensive "Micro Reactor" tutorial on their website. The tutorial includes needed tools and materials in addition to build instructions. One thing that's not clear at first glance is that this build requires plastic eggs that are a bit on the small side.

Rosie scores more salvage.

Construction

The basic idea is to glue an egg half on top of a plastic bottle cap. Handling the egg halves can get tricky - the plastic is prone to cracking, but I avoided breaking either of them. This uncomplicated process results in an interesting shape that can be enhanced with any greeblies that might be on hand. I ended up playing around a little to see what techniques I could carry forward to future projects.

I might have overdone the wires, but it's good practice.

The blue one is an experiment in using short lengths of salvaged electrical wire to represent cables or hoses. The wires were added after priming and painting. The terminals and connectors are plastics beads from the craft store. It is a good way to add mechanical complexity to a model by connecting various parts.

To be honest, I'm not sure which is the front and back on this model.

I attached a few stickers to what would become the red one to represent after market panels covering up improvised "improvements" and repairs. Looking at it now, the panels seem too uniform to be convincing, but the idea works well enough. If I were to build something of more ramshackle construction, I might go for covering much of it with overlapping stickers.

The "hat" on top of the red one is the plastic valve from a bag of coffee. Here's a short video on how I wrestled it out:


Priming and Painting

I spray primed both pieces with some black Krylon from a can that I'm trying to finish off. That got followed up with some Tamiya Surface Primer (L) in gray, sprayed in a zenithal pattern from the top. Masking off the sections that would later be painted metallic, I reached for a couple more cans of Krylon I was trying to use up. The blue is Krylon ColorMaster Paint + Primer Satin Iris and the red is the same brand in Matte Poppy Red.

Don't let the name fool you - this stuff comes in all kinds of colors.

The metallic sections offered me a chance to try out something new to me. FolkArt Treasure Gold came to my attention thanks to one of the many hobby YouTubers I follow. I brushed a coat of 5554 Antique Silver over the black primer, being careful to leave some black showing in the recesses. A little 5552 Platinum worked well as a highlight layer on the metallic areas. I also brushed on both metallic paints on various places to simulate scratches and other wear.

FolkArt Treasure Gold, despite the name, comes in a variety of colors. It works well for dry brushing and similar techniques, but seems a little thick for using as a base coat. I'll have to use it some more to get a better feel for how to use the stuff.

The pieces still looked too pristine. This called for a coat of wash. I mixed up some Liquitex Matte Medium, Liquitex Soft Body Payne's Grey, and water. Despite wiping off the excess, I still spotted some pooling when I took a look at the photos I shot for this post. It's one of the dangers of photographing miniatures - every flaw becomes obvious after clicking on the photo and seeing on the screen.

"The energizer's bypassed like a Christmas tree, so don't give me too many bumps."

Wrapping Up

This was a great little project to get me back into the hobby after an involuntary break. These will make good scatter terrain for my next sci-fi game. No idea what kind of machinery they're supposed to represent, though.

Sunday, October 30, 2022

Finishing the Pack - Alternative Armies EH03 Space Brains

October is a good time for horror themed projects. I painted up one of these figures last year for that very reason. Then I forgot about the rest of the pack until I was looking for a horror-themed painting project as this Halloween loomed closer. B-movie horror is still horror, so I finished the other four.

A brainy bunch. Last year's test model is in the middle.

Alternative Armies sells these floating, gun-toting brains in packs of five. They work as gray matter extracted from enormous, mutated, alien conquerors in a variety of scales. Their ability to fly could come from their cybernetic augmentations or be some psionic power from their vast, cold, and uncaring intellects. Their cybernetic enhancements otherwise seem to be limited to weapons and the sensors needed to navigate and find targets. Each figure in the pack is a distinct sculpt with its own configuration of cybernetics and arms.

Close up of the different robotic appendages.

I used the test model from last year as a guide. The improvised flight stands are the same. The paint job is almost the same – there were two exceptions because I couldn't resist tinkering. The squishy thinking bits got a layer of highlighting using a mix of white and the Reaper 09281 Brains Pink that I used as a base color in those areas. The cerebral areas also got additional coats of wash. It gives those areas a raw and bloody look. I kept the dark look of the cybernetics - they remind me of Borg implants and add to the menacing appearance.

Last image from some remote outpost or a bunch of cybernetically enhanced brains dropping an album?

Now I need to consider when these will hit the table. Five Parsecs From Home? Or do I send them after the crew of USS Phoenix in our Star Trek Adventures campaign first?

Friday, October 21, 2022

Reaper Bones 77037 Medusa or How a "Warm Up" Project Comes in Handy

I suspect that this miniature - packing a bow and quiver while featuring the lower body of a snake from the torso down - was inspired by the Medusa in Clash of the Titans (1981). This is the white plastic version. I received mine as a backer reward from the first Reaper Bones Kickstarter.

A quick miniature painting project is the best way for me to get back into crafting tabletop gaming stuff after a break. Using a Bones fantasy monster miniature is ideal. Bones miniatures tend to be inexpensive and getting paint on one knocks down the pile I still have from the Kickstarter. Since I'm coming back after a break, I'm more likely to make mistakes. I'd rather do that on a model that will only be on the table long enough for the player characters to remove it violently. Unfortunately, I ran into more problems than I could have anticipated and a "quick" project turned into a "longer than I thought it would take" project.


Planning and Preparation

Most of the Medusa miniatures I've seen online are a shade of green. I decided to be different and go for a brown color scheme.

I posted my usual approach to preparing a white plastic Bones miniature elsewhere on this blog. Short version: I clean the miniature thoroughly with warm soap and water. Then I glue it on a one inch steel fender washer. Finally, I hit it with a mix of FolkArt Glass & Tile Medium and either brown or black paint. This acts as a primer coat. For this project, I went with brown.


First Paint Pass

This was supposed to be the only paint pass, but things didn't go as planned.

Tail and Hair
FolkArt 231 Real Brown
FolkArt 479 Pure Black

The first coat was a mix of Real Brown with some Pure Black to darken it a shade or three. Real Brown was used over that as a highlight. This really brought out the scales on the tail and torso.

Skin
Reaper 09221 Olive Skin
Reaper 09041 Tanned Skin

Base coated with Olive Skin with Tanned Skin used over it as a highlight.

Bow and Quiver
Reaper 09041 Tanned Skin

The Tanned Skin color works as wood and worn leather as long as a wash is used over it.

Bracelets and Other Metallics
Citadel Colour Tin Bitz
Citadel Colour Shining Gold

I used this over the bracelets and pretended that the bare breasts were really sculpted bronze plates worn over the breasts. The dark brown metallic base color is a little too dark, but the brighter metallic brushed on as a highlight makes it look like its catching more light in some areas.

Wash Coat
FolkArt 231 Real Brown diluted with water

There were a few spots that needed some help after I was done painting. A wash sometimes works as a quick fix, but wasn't enough in this case.


The Problem

The issue I kept running into was the paint running off the raised areas and exposing the bare plastic underneath. Early production Bones miniatures used a white material that sometimes repels water and water-based paints when painted right out of the package. (More recent Bones miniatures use a grey plastic and may not have this issue.) A good cleaning and a coat of FolkArt Glass & Tile Medium usually solves the problem, but didn't seem to be as effective on this project. Looking back, using craft paints instead of higher density artist or miniature paints may have contributed to the difficulties I was having.


Second Paint Pass

My new plan was to hide all the mistakes and patchy spots of the first pass with another coat of wash. Then I could brush on highlights over the wash coat and nobody would know unless they read this blog post.

Wash Coat
FolkArt 231 Real Brown
FolkArt 479 Pure Black
Liquitex Matte Medium
Water

This is a much darker wash than the one I used at the end of the first pass. It also holds together better due to the Matte Medium keeping the pigments in suspension.

Tail & Hair Highlights
FolkArt 231 Real Brown

Skin Highlights
Reaper 09221 Olive Skin

Metallic Highlights
Citadel Colour Shining Gold

The wash caused the previously applied colors to blend together. Here I tried to make the raised areas stand out again.

Basing
Mix of sand, FolkArt 231 Real Brown, PVA glue, and water
FolkArt 420 Linen

My usual approach to texturing and coloring the base of miniature is covered in more detail elsewhere on this blog. Once the mix was dry, I brushed on the Linen to bring out the rough texture.


Final Paint Pass

The second pass fixed most of the areas where the paint ran off during the first pass. There were still a couple of raised areas were much of the paint flowed off, leaving them significantly brighter. Worse, the details on the miniature were getting lost. Using Real Brown as a highlight over a mix of Real Brown and Pure Black works under a bright lamp, but is too subtle a difference to notice in other lighting conditions. I needed one more pass to highlight the details further and cover up the last remaining spots.

Highlighting Layer
FolkArt 420 Linen
FolkArt 231 Real Brown

Straight Linen would be too bright on its own, so I added a touch of Real Brown to darken it slightly. I used this mix over all the non-metallic areas to bring out the raised details and highlight certain areas. It also served to cover up the remaining spots.

Wash Coat
FolkArt 231 Real Brown
Liquitex Matte Medium
Water

Even darkened down with a little Real Brown, the highlight mix was still a little too bright when I was finished with it. I brushed on Real Brown diluted with water and Matte Medium to blend the layers together.


Wrapping Up

I tend to be more prone to making mistakes after a break. This makes "warming up" with something like a Bones miniature worthwhile for me. The process of engaging with a project can come back to me while working on something that only has to be good enough.

As for the Medusa, this miniature will do fine when it goes on the tabletop. All it has to do is menace the player characters until it runs out of hit points.

Wednesday, October 12, 2022

Lightyear Hyperspeed XL-07 Modest Modifications

A quick update on this project. September 2022 was not a good month for me. I couldn't cobble together any hobby time until last weekend.

Not as much of a conversion as I first planned, but sometimes less is more.

Finding parts to add a few more details proved more challenging than I counted on. The usual approach of digging around for model kit parts and searching the bits collection wasn't fruitful. Most of the things I found were just too big or looked out of place.

One thing that did work was a round plastic bushing. I used it to add detail to the blank area inside the thruster. This was the spot that was bothering me the most for some reason. The bushing will be nothing but a vague shape in the darkly painted interior when I'm done, but even that will give the impression of mechanical workings.

Rear view. Note the plastic bushing filling out the thruster and the MDF blocks on the sides.

A scaled down approach was in order for the rest. My collection of tiny bits isn't as extensive as the rest. I found most of what I needed in the leftovers from the various MDF terrain pieces I've built over the years. Some of the terrain had fine details that were exposed by pushing out the MDF left after laser cutting. Most are simple shapes that are handy for projects like the monowheel cycle I scratchbuilt earlier this year.

MDF and many plastics form a solid bond when joined with CA glue. I stacked the deck a little more in my favor by using some trusty Gorilla Super Glue.

She may not look like much now, but she's got it where it counts.

A couple of angled MDF parts form canard-like additions to the sides of the fuselage. These would be absurdly small on any other craft, even at this scale, but they don't look out of place compared to the size of the actual wings.

Two rectangular MDF parts hide some mold lines on the rear. They extend the existing shapes and should blend in after painting.

A pair of cylindrical MDF parts suggest sensors or the business ends of weapons protruding from the twin noses of the spacecraft. They give it a slightly more aggressive appearance than before.

Front view. Note the MDF "gun barrels" and canards.

I could add more details, but the work I've done fills in the blank areas and mold lines that I wanted to fix. I'll be spray priming it next. Painting may have to wait until I decide on a color scheme. Do I want a sporty civilian flyer, a rugged scout ship, or military light attack craft?

Saturday, September 10, 2022

Lightyear Hyperspeed XL-07 Pre-Conversion

I'm planning on adding some details to this toy, slapping on some paint, and putting it on the tabletop as a 28mm scale sci-fi terrain piece. This post takes a look at the toy in its pristine state right out of the box. This is for the benefit of other folks contemplating similar projects by giving them a look at what they would be working with.

Front profile view before I start gluing stuff to it.

It Would Be Nice If I Was Being Paid For This, But No

The toy represents a spacecraft from the Disney Pixar movie Lightyear and was made by Mattel. It retails for $12.99 USD. I probably should have waited for a sale, but I couldn't tune out the little voice in my head telling me that what I really need right now is another project. This post isn't sponsored, by the way. Nobody at Disney, Pixar, or Mattel is that crazy.


On Appearance and Customization

There are other spacecraft toys in this line, so anyone thinking of picking one up will have a selection to choose from. I choose this one for a couple of reasons. First, the larger cockpit canopy compared with the others offers a little more wiggle room for scaling. Second, if I squint and tilt my head, this one kinda reminds me of the Earth Defense Directorate "Thunder" fighter from Buck Rogers in the 25th Century television series (1979-1981).

The general appearance of this toy is generic enough to fit into a variety of sci-fi settings. While it is part of a movie released by a major studio, it isn't as iconic or recognizable to sci-fi fans as a Star Wars TIE Fighter or Star Trek shuttlecraft. It wouldn't look out of place as a static terrain piece in any sci-fi setting with single-seat aircraft or spaceships. A fresh coat of paint will only help to conceal its toy store origins.

Landing gear close up.

There's a good amount of detail on this toy right out of the box. The solid shapes are broken up with panel lines and other mechanical looking details. The cockpit opens to reveal a detailed interior. There is also a set of retractable landing gear for the toy to sit on. Frankly, I wouldn't blame someone for just weathering one of these with a coat of dark wash and calling it a day.

Still, I just can't resist giving it another detail pass before reaching for the paint. The round exhaust nozzle looks good, but the interior isn't deep enough to convey that it's there to generate thrust. I'll likely end up gluing something in there to represent some kind of rocket plumbing. There's also a couple of spots where I could add gun barrels, sensor arrays, or other mechanical details to further customize it.

Close up of rear thrusters.

On Scaling

I shot a couple of photos for scale comparisons.

Rosie rarely gets to work on anything brand new.

One features my Reaper Miniatures Rosie (28mm scale) standing next to it. Sliding into the cockpit wouldn't be too tight a squeeze for her, but a model scaled for the heroic end of 28mm or 32mm might be a snug fit. On the other hand, a 15mm model might get lost in there.

15mm GZG, pilot figure that came with the toy, 28mm Reaper.

The other photo compares the pilot figure that comes with the toy with Rosie and a Light-Duty Vacc-Suit model from Ground Zero Games (15mm scale). The pilot figure slides nicely into the cockpit, so its safe to state that it's scaled with the toy. An eyeball comparison places the pilot figure somewhere around 25mm scale.

I'd say that the toy is close enough to work with most 28mm scale models with the understanding that this toy represents a small vehicle. Think of something like a Rebel Snowspeeder or an A-Wing from Star Wars - basically a cockpit bolted onto a propulsion system. It could be used as a larger spacecraft in 15mm scale if the canopy is painted opaque and kept closed to conceal the interior details.

Rear profile view as I think about a paint scheme.

Wrapping Up

$12.99 USD for a sci-fi terrain piece isn't bad, but I completely understand waiting for a sale or discount. A static spacecraft terrain piece is nice, but most tables don't need more than one or two. Unless someone decides to build a hangar bay diorama with a squadron of these, of course.

Now I just need to pick through my bits collection and figure out a paint scheme. Maybe red?

Tuesday, August 30, 2022

Outta Storage & Off the Workbench: Brutal Cities Eternity Lab Module C

I'm at the stage where I'm happy with how this looks, but kinda tempted to give it another weathering pass...

Anyhow, this is part of the same modular line of sci-fi office buildings as Module A from awhile back. Both modules were assembled and spray painted at the same time and using the same methods and materials. Life decided to get in the way of my hobby after I completed Module A and the accessories that came with both kits - the doors and air conditioner unit. Module C sat in storage until I got back to it. I decided on a simpler approach for a cleaner appearance and in the name of Getting It Done.

Sarah keeps watch while Rosie figures out what's wrong with the air conditioner.

Spray Coats
See Brutal Cities Eternity Lab Module A post.

Highlighting
Khaki areas: FolkArt 420 Linen diluted with water.
Blue areas: FolkArt 520 Dark Hydrangea diluted with water.

Diluting the craft paints allowed me to build up subtle gradations in the corners and other areas that would be more exposed to light.

First Wash
Mix of Liquitex Soft Body Payne's Gray, Liquitex Matte Medium, and water.

My goal was to augment the shading effect already in place from spraying the base coats in a zenithal pattern. This wash was applied over the entire surface and was allowed to pool in the recesses while the excess was wiped away.

Side view with A/C unit on top.

Second Wash
FolkArt 479 Pure Black diluted with water.

The shadows didn't quite look dark enough after the first wash coat. I brushed this darker mix into the areas between the Khaki and Blue areas and other recesses such as those on the ladder.

Lights
FolkArt 520 Dark Hydrangea
FolkArt 480 Titanium White

Here I reproduced the techniques used on Module A. The Dark Hydrangea got stippled on and around the light. I mixed some Titanium White in the Dark Hydrangea and stippled it on a slightly smaller area within the first one. More Titanium White was added in each following layer until I was working with an almost pure Titanium White.

Module A stacked on Module C and accessories (doors and A/C unit).

This project illustrates the benefit of a more streamlined approach and the issue of putting a project on hold. I was able to get Module C to a tabletop ready standard with less work than Module A, even through this is a larger piece. On the other hand, the two pieces don't quite match due to the different techniques used. Any more Eternity Lab Module kits I purchase from Brutal Cities will likely get the simplified and faster approach I used from Module C. This leaves Module A as the odd one out, but I'm okay with that.

Still thinking about one more weathering pass...

The post on Module A has my thoughts on the build, product quality, etc. Long story short - Ryan at Brutal Cities makes good stuff. Sturdy, well thought out, and can fit a variety of settings from modern to cyberpunk to space opera. The cost of shipping from Australia is higher than I'd like, but I can't fault Brutal Cities for the realities of the international shipping. I'll just resort to my usual remedy of waiting for a sale to offset such costs.

Monday, August 15, 2022

Trash Bash Sci-Fi Fuel Drum

This was a quick and dirty proof of concept I threw together over a hot summer afternoon. The goal was to see what else I could do with a couple of plastic soda bottle caps other than make another wheel for a sci-fi vehicle. It could be almost any kind of sci-fi widget, but I'm going to develop it as a sci-fi fuel drum for 28mm tabletop gaming. The execution needs more refinement before I crank out a bunch for scatter terrain.

One thing I can't complain about is the cost of the parts.

Parts List
  • Plastic soda bottle caps x 2
  • Coffee bag valve x 1
  • Plastic beads x 3

Preparation

The soda bottle caps and coffee bag valve got a good scrubbing with warm soap and water. Then I sanded down the edges and tops of the soda bottle caps. The edges were pretty rough and I wanted to improve how well they fit together. On the other hand, the tops were too smooth and I was concerned about how well glue, primer, and paint would bond to the surface.


Assembly

Pretty straightforward. I formed the main body by gluing the pair of soda bottle caps together. The coffee bag valve and beads were glued on what I arbitrarily decided was the top.


Spray Priming

Krylon Fusion All-In-One Matte Black

Coated all surfaces, including the underside.


Spray Painting

Krylon ColorMaster Paint + Primer Metallic Aluminum

A single coat. Since this was a proof of concept, I didn't feel the need to go further with the paint job. Later iterations will get a coat of wash and some details painted with a brush.


Moving Forward

It's good enough for a proof of concept, but there are some issues that I'll need to fix in the next iteration. I didn't notice the lettering on the coffee bag valve until after spraying on the metallic coat. That will have to get removed next time. I might play around with the number of beads and find something else to add as a detail. Reducing the number of beads from three to two would match the number of openings on a real world fuel drum. Adding an angular bit would contrast with all the curves everywhere else. Finally, I'd like to try another color for the base coat.

Monday, August 1, 2022

Trash Bash Monowheel Cycle FINISHED

Here's a monocycle model I cobbled together from reclaimed materials. It started off as an experiment with making a wheel with a pair of plastic soda bottle caps and grew from there. When I last posted about this project, all I had left to do was put it on a base and paint it up. Finding my way forward took awhile.

Rosie inspecting some Atmospheric Water Condensers during her frontier days.

Basing

I started by attaching the model to a round plastic base with Gorilla Super Glue. This bond was only intended to hold everything together long enough to apply texturing mix to the base. The mix of sand, PVA glue, paint, and water that I favor sets like concrete once dry. The combination of Gorilla Super Glue and texturing mix produces a strong and durable bond.


Spray Re priming/Base Coats

Krylon Fusion All-In-One Matte Coffee Bean Paint + Primer
Krylon Camouflage Ultra-Flat Khaki

At least one more coat of spray primer proved necessary when I ran into problems painting the wheel black. The Tamiya Surface Primer didn't seem to bond properly to the plastic soda bottle cap. The Krylon Coffee Bean covered well and provided a flat, dark brown base coat. I followed up with Khaki sprayed in a zenithal pattern.

A little dirty and dusty, but still purrs like a kitten.

Painting

Wheel

FolkArt 479 Pure Black

A couple of coats over the entire wheel surface to represent rubber or some sci-fi substitute.


Body

FolkArt 437 Lipstick Red
FolkArt 932 Calico Red

I considered yellow or orange for the body, but went with red for the speed boost. Lipstick Red works as a dark base color and Calico Red as a highlight color.


Clean Up

FolkArt 231 Real Brown

I changed my mind about where some of the red went and gave those areas a coat of Real Brown. The dark brown produced a good undercoat for the metallic and cloth areas.


Metallic Areas

Citadel Colour Boltgun Metal
Citadel Colour Mithril Silver

I don't know how, but these old bottles are still going strong. The Boltgun Metal coated the areas representing bare metal parts with Mithril Silver lightly brushed over as a highlight.


Cloth

FolkArt 420 Linen

Linen seemed like a good choice for the sandbag seat cushions and the bags in the stowage area.

The only thing kept clean on this ride is the holographic projector for the HUD.

Weathering

FolkArt 479 Pure Black (diluted with water)
FolkArt 231 Real Brown (diluted with water)
FolkArt 420 Linen

The monocycle is supposed to be made of salvaged parts – much like the actual model - and used in the wastelands of some frontier world. A showroom new appearance didn't seem like the right move. The diluted Pure Black and Real Brown were each applied as wash coats. A heavy brushing of Linen produced a dusty appearance. If I do another project like this, I might use a Silver Sharpie to add some chipped paint and other details before applying the washes and drybrushing.


Base Clean Up

FolkArt 231 Real Brown
FolkArt 420 Linen

I needed to cover up some of the red paint that ended up on the base. This step also ties the ground colors to the weathering colors.


Wire

Adding a wire to connect a couple of the parts together was always part of the plan. Unfortunately, I forgot about it until everything was painted, but before I started weathering the model. Fortunately, the wire color works with the rest of the model and the wash coats help to tie it in.


Heads Up Display

The final step was to attach one of the Warsenal Fluorescent Scifi Screens I purchased way back in 2020 to the part representing a holographic projector.

Rosie: "Now where did I pack that screwdriver?"

Fictional Background

Let's wrap up with another Kessler's Catalog entry. I often think of how elements of a model would fit into a fictional setting while working on it. Writing these thoughts up into a backstory gets them out of my head.

This monowheel vehicle is representative of those used in remote regions of thinly settled worlds throughout the frontier sectors. Such vehicles serve a variety of operators such as couriers, surveyors, salvagers, and scouts. Packs of similar vehicles see use in conflict zones as raiders.

The chassis is built on the remains of a planetary survey probe. The wheel was salvaged from the landing gear of a heavy interplanetary transport. The other components originated from sources to varied to be listed here. Reliability is surprisingly high, but some maintenance tasks are described as "a bit tricky" by our technical staff. Performance is good, but handling "takes some getting used to" according to our test drivers.

The wheel is a plastic drum with a synthetic rubber coating and a metallic core. It is electromagnetically suspended and rotated when the vehicle is in operation. Stability and control are provided by a variety of counter gravity and mass manipulation systems. While these systems reduce the effective mass of the vehicle while operating, true flight is not possible due to their limited output.

Energy storage is provided by a series of repurposed power packs distributed throughout the vehicle. These packs are tied into a single system and can be replenished at any standard recharging station. The large solar energy collection arrays standard for planetary survey missions are missing - likely removed and repurposed long ago.

Auxiliary power is supplied by an internal combustion engine designed for planetary exploration and colonial applications. The engine can burn a variety of hydrocarbon fuels, but is most efficient when using high octane synthetic gasoline or alcohol. There is evidence of another auxiliary power system based on a nuclear generator, but most of the components are absent.

- Kessler's Upcycling Sales Catalog

Tuesday, July 19, 2022

D&D Beholder Miniature Rebasing

I was reminded of a problem with this Beholder miniature after using it on the thumbnail for the "The AD&D Monster Manual (1979) A - Z: Episode 3: "B - Baboon to Beholder"" video. Basically, the material used for the base is too soft for the job.


Replacing the base was a quick and fun project. This video provides an overview of the process.

Wednesday, June 15, 2022

Reaper Bones 80008 Rosie, Chronotechnician

It's been months since I did anything with my Five Parsecs From Home campaign. Sizing things up, there's three things I need to continue and a substitute miniature for Lin is the easiest to check off the list. Lin, previously represented by Rosie, Chronotechnician from Reaper's Chronoscope line, failed to repair her signature Brutal Melee Weapon and will be wielding a more conventional weapon for the next fight. Fortunately, I received the Bones version of her miniature as a reward from the first Reaper Bones Kickstarter.

I didn't want to simply reproduce my previous paint scheme on this figure. First, it's boring. Second, a quick change of clothes along with the weapon makes sense for the character. Third, it would allow me to use the figure as a different character later on.

Lin's got a loaner weapon until her big wrench gets fixed.

Base

I glued the integral base to a spray primed steel fender washer. The gap was filled after painting the miniature with a variant on my standard basing mix. This variant adds black rather than brown craft paint to a mix of sand, PVA glue, and a little water to improve flow. Some gray drybrushed on after the basing mix dried completes the industrial look of the base.


Preparation

The same approach I use for all white Bones plastic. Details are at the end of this link.


Skin

Menoth White Base

This with a wash creates a pale skin tone. I've never been happy with this approach and moved away from it, but used it here to match the Chronoscope version I painted before.


Shirt

Reaper 09017 True Blue

This is a bright blue that coats well. As the shirt is a small, flat area, I didn't feel the need to paint any highlighting over what the wash I applied later would provide.


Weapon

Citadel Colour Chaos Black
Citadel Colour Codex Grey
Army Painter Warpaints Quickshade Dark Tone

Not the neatest or fanciest approach, but one that brings out the mechanical details.


Overalls

Reaper 09158 Olive Drab
Reaper 09177 Camouflage Green

These are darker and lighter versions of an olive green camouflage color. They work well paired as a base and highlight.


Leather

Reaper 09284 Lonestar Leather
Reaper 09110 Oiled Leather

This is the same combination I used for the leather on the metal version and has become my go-to for a base and highlight combination.


Hair

Reaper 09183 Cloud Pink
Citadel Washes Baal Red

Again, the same combination I used for the metal version. To my surprise, the Baal Red was still perfectly viable, but most red washes should work fine.


Wash

Army Painter Warpaints Quickshade Strong Tone

Everything except for the hair and weapon got a coat of this wash slapped on it. Again, this reproduces my approach to the metal version and remains how I paint Bones plastic.

Bones (plastic) version on the left, Chronoscope (metal) version on the right.

Chronoscope and (Early) Bones Comparison

This is a chance to compare the metal and plastic versions of the miniature. To my mild surprise, I haven't actually painted the same sculpt in two different materials before.

The details of the Chronoscope version are sharper and better defined when compared to the Bones version. This is the expected finding. The soft white plastic used in the initial waves of Bones doesn't seem to be able to retain fine detail like metal or the harder gray plastic that Reaper switched to later on. The difference in detail is significant. The face is less detailed and the goggles are a muddy mess. It made for a less pleasant painting experience as I kept hunting for details that I knew were there on the metal version.

A comparison between the metal and plastic versions is incomplete without discussing pricing. Here are the prices in USD at the time of this writing:

Reaper Bones 80008 Rosie, Chronotechnician $3.99 (USD)
Reaper Chronoscope 50016 Rosie, Chronotechnician $5.99 (USD)

The plastic version can be picked up for two-thirds the price of the metal one. However, two bucks isn't a huge price difference in absolute terms. It comes down to personal preference. Is the difference in detail worth paying a little extra? The Bones version wouldn't be my first choice as a hero miniature or display piece. Which material is the buyer more comfortable working with? Metal and plastic demand different approaches. A painter set up for one material may not wish to adapt to the other.

Bones (plastic) version on the left, Chronoscope (metal) version on the right.

Bones - even early Bones - do have a place. Most of my Bones collection is from the first Kickstarter and is therefore the white plastic from the beginning of the line. All of the ones I've painted are serviceable when painted to a tabletop standard. The majority of the figures are monsters or other opposition that will only be on the table as long as the players allow them to survive. Also, a Bones figure makes for a fun "rainy day" painting experience. The work goes quickly since I don't stress much about getting the best results possible like I might with a metal, resin, or higher quality plastic figure.

In the end, comparing this figure to its metal counterpart didn't change my option on early Bones miniatures. They are a cost effective option for the kinds of miniatures meant to be used in bulk. Orcs or zombies? Oh, yeah, I'm going for the white plastic Bones versions. Likewise, large miniatures are much more practical in any form of plastic when compared to metal. However, I'm happy to shell out a little more for a centerpiece miniature of metal, resin, or higher quality plastic that I'm painting to look the best I can manage.

Saturday, June 11, 2022

Trash Bash Pill Bottle Stasis Tube

Awhile back, I made some Stasis Pods using pill bottles as a quick and dirty project. The idea behind this terrain is to be able to place a 28mm scale miniature inside and still see it through the transparent pill bottle. The original set met a sudden need for the campaign I was running at the time, but I knew I could do better. This is my second try at the concept.

Final test fitting. Just waiting for its first patient. Or victim.

Top Cap
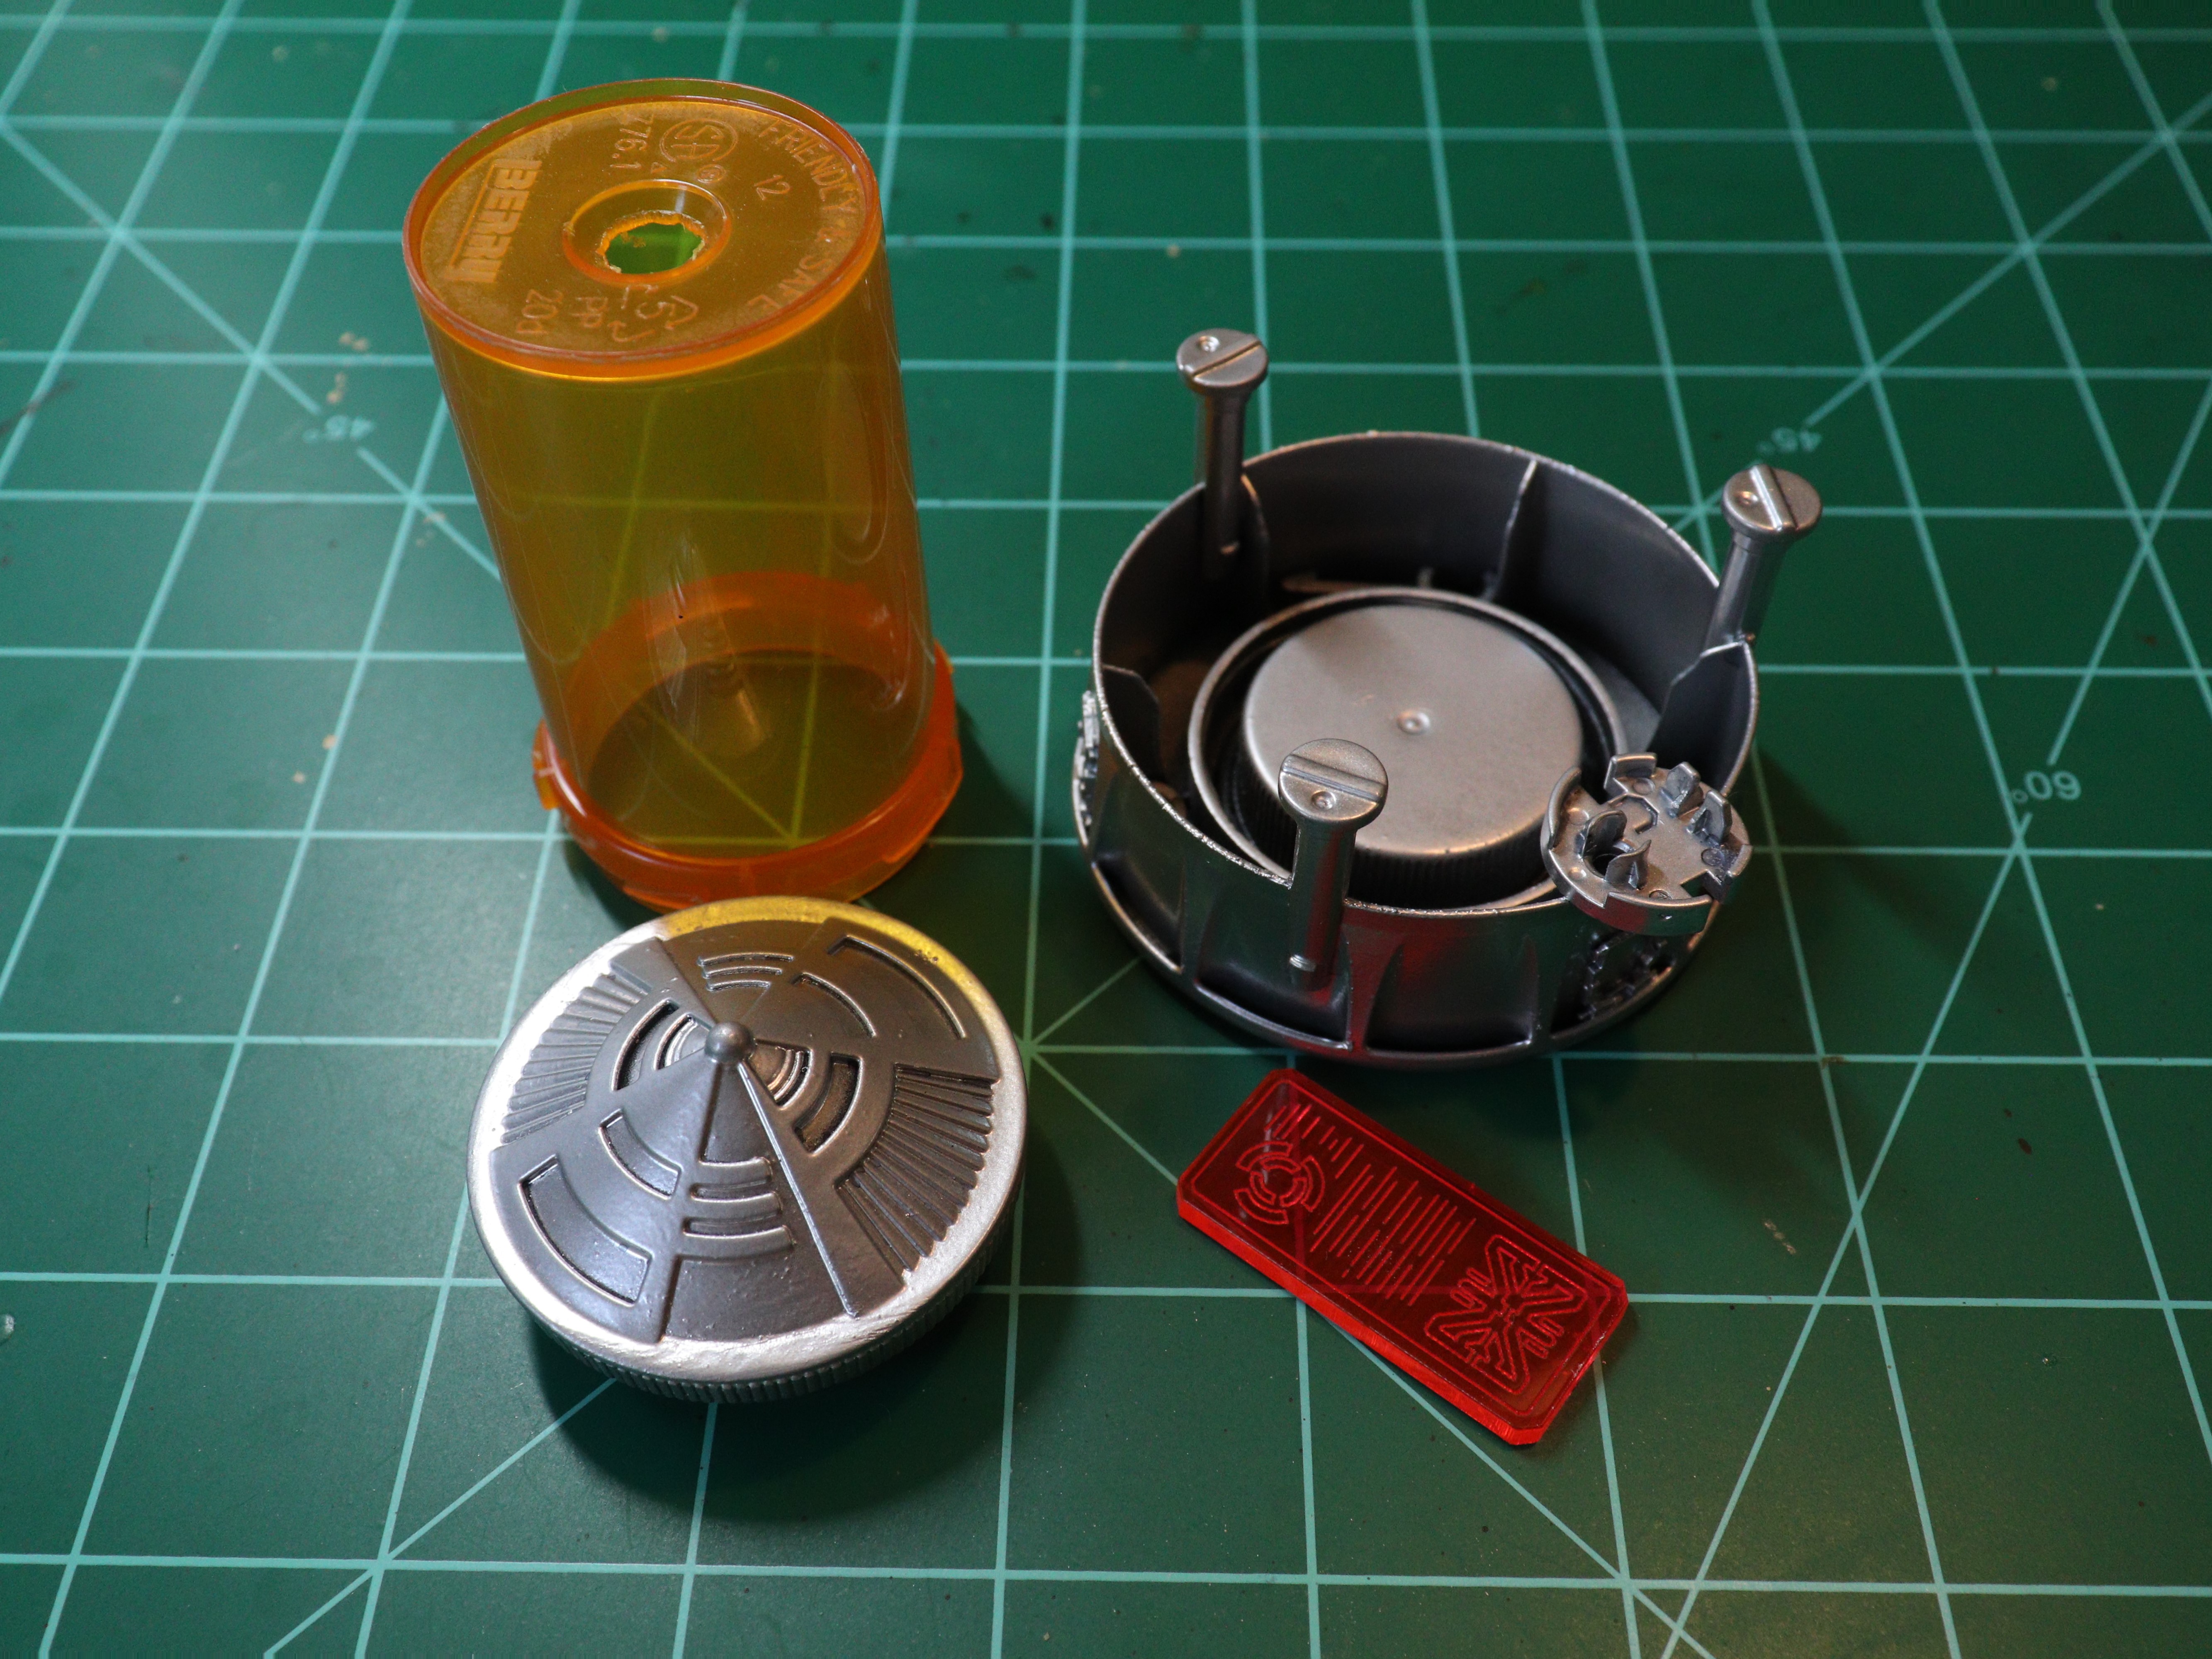
This is a McDonald's Happy Meal toy from ages ago. I'm pretty sure it's a Star Wars themed spinning top. I wiped it down and realized that the protrusion would get in the way of mounting it on the pill bottle. I didn't relish the idea of cutting through the tough plastic of the toy, so I did the other thing.

Stasis Tube Body
A transparent pill bottle with the labels removed and cleaned with warm soap and water. I drilled a hole to accommodate the top piece's protrusion.

Mounting Hardware
The bottom piece is the cap from a juice bottle. I removed most of the threading to improve the fit of the pill bottle.

Initial test fit prior to painting.

Mounting Hardware Internal Platform
I glued a bottle cap inside the juice bottle cap to cover up some markings. It also raises up any figures placed inside the tube.

Display Panel
From a set of Fluorescent Scifi Screens from Warsenal. I purchased these awhile back to add exactly this kind of detail to my terrain projects. Not sure about the color, though. I'll try the blue and green options before gluing anything down.

Various Mounting Hardware Details
The towers are plastic clips of some kind. I don't recall the source. The round piece that I used to mount the display panel is a salvaged printer part. The square details were recovered from a nonfunctional keyboard. Finally, the parts glued inside to add some internal detail are the same as the ones I used as arms for the "Astromecha" robot. I may add some wires to simulate hoses running between them at some point.

Test fit after black spray coat.

Painting
The top cap and mounting hardware were spray painted black and then metallic. I then applied a dark wash, wiping off any excess with a sponge.

Major components after painting and prior to assembly.

Assembly
The spinning top and pill bottle fit together perfectly. It's almost snug enough to not require glue. Almost. The fit of the display panel is also good, but it will also be glued in place once I settle on the color. The pill bottle sits evenly in the juice cap and can be easily removed so that a miniature can be placed inside.

Tin Man Miniatures Princess Livia recovering from a beach trip.

I'm content with the results. but I still think I can do better. It's a more convincing terrain piece than the originals. It's missing something, though. I'll have to give it some thought and make another attempt later.