Showing posts with label Pegasus Hobbies. Show all posts

Wednesday, October 20, 2021

Hexagon Construction Set Sci-Fi Industrial Towers

An inventory of my 28mm sci-fi miniatures and terrain suitable for Five Parsecs From Home revealed some gaps. I have plenty of sci-fi miniatures for a crew, but would have to proxy some of the aliens. Likewise, most of my 28mm terrain is fantasy, so I need more sci-fi terrain if I wanted to set up a table. I considered going with 15mm, but ran into the opposite problem - enough terrain, but a lack of miniatures. Besides, I could also use 28mm sci-fi for roleplaying.

Sarah keeps an eye out while Rosie performs percussive maintenance.

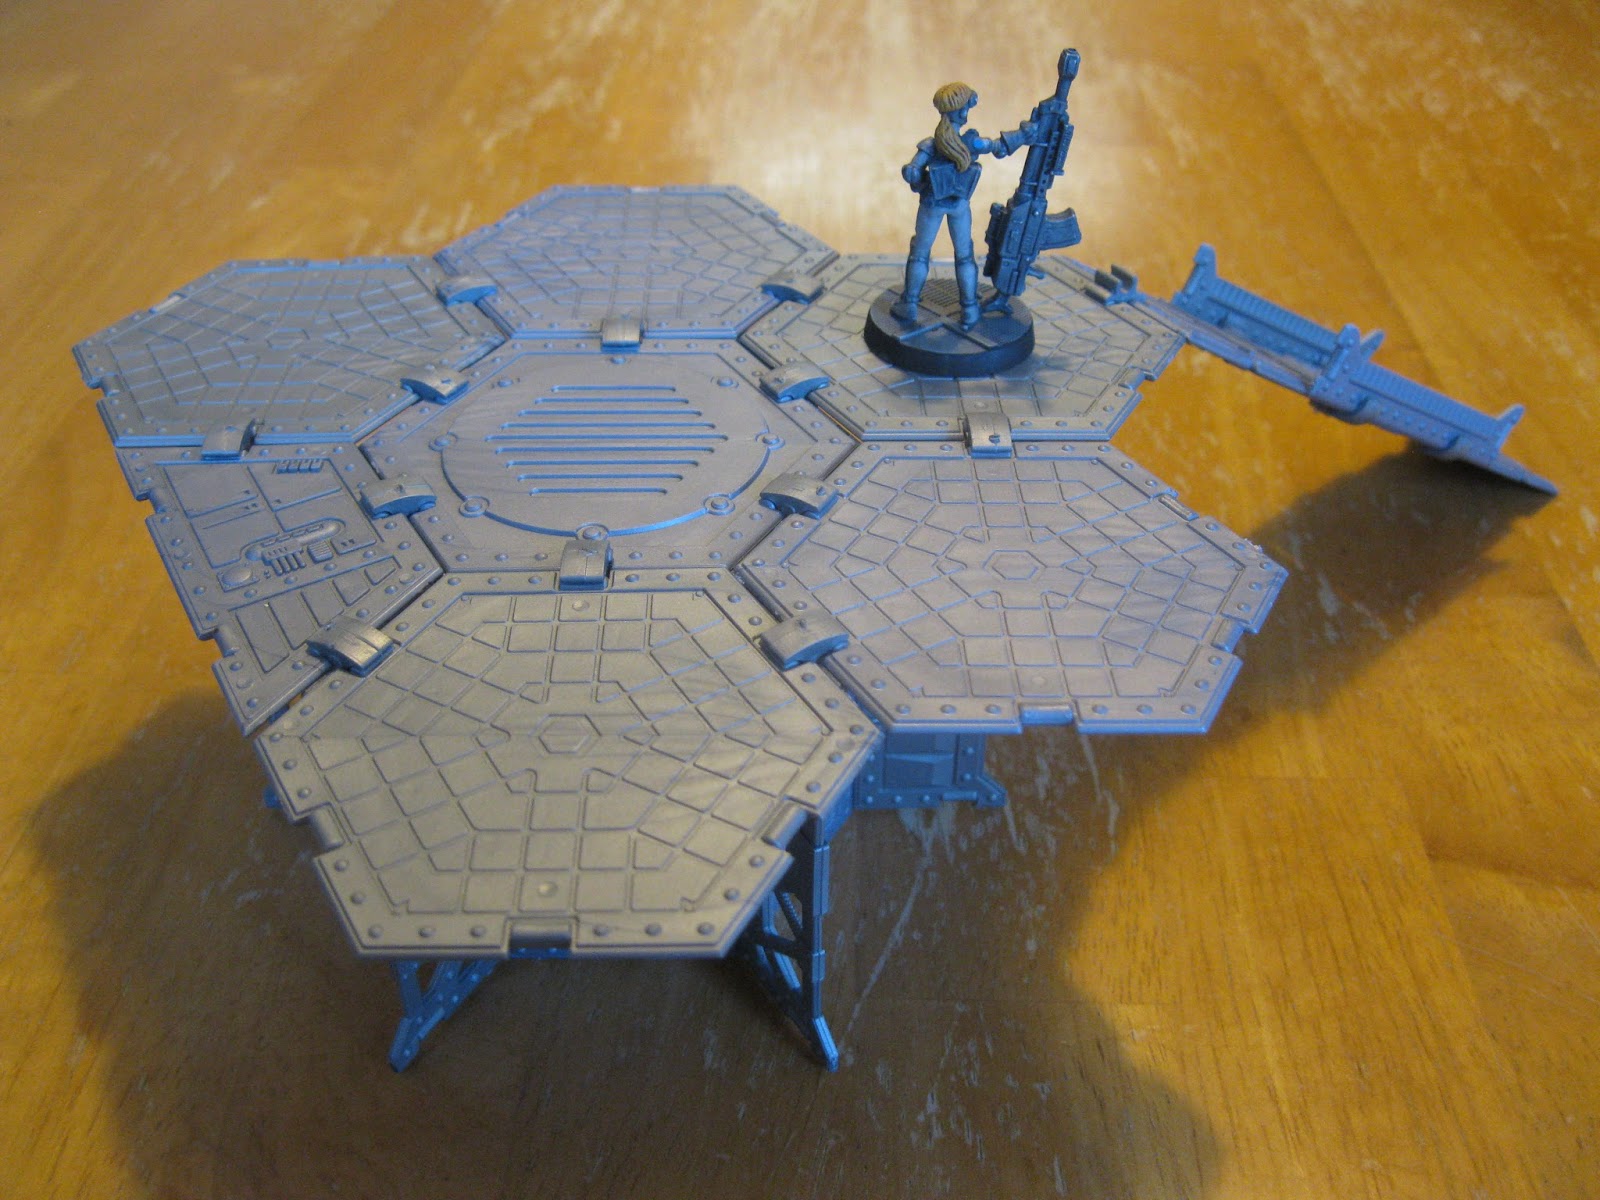
Fortunately, I have some solutions for my sci-fi terrain shortage on hand. There's the Power Plant Construction Set featured in a previous post. I also have boxes of materials to scratch build or trash bash something together. And I own two Hexagon Construction Sets - the remains of one with some choice bits still on the sprues and an unopened box I bought last year. Like the Power Plant Construction Set, these are made by Tehlog in Russia and distributed by Pegasus Hobbies in the USA.

Wanting to save the unopened box for later, I dug through what was left of the other one and cobbled these two pieces together. My goal was for the completed pieces to look like functional parts of some industrial system. There are features that look like hatches for accessing internal components to perform maintenance and repair. The sides have ladders to climb to the upper parts. The safety railings also provide plausible cover for any figures placed on top.

Sarah: "Did you hear that?" Rosie: "WHAT?! All I can hear is ringing! I've been hitting this thing with my wrench!"

The paint scheme is the same as the one I used for the red areas of the Power Plant test piece.

Underlayer
Krylon ColorMaster Paint + Primer Flat Black. An even coat on all visible surfaces.

Base Color
Krylon ColorMaster Paint + Primer Matte Poppy Red. This is a bright red on its own, but is significantly darker when used over a layer of black. This layer was sprayed down from above. This leaves some of the black underlayer showing for a shading effect.

Dark Wash
I applied a dark (gray-blue) wash mix on all surfaces and wiped off the excess with a sponge. This produced a further shading effect.

Brown Wash
The final touch was applying a brown wash mix using the same technique as the previous step. This gives the piece a more weathered appearance.

"Bug Spray" joining Sarah for some target practice.

These work as generic 28mm sci-fi terrain and should fit a variety of game settings. I might go back and add some weathering later, but they look good enough for now. Besides, I need to get more stuff like this finished so I can get a game of Five Parsecs From Home on the table.

These items are Mark I and Mark II McQuary-Mead Industrial Infrastructure Support Units. These models reliably serve many frontier colonies and installations, although they have been superseded by more advanced equipment in more settled areas. They are commonly used in atmospheric processing or temperature control systems. The Mark II can be distinguished from the Mark I by the additional equipment module. The improved range of features and performance of the Mark II come at the cost of higher operating expenses compared with the Mark I

These specific items are part of a larger shipment of recovered equipment sold off as surplus. The anti-corrosion coating are intact, although there is some surface discoloration. Each unit sold comes with an inspection report from our factory certified technicians. Our agent would be happy to discuss providing a service agreement during the sales process.

- Kessler's Upcycling Sales Catalog

Thursday, October 14, 2021

Playing with Power (Plant Parts)

Recently, I realized that I could use more 28mm scale sci-fi terrain. Nothing to do with a new game I want to try out. It just came to me out of the blue.

Honest.

The box is a little worse for wear, but the plastic is fine.

Digging around my pile collection, I came across a Power Plant Construction Set. Like the Hexagon Platformer Construction Set, it was manufactured by Tehnolog in Russia and distributed in the United States by Pegasus Hobbies. It's been awhile since I last saw a Power Plant kit on the market. I was kinda saving mine, but this seemed as good a time to put it to use as any.

Looking over the Power Plant sprues, I decided not to go with the build seen on the box. It would use up all of the parts in the kit for a single piece of terrain. Besides, the pipes, antenna, and other bits would be handy for other projects. But the generators and structural components looked promising for my immediate needs.

I put this piece together as a proof of concept and liked it enough to paint it up. It works as stand alone terrain. However, I may make similar piece with other parts from the kit and connect the two using some of the pipes.

As with the Hexagon Platformer parts, the plastic takes Krylon spray paint well. I disassembled the piece before painting so that I could use more than one color without the need to use masking tape.

"This one? She's a beauty, isn't she? Sure, there's some wear and she could use a good cleaning, but we've been running our local operation on her output. Not only that, but we've been making a pretty credit off selling the excess to our energy provider. Rumors? What kind of rumors? Well, nobody's really sure where it came from. The crew we bought it from wouldn't say. Wait! Where are you going?!"

- Sales representative, name withheld, Kessler's Upcycling

Rosie gives this bit of tech a once over before making an offer.

Underlayer
Krylon ColorMaster Paint + Primer Flat Black. All parts of the disassembled test piece got an even coat on all surfaces.

Red Parts
Krylon ColorMaster Paint + Primer Matte Poppy Red. This bright red darkened up when sprayed over the black to produce a nice industrial looking color. I sprayed the parts at an angle to produce shading when the piece was reassembled.

Metallic Parts
Krylon ColorMaster Paint + Primer Metallic Aluminum. A couple of light coats produced a smooth, shiny metallic finish. Again, the parts were sprayed at an angle to help generate the appearance of shadows on the finished piece.

Dark Wash Layer
The colors on the reassembled piece seemed a little flat in places, even with the shading that was already there. I mixed some dark (gray-blue) wash and brushed it over all surfaces. The excess was wiped off with a sponge to prevent pooling. The result provided additional shadows and brought out the recessed details.

Brown Wash Layer
Even with the dark wash, the piece still looked a little too new. A brown wash mix applied the same way as the dark wash layer gave the piece a more used look.

"We have no idea what it is, how it works, where it came from, who might come looking for it, and some junk yard wants to sell it off as salvage?"

- Doctor Solheim, Xeno-Archeology Department, Miskatonic University

It just fell out of orbit? Sure, pull the other one.

This piece started out as a test, but turned out well enough for the tabletop. I could add more weathering later, but I'd like to see what more I can do with this kit first. Before that, I have some other terrain ideas to pursue with the other materials I have on hand.

Tuesday, June 22, 2021

Pegasus Hobbies Technobridge

This is the Technobridge from Pegasus Hobbies. This is a "classic" product that I've been saving as quick and easy project. It's a relatively simple challenge that's still satisfying to finish.

Assembled and painted Technobridge with packaging.

The Technobridge is sold by Pegasus Hobbies as part of their Museum Models Collection. In spite of that, this product is clearly marketed for a certain miniatures wargame set in a grimdark future where there is only screaming, swinging weaponized chainsaws, and shooting at things. I've seen this product around since at least the early 2000s, but the packaging lacks any copyright information.

No written instructions are included, but putting together the twelve parts in the box is straightforward. Clean up took longer than assembly. There were some pegs to be cut off and a small amount of flash that needed the attention of a craft knife. The parts snap together using tabs and slots. The bridge surface is composed of two flat sections and two sloped ends. Eight parts make up the railings - four straight and four sloped to go on the ends. The box states that glue is "recommended, but not required." The parts fit together tightly enough for a display piece, but this particular bridge is destined to serve on the tabletop. I followed the recommendation and glued my bridge together.

Close up of Technobridge details and underside. How the parts join together can be seen on the right. I'm not sure why the bottom is detailed with rivets.

When the weather finally cleared enough to permit it, I reached for the rattle cans and went to work. The first coat is Krylon Camouflage Ultra-Flat Black. It provides a non-reflective surface and doesn't need primer when used on plastic. I followed that up with a coat of Krylon ColorMaster Paint + Primer Metallic Silver. I wanted a patchy, weathered look, so I didn't spray for complete coverage. A layer of dark wash accents the worn appearance. Experience taught me that washes tend to bead when applied directly on some Krylon paints. I used a sponge to wipe away the excess to prevent this and provide some streaking to suggest the direction of traffic over the bridge. The final touch is a little Craft Smart Premium Wax Silver Metallic Finish applied with a cloth to highlight some of the raised areas.

The assembled piece forms a raised arch that seems study enough to support large plastic models. The packaging mentions "Dirt Plunderer battle tanks" to give an idea of what models were in mind when it went to market. The plastic seems thick enough for regular handling, but I'm not looking forward to the improvised drop tests that occur during play.

Rosie directs a pair of oversized droids across the Technobridge.

The packaging gives the dimensions as "12 3/32" long x 7 3/32" wide" for a single assembled Technobridge. The packaging also mentions that the modular design allows multiple kits to be assembled into a longer structure. I'm not sure if I would go further than doubling the length. More than that and I would have concerns about how much weight it could support.

The industrial appearance of the Technobridge means that it should fit in a variety of settings ranging from sci-fi to steampunk. Although it was made with 28mm figures in mind, it could be used for 15mm games as long as nobody looks at the size of the rivets too closely. At $16 USD retail, it offers good value considering the versatility of the product.

Side view with 28mm Reaper Miniatures figure provided for scale. 

I had a fun time putting the Technobridge together and painting it up. It's fairly straightforward project and sometimes that just what I need to get me back on track.

Monday, September 7, 2020

Pegasus Hobbies Hexagon Construction Kit Review

Let's look at the Hexagon Construction Kit. I've posted about this product before. None of those posts are proper reviews - more like a couple of early impressions and a project that made use of this product. So what's in this kit? And is it worth getting?

The Hexagon Construction Kit "Large Box" and contents.

The Hexagon Construction kit has been around for awhile. The manufacturer is a Russian company named Tehnolog Limited (copyright 2003). Pegasus Hobbies distributes the kits in the United States. These kits were once a popular choice for 15mm to 28mm scale sci-fi wargaming terrain and used to be available from many online retailers. Either the supply of this product has dried up or the demand declined in the years since then. The kits are still available, but they are harder to find these days.

The "Large Box" Hexagon Construction Kit holds a dozen sprues of parts and a set of instructions. There are three different sprue designs and each sprue holds a variety of parts. Expect to spend some time with a hobby knife cutting away mold lines and flash. The most useful part of the instructions are the notes on how the five different connectors work. The rest of the instructions describe how to build the structure pictured on the box. I couldn't find any reference to anybody actually building that structure. Most folks seem to use these kits for building custom sci-fi wargaming terrain.

The connectors used to hold the parts together take up a significant amount of real estate on each sprue, but they are a necessary component to assembling the parts as designed. The connectors fit tightly enough not to require glue. That stated, I'm not going to judge anybody who uses a little superglue to make sure everything holds together. There are gaps between the parts when using the connectors, but they don't stand out at tabletop distances. The connectors can break during assembly, but the sprues supply plenty of them.

The sprues are made from a hard plastic. Each part has different greebles on each side. The details are sharp - the vents, bolts/rivets, and ribbing on the cables are all clearly visible. The parts take spray primers and paints well. Some highlighting and a wash is recommended to bring out the details.

The look of these parts is fairly generic, but they aren't universal. They might work for steampunk, but not for more traditional fantasy. They slide seamlessly into the grimly industrial look of darker sci-fi settings, but might not fit a sleeker sci-fi aesthetic where rivets look out of place.

The sprues with the titular hexagon parts (front and rear views) and my current storage solution for the connectors - medicine pill bottles (cap not shown).

This is the most common sprue - six come in each "Large Box" kit. Sprues like these were the basis of the Sci-Fi Landing Pad and Shelters project. Before that project, I considered using the square and rectangle parts to assemble some 28mm scale sci-fi cargo containers as scatter terrain. I decided against the idea after considering the number of 28mm scale sci-fi cargo containers on the market.

Sci-Fi Landing Pad and Shelters. The hexagonal parts make up the top of the landing pad. Note that seven hexagons were needed - I had to use parts from a pair of kits.

 Shelter details. Square and rectangular parts were used for most of the shelters, the landing tower, and the elevator structure. An earlier version of the landing pad incorporated a couple of rectangles for a ramp.

The sprues with the large rectangular, various triangular, and ladder parts (front and rear views).

Each "Large Box" also contains four of these sprues. I planned to use the large square parts as part a security barrier scaled for 15mm, but I had a better idea when I started a Star Trek Adventures campaign. Note that at least two kits will be needed for a complete cube. The ladder parts are a little large for for 15mm, but should work for 28mm. I'm reserving those for my next electrical box or trash bash terrain project. The small equilateral triangles can be combined into an additional hexagon part. I assembled them as the opening doors of a missile silo for an abandoned project.

I'm thinking of calling this one "Techno-Pyramid". I'm also thinking that "Techno-Pyramid" sounds like the name of a Synthwave band.

The "Techno-Pyramid" was the result after tinkering with some of the triangular parts. It will probably appear on the table as an alien artifact or something. I just need to decide if I want to paint it metallic silver or some neon color.

The sprues with all the railings (front and rear views).

The "Large Box" only has two of these sprues. Most of these parts were intended to be used as railings. The open design works well for structural supports as well. There are also a couple of rectangular parts with integrated ladders.

These elongated right triangles? I have yet to use them for a project. I've played around with connecting them to the other parts, but inspiration hasn't struck. They are most likely going to end up glued to an otherwise flat surface on some kitbashed terrain piece.

Much of the utility of this product comes from being able to assemble the parts into structures, but the parts themselves are an excellent way to bulk up a bits box. I have a small pile of parts left over from previous kits and will have more once I take my cutters to this one. They have been a handy way to add details to trash bash terrain, a kitbashed spaceship model, or the base of a large figure.

These kits have gotten harder to find, which may be a turn off for those interested in a reliable long term supply. The full retail price for a "Large Box" kit from Pegasus Hobbies is $32.99. That works out to about $2.75 per sprue. That's a good value considering the number of parts that come on each sprue.

Sunday, December 16, 2018

Sci-Fi Landing Pad and Shelters

This is a sci-fi terrain project that I completed a few weeks ago - a landing pad with elevator access and a trio of shelters. The goal was for a set of buildings that would fit a variety of themes and backgrounds. Anything from a military outpost to a industrial site to a colony could make use of a landing pad. The shelters likewise could represent any general purpose building. The overall appearance of these terrain pieces are intended to be generic. They would not look too out of place in Star Wars, Star Trek, or most other space opera settings.


Finished landing pad and shelters. 15mm ARC Fleet troopers for scale.

All parts were from a pair of Hexagon Construction Sets from Pegasus Hobbies. My understanding is that the sets are scaled for 25mm, but they fit well with 15mm figures. I played around with these sets in a couple of posts from before my gaming interregnum, including a previous version of the landing pad and a missile silo concept. The final version of the landing pad replaces the rather flimsy ramp of the concept version with an elevator shaft. The doorways of the landing pad elevator and the shelters feature covered areas for additional protection from hostile environments. These porches were added to give the buildings a little more character and to make the locations of the doorways more obvious during play.

Construction Stage: This basically consisted of test-fitting various configurations until I found the ones I most liked. This stage actually benefited from my time away from tabletop gaming - I took these pieces out whenever I was bored and these versions slowly evolved. For example, the shelters were originally more squared off, but the "space quonset hut" developed as I played around with different configurations. I considered reinforcing the clips used to hold the parts together with glue, but rejected the idea as not worth the trouble.

Primer Stage: I used two layers for priming. A dark gray spray primer to the underside and a light gray primer sprayed at an angle to the top. This was intended to simulate shading from an overhead light source.

Base coat only. Note how flat the color appears.

Base Coat Stage: A couple of thin layers of Krylon ColorMaster Paint+Primer Iris Satin. I left a little dark gray primer showing on the underside areas to simulate shading.

After both layers of dry brushing.

Dry Brush Stage: Two layers - one a light blue and a thinner layer in pure white. This brought out the raised details like the rivets.

Detailing Stage: Gold and Silver Metallic Sharpies were used on some of the raised details to break up the blue base color. This was my first experience using Sharpies on a terrain or miniature project. Using Sharpies seemed more precise than a brush for these kinds of small details. Even so, I did manage to get some metallic color in areas that I did not want it in. This was easily fixed with a little blue paint.

Rear view of one of the shelters after detailing and wash layer.

Wash Stage: A mix of Liquitex Soft body in Payne’s Gray, Liquitex Matte Medium, and water was applied in two layers - one to the underside and one to the top. The wash was applied in heavy layers. I used a sponge to remove any excess wash and prevent pooling on the flat surfaces. The wash brought out the recessed details, evened out the overall color of the pieces (the dry brushing was a little uneven in areas), contribute to a more weather appearance, and - most importantly - to hide minor errors from earlier stages.

I’m looking forward to putting these pieces on the tabletop!

Friday, February 7, 2014

Workbench #8 - Hexagon Construction Missile Silo and Communications Station

Here are a couple more results of playing with Hexagon Construction Sets. Details on this product and earlier terrain pieces can be found here. Both of these are works in progress.

Missile Silo

This depicts the launch site for a large missile - an ICBM or a surface-to-space warhead delivery system for planetary defense. The structure represents the above ground portion of a mostly underground missile silo. One of the arms would give access to a stairwell or elevator to the underground portions of the silo complex.

Opening silo, preparing for launch.

The silo covers are partly open to make it clear what it is intended to be. At the moment, I've been going through my bits collection for a suitable missile cone to place in the silo.

Communications Center

Why are we always guarding these things?

This represents a communications building made from modular components. The arms of the structure contain communications equipment and storage. Right now, I'm looking at options for an antennia for the central hex-shaped area.

Saturday, December 28, 2013

Workbench #7 - Hexagon Construction Landing Pad and Industrial Spire

These are a couple of new terrain pieces built from a pair of Hexagon Construction Sets. The sets are currently distributed in the United States by Pegasus Hobbies. These have been available for awhile, so you likely have seen them before in some form.

A Large and Small Set caught my eye back at Millennium Con. I've been interested in picking them up for awhile now, but not enough to place an online order. But with two of them sitting right there with some cash burning a hole in my pocket, well...

...I've been playing around with them ever since.

My understanding is that the Hexagon Construction Sets were originally made for a Russian wargame scaled for 25mm. They comfortably scale for anything from 15mm to 28mm with a little management of details like ladders. The doors are undersized for 28mm, assuming that the doors are intended to be walked rather than crawled through.

The parts are well detailed with high tech looking greebles. The overall appearance of a finished assembly tends towards unrefined and functional. A terrain piece made from these sets would fit in well with a gothic or steampunk aesthetic.

All of the parts are made of plastic and are held together by plastic clips. Different clips allow for the parts to be assembled at different angles. I did run into an issue with flash on the sprues gumming up a few of the clips. However, the large number of clips available on the sprues make this a minor concern.

Landing pad ramp-side view with two Titan Marines (15mm) and a Sky Scorcher for scale.

This piece fills a hole in my terrain collection - a landing pad and ramp. The design is based loosely on a couple of pieces I saw at Millennium Con 12+1 in 2010. The pad itself is built from 1 half-hexagonal and 6 hexagonal parts. It is supported by 6 rectangular parts. 6 parts originally intended as 25mm scale handrails act as buttresses to reinforce the whole structure. The ramp is built from 2 rectangular parts reinforced with 2 smaller "handrail" parts. The structure is quite sturdy and lightweight. Unpainted.

Landing pad alternate view with Sarah Blitzer (28mm) for scale.

The landing pad is ideal for 15mm. Every 15mm-compatible flying craft in my collection fits on the pad with plenty of room to spare. Of course, that might change if I ever buy some behemoth of a dropship. Using the pad for 28mm scale is a little more problematic. A small shuttle or flying car would fit, though.

Industrial Spire with a Titan Marine (15mm) and Sarah Blitzer (28mm) for scale.

This industrial looking piece is an exercise in what I could make with a bunch of triangular parts. It could be an atmosphere processor, a solar power station, or a widget replicator, However, I think we all know its main job is to block lines of sight. The piece is intended to work with 15mm or 28mm scale figures. Unpainted.

I'm still playing around with the considerable amount of parts still in the sets. The large square parts look handy for a larger structure. The smaller parts have possibilities for scatter terrain once the bigger ones are used up. Overall, I'm glad I picked up these sets.