Showing posts with label 15mm. Show all posts

Sunday, October 30, 2022

Finishing the Pack - Alternative Armies EH03 Space Brains

October is a good time for horror themed projects. I painted up one of these figures last year for that very reason. Then I forgot about the rest of the pack until I was looking for a horror-themed painting project as this Halloween loomed closer. B-movie horror is still horror, so I finished the other four.

A brainy bunch. Last year's test model is in the middle.

Alternative Armies sells these floating, gun-toting brains in packs of five. They work as gray matter extracted from enormous, mutated, alien conquerors in a variety of scales. Their ability to fly could come from their cybernetic augmentations or be some psionic power from their vast, cold, and uncaring intellects. Their cybernetic enhancements otherwise seem to be limited to weapons and the sensors needed to navigate and find targets. Each figure in the pack is a distinct sculpt with its own configuration of cybernetics and arms.

Close up of the different robotic appendages.

I used the test model from last year as a guide. The improvised flight stands are the same. The paint job is almost the same – there were two exceptions because I couldn't resist tinkering. The squishy thinking bits got a layer of highlighting using a mix of white and the Reaper 09281 Brains Pink that I used as a base color in those areas. The cerebral areas also got additional coats of wash. It gives those areas a raw and bloody look. I kept the dark look of the cybernetics - they remind me of Borg implants and add to the menacing appearance.

Last image from some remote outpost or a bunch of cybernetically enhanced brains dropping an album?

Now I need to consider when these will hit the table. Five Parsecs From Home? Or do I send them after the crew of USS Phoenix in our Star Trek Adventures campaign first?

Monday, April 25, 2022

Zealot Miniatures Magic Portal (Blue)

This is another resin terrain piece using a translucent plastic insert to represent an inter-dimensional passageway. In this case, the popular circular shape was chosen for the generating mechanism. I purchased this piece at the same time as the Demon Gate late last year. The plastic insert is available in blue or red.

Remember: It's a portal, not a gate. Very important.

Preparation
The resin required nothing more than a scrubbing with warm soap and water. I had to remove and sand down a tab on the clear plastic insert. The insert has a significant flaw, but it doesn't stand out (much) at tabletop distances.

Planning
The Magic Portal comes in four parts - the two halves of the circular portal, the platform, and the insert. I decided to prime and paint everything before assembly. Painting the assembled piece would require trying to keep paint off the insert. That seemed to be a great deal of trouble for no real benefit.

Rosie considers another piece of hardware she's been asked to fix.

Plastic Insert
The insert was a little underwhelming out of the package. The swirling details weren't really visible in the clear plastic. There was also the flaw in the material. I decided to apply a wash to bring out the details, hide the flaw, and protect the plastic from the fogging effects of the glue I would be using later on. The initial layers of Secret Weapon W015 Blue didn't coat to my satisfaction. The follow up layers of Secret Weapon W016 Green covered this material better.

Primer Coat
Tamiya Surface Primer (L) in Gray sprayed over all resin parts.

First Paint Coat
As with the Demon Gate, I applied a layer of FolkArt 479 Pure Black diluted with water to darken up the Tamiya Gray and fill the recessed details on the resin parts.

Second Paint Coat
FolkArt 480 Titanium White brushed on the upper areas as a highlight and outward from the inside of the portal.

Magic Portal and Demon Gate comparison.

Source Lighting
A mix of FolkArt 720 Cobalt Blue and Sargent Art Cadmium Green lightened with FolkArt 480 Titanium White as needed. The circular generator would block some of the light from the magical portal, so the glow effect didn't need to be as extensive as on the Demon Gate. I started by brushing on the Cobalt Blue/Cadmium Green mix over all areas that would be touched by light from the portal. Each following layer covered a slightly smaller area closer to the portal. I mixed in a little more Titanium White with each layer until I was using almost pure white right next to the portal.

Touch Up
I ended up overdoing the glow effect in some areas. I brushed on some FolkArt 2561 Steel Gray to bring back an approximation of the base color.

Assembly
This was a straightforward matter of gluing the two halves of the circular gateway around the plastic insert. I had to clamp the halves together to give the Gorilla Super Glue time to work. Then I glued the assembled portal to the platform and clamped that together until everything was solid.

Does this remind anyone of anything?

There is a visible line around the circular resin piece. This is one of the resin halves overlapping the other. I considered sanding it down and repainting the edge, but decided against it. This would remove some the details on the edge and the line isn't as noticeable at tabletop distances.

Close up of the seam between the two halves of the circular portal generator.

It's ironic that this was the piece that I was most looking forward to while the Demon Gate was an afterthought. The Magic Portal works with 28mm scale miniatures, but a 32mm figure might have to duck down a bit to fit through. It would fit in fine if used for 15mm scale games. Together, the Magic Portal and Demon Gate give me options whenever I need an extradimensional passage to and from another space and time. Overall, though, I like the Demon Gate a little more than its rounder counterpart.

Sunday, February 6, 2022

Zealot Miniatures Demon Gate (Red)

This is a resin piece with a translucent plastic insert representing a portal generated by pointy bits instead of a ring thingy. I purchased mine from Zealot Miniatures when I was going hog wild over various Black Friday/Cyber Monday Sales late last year. The plastic insert is available in red or blue. I opted for red given the aggressively spiky appearance of the resin model. The glow effect took some time and effort, but I think it turned out well.

Not ominous. At all.

Preparation
There were some bits that needed to be fixed. The plastic insert had a rough edge that needed to be sanded down. I also had to remove a tab on the resin part. The biggest issue was that the resin piece tended to wobble, so I had to sand down the bottom to get it to sit level. Following that was the usual scrubbing in warm soap and water. I set the clear plastic inset aside - no priming or paint was applied to it.

"I think we're guarding the wrong thing." "Yes. Yes, you are."

Primer Coat
Tamiya Surface Primer (L) in Gray sprayed evenly over the resin piece.

First Paint Coat
I brushed on a layer of FolkArt 479 Pure Black diluted with water to darken the gray primer and fill in the recessed details.

Second Paint Coat
Next came a light dry brush of FolkArt 480 Titanium White as a highlight on the uppermost areas.

"How about you go through and see what's on the other side?" "How about no."

Glow Effect
I used layers of FolkArt 437 Lipstick Red, 932 Calico Red, and 480 Titanium White to color the crystals sculpted on the model and build up the glow effect radiating out from the crystals and portal. My initial attempt turned out more pink than red. The solution was to darken it down with washes and dry brush more of the glow colors with more of an emphasis on the darkest red color. The washes were FolkArt 479 Pure Black and 231 Real Brown diluted with water. Excess wash was wiped away to prevent pooling. The second layer of red glow colors worked much better.

Assembly
I glued on the red plastic insert with a drop of Tacky Glue. This was to avoid any potential issues with using superglue on clear plastic. No primer or paint was used on the plastic insert.

What happens if somebody goes through the back of one of these things?

This was a quick and fun rainy day project. The completed piece has a distinctive look and works well with 15mm and 28mm scale miniatures. I'm really pleased with how the red glow came out. I'm not sure if I can convince any players to risk their characters on a trip through it, but I can always have something step out of it for a visit.

Friday, February 4, 2022

Warsenal REM Shack TR-MDF-TER-REM-SHK

Known as "The Barn" or "The Red Shed" to the local population, this structure has changed hands (or equivalent manipulator) many times over its existence. The businesses it has hosted include: a small machine maintenance bay, the branch office of a repair services company, a chop shop disguised as a robotics workshop, and a portable communications device outlet. The communications and sensor arrays have gradually been upgraded over the structure's history. The initial set up was a dispatch system for service technicians. The largest expansion took place when the structure briefly hosted a pirate subspace radio station. The original sensor gear was a diagnostic rig, but was later expanded to monitor the nearby area for law enforcement activity during those periods when the structure was used for illicit enterprises. The structure is currently unoccupied and has passed all required inspections.

- Kessler's Upcycling Sales Catalog

Rosie considers a fixer upper for her new workshop.

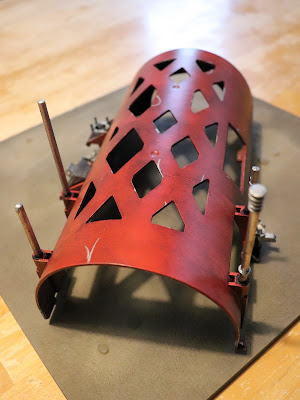
This is the REM Shack from Warsenal. It is marketed for use in Infinity, but what caught my eye was its potential as a versatile scale-neutral terrain piece. Besides, Five Parsecs From Home turns out to need more terrain than I thought it would.

Assembly
The REM Shack is all MDF except for the plastic antenna. I had a relaxing time putting it together. The instructions - available from Warsenal as a .pdf download - were clear enough. None of the parts needed convincing to go where they needed to go. I used Tacky Glue, but any white glue should work. If I were to get another REM Shack, I might leave a few parts off until after spraying on a base coat. Getting paint into some of nooks and crannies was a little annoying.

Some 15mm scale GZG Survey Team personnel for comparison.

First Spray Coat
Krylon Fusion All-In-One Matte Black sprayed evenly on all surfaces.

Second Spray Coat - Base Only
Krylon ColorMaxx Paint + Primer Matte Deep Gray on the flat base only. This is intended to represent concrete or some sci-fi equivalent. I masked off the base after this coat dried.

Third Spray Coat - Metallics
I picked out certain areas for a layer of Krylon ColorMaster Paint + Primer Metallic Aluminum. These areas were masked off afterwards. I also sprayed the upper surfaces to achieve a zenithal effect.

Fourth Spray Coat - Red
All of the remaining (unmasked) areas got a layer of Krylon ColorMaster Paint + Primer Matte Poppy Red. The red is noticeably lighter in the areas previously sprayed with Metallic Aluminum and darker over the Matte Black.

I'm not sure what that duct is supposed to do, but it looks nice.

Touch Up
I found some overspray after removing the masking tape. It happens. These areas were corrected by various means. I brushed on a little gray paint where the Poppy Red got on the base. A Silver Metallic Sharpie covered up the Poppy Red that showed up on the metallic areas. There was also some Metallic Aluminum showing on some of the Poppy Red areas. I used some diluted black paint to conceal it and simulate grime.

Detail Pass - Yellow
The REM Shack has some small rectangular details that I decided to bring out. They looked like some kind of futuristic fasteners to me, so I was originally going to go with a metallic gold or copper color. However, the yellow I picked to go under the metallic really popped against the Poppy Red. I liked the effect enough to leave it as is.

Weathering Pass - Metallic Wear and Tear
I used a Silver Metallic Sharpie to simulate areas where the red chipped away.

Wash Layer
Finally, I finished up with the messy stage - brushing on a dark wash over all surfaces and wiping off the excess. I used a downward motion where possible to simulate grime flowing down the structure. I followed up with diluted black paint in areas where I wanted the weathering to be darker.

The back is also well detailed.

I've been ordering scatter terrain from Warsenal for quite awhile, but this is the first building I've purchased from them. Overall, I'm happy with it. There is a great deal of complex detail added to a relatively simple shape. It works with both 15mm and 28mm figures and will make a good display piece in between seeing action on the table.

Monday, January 17, 2022

Trash Bash Sci-Fi Quonset Workshop

This terrain piece is built around a part from some kind of office machine. The core part immediately brought a Quonset hut to mind when I first laid eyes on it. I previously painted up my other one during my still-incomplete Electrical Box Sci-Fi Shelter.


Preparation
The first step was to cut off the plastic protrusions on the bottom of the core part that kept it from sitting flat on the table. Next came the application of elbow grease in the form of sanding and cleaning. I don't know what kind of plastic the part is made of and preparing the surface seemed to be a reasonable measure.

Antenna Assembly
The antenna are used printer parts - basically plastic rods. The core part had four holes drilled out for screws that were just a little to small to fit the rods. I used a hobby knife to widen the holes and glued the rods in place.

Technical Looking Bits Assembly
The core part had various protrusions originally used as attachment points. I sorted through my bits collection for parts to disguise them. A couple of keyboard buttons and a flat bead did the trick. They represent equipment attached to the outside of the structure.


First Spray Coat
Krylon Fusion All-In-One Matte Black sprayed for complete coverage on all surfaces.

Second Spray Coat
Krylon ColorMaster Paint + Primer Metallic Aluminum spray to coat the antenna and technical bits.

Third Spray Coat
I masked off the areas I wanted to stay metallic and sprayed Krylon ColorMaxx Paint + Primer Flat White to achieve a zenithal effect on the upper areas.


Fourth Spray Coat
Krylon ColorMaster Paint + Primer Matte Poppy Red on all exposed surfaces. I kept the masking on the metallic areas and did not spray the underside of the piece. The zenithal effect showed through the red with the upper areas being noticeably brighter than the lower ones.

Wash Layers
Next I applied multiple coats of black wash. Although I wiped off the excess, I also allowed the wash to build up in some areas for a grimy effect.

Detailing
I used Silver and Black Sharpies to further weather the piece. The silver was applied to the edges to simulate wear marks and on some flat surfaces as scratches. The black worked to dirty up the piece a little more and to draw some graffiti on a couple of spots.


The piece represents a workshop built from prefabricated or repurposed components. Used with 15mm models, it could be a garage or modest hangar. It's a little small for vehicle maintenance at larger scales like 28mm, but still conveys the appearance of a utility building.

Wednesday, October 27, 2021

Alternative Armies EH03 Space Brain

Took a break from terrain making to paint up one of these little horrors. Besides, the month of Halloween seems like a good time for this B movie escapee. I had to improvise a stand for it, but I think it'll do.

Space Brain on patrol.

Alternative Armies offers these in packs of five and as suitable for a range of scales. They are very large for human brains in 28mm. However, they should work fine as big floating cyborg brains extracted from a dying species of mutated alien overlords even in 15mm. I acquired my set as a freebie with an order I placed in June 2021.

Stand
I had no flight stands on hand that would work with this figure, so I ended up cobbling together one from a paper clip, some air drying clay, and a 25mm slotted base. The assembly was spray painted with Krylon ColorMaster Paint + Primer Flat Black and textured with a mix of sand, PVA glue, and brown craft paint. The small hole sculpted into the bottom didn't seem quite deep enough, so I drilled it out a little more to be sure. The miniature is secured to the stand using Gorilla Super Glue.

Zombies hunting for a feast. I better get to work on the rest of the set - it looks like this Space Brain could use some reinforcements!

Primer Coat
Krylon ColorMaster Paint + Primer Flat White. In retrospect, a neutral color might have been better for painting gray matter.

Brains - First Coat
Reaper 092881 Brains Pink. A bottle of this stuff has been knocking around my paint collection since I got it as a backer reward from the first Reaper Bones Kickstarter. With a name like that, I couldn't resist using it for this project.

Brains - Wash Coat
Citadel Washes Baal Red. The pink turned out a little too pale and the details weren't coming through. A red wash shaded the overall color and settled nicely into the recesses.

Cybernetic Bits - First Coat
A mix of Reaper 09038 Rainy Grey and Reaper 09037 Pure Black. This mix produces a very dark gray that I used as the base color for the mechanical elements.

Cybernetic Bits - Second Coat
Reaper 09038 Rainy Grey. This medium gray was used to highlight the upper and raised surfaces of the mechanical elements.

Cybernetic Bits - Wash Coat
Reaper 09255 Black Wash. Some of the gray ended up in the recesses, obscuring those details. I used a black wash to reverse the effect.

Rosie sneaking up to perform percussive maintenance on this Space Brain's cybernetics.

This figure was a welcome break from terrain making and a reminder that I need to paint some sci-fi miniatures as well. Of course, a set of these could work as weird aliens for a Five Parsecs From Home game. Maybe as proxies for Converted or Abductors?

Thursday, September 23, 2021

Khurasan Miniatures PLA-11 Dethroids Repaint

Repainting these figures was a quick project after a weeks-long spell of getting very little done hobby-wise. The one thing I did accomplish during that time was a long delayed reorganization of my home office/hobby space. I came across these figures during that process. Unfortunately, the metallic paint job I originally used didn't age well. The shine seemed dull and there were some marks marring the surfaces. I considered retouching the paint, but decided that a fresh start would be a better approach.


I commented on the appearance of these models in my previous post from back in 2014. Briefly, they seem to be inspired by two sources. One is a certain group of aliens who dress in pepperpot shaped murder machines and enunciate every syllable of their lines. The other are the autonomous reconnaissance drones deployed by a particular galactic autocracy for searching out insurgent bases.

Paint Removal
An overnight soak in a 50/50 mix of water and Simple Green has been by go-to for stripping paint from miniatures for awhile now. It also removed the sand and glue mix I used for basing. There were a couple of stubborn spots, but a stiff brush and a little elbow grease took care of them.


Primer
A couple thin coats of Krylon ColorMaxx Paint + Primer in Matte Deep Gray provided good coverage.

Paints
I started with Formula P3 Menoth White Base on the upper bodies. The dangling appendages received a coat of Citadel Colour Codex Grey. Everything got dry brushed with Formula P3 Morrow White to increase the contrast between the raised areas and the rest of the figures. The bases were painted with Citadel Colour Chaos Black. This is a departure from my usual approach of applying a sand/glue/paint mix for basing. It looks good, but I'm not sure how it will hold up - the edges are already starting to show wear.

Washes
I brushed on two layers of Army Painter Warpaints wash over each model. Dark Tone to bring out the recessed details. Strong Tone to blend the colors together and weather the models.


I like the dirty, worn appearance better than the paint job I originally used. It makes them look like machines that have been in the field for awhile.

Tuesday, July 20, 2021

30 Minutes Missions Alto Option Kits by Bandai - First Impressions

This post continues a look at 30 Minutes Missions. The previous post with my first impressions of the Alto itself can be found by clicking this link. Here I'm examining two of the options kits available for the Alto.

Original recipe Alto compared with optional face plate, shoulder armor, and chest armor.

The option kits came as a bundle when I ordered the Dark Gray Alto on Amazon. Frankly, I'm not sure if I would go that route again. The cost of the bundle was only slightly cheaper than ordering the items from an import site like Hobbylink Japan. It also took about the same amount of time to ship. On the other hand, the bundle did have matching colors for the Alto and Option Armor kit, so that's nice.

Both kits are made specifically for the Alto. This makes sense for the armor, since the parts have to fit the shape of the model. However, I'm not sure why the weapons wouldn't work with other models. They are mostly handheld or fit on parts that should be universal within the 30MM line.

As before, I cut the parts off the runners and assembled them without any further tidying up.

Rosie examines the Alto's knee while Sarah looks on.

Option Armor for Long Range Sniping (Alto Exclusive/Dark Gray)

This kit comes in a bag containing the instructions and a single runner. A little disappointing, but the kit is only a couple of bucks USD before factoring shipping costs. Given the prices I've seen for a similar amount of plastic in the form a single miniature, that's not bad.

Shield option attached to the arm and shoulder.

The runner has parts for:
  • A replacement face plate. It pulls off the appearance of some kind of telescopic sensor array, which fits the "Long Range Sniping" theme. A sticker for the lens would have been nice - I'll have to see about painting it sometime.
  • Replacement armor plates for the chest and shoulders. These are more beefy than the ones that came with the Alto. I'm not sure why a sniper would need additional protection in these areas. The shoulder parts don't seem to have the snug fit of the originals - they pop off more easily.
  • A shield that can attach to an arm or shoulder. I'm not sure why a sniper mecha would need a shield that looks like it could double as a melee weapon. Maybe I'm not part of the intended market for these things?
The chest and shoulder armor, combined with the shield, offers up the appearance of a brawler rather than a sniper. The original Alto face plate works to complete the close in fighter look. The sniper face plate works well with the Alto's original armor plating.

Roy Roy drone undergoing trials while an evaluation team in light duty vacc suits looks on.

Option Weapon 1 for Alto

This kit comes in a small box holding a pair of runners. The variety of parts offers a satisfying selection of firearms and melee weapons.

Submachine gun, assault rifle, and long rifle with telescopic sight and grip.

The choice of firearms starts with a duplicate of the submachine gun included in the Alto kit. The other firearm parts attach to the pistol grip/receiver of the submachine gun, replacing the short submachine gun barrel with one resembling an assault rifle with an underslung grenade launcher or a long barrel suitable for precision shooting. There are also two sights available - the one that come with the submachine gun (resembling a reflex sight) and a larger one that looks like a telescopic sight. Finally, there is  grip that can be attached to the side of either rifle.

Empty hand, stabby hand replacement, axe hand replacement. I tried the sword, but it just looked silly.

The melee weapons are based on the knuckle weapon included in the Alto kit, using it as a handle/hand guard. A duplicate of the knuckle weapon appears in this kit, allowing for dual wielding. The melee options include a combat knife, axe, and sword. They can be attached to the knuckle weapon or to a part that replaces a hand. There is also a shaft that can be combined with the melee options to create a variety of polearms.

Axe and sword attached to the polearm shaft.

Something I Forgot from the Last Post - The Roy Roy

This is a small robot that comes with the Alto kit. Not including it in my previous post was an oversight on my part. It works as a drone for either 15mm or 28mm scale. The body of the Roy Roy can be attached to the top of the Alto as an insectoid looking head alternative.

Roy Roy and Roy Roy head.

The option kits make the Alto more versatile, allowing it to be customized to better fit a particular role or setting. Combining the chest and shoulder armor with a submachine gun and melee weapon makes the Alto into a nifty close combat unit. Of course, outfitting giant stompy robots with pointy and stabby things doesn't fit every setting. In Battletech, for example, melee weapons for 'Mechs exist, but are an unusual design choice compared with guns, energy weapons, and missiles. However, 30MM is clearly more inspired by settings like Gundam, which feature melee weapons as standard issue for mobile suits. It really depends on the game - a giant robot with an equally big sword fits right into some, but is over the top for others.

I wasn't kidding about the look of the sword hand replacement.

The various guns should fit into a wider variety of settings. There are enough parts to build a pair of submachine guns, if dual wielding isn't just too much for the game in question. The assault rifle is a good choice to give the Alto the look of an infantryman. The long rifle with the sensor face plate sends the message that something in the neighboring time zone is going to get an unwelcome surprise. Again, it depends on the game.

Sunday, July 18, 2021

Brigade Models B15-1001 15mm SF Bunker

This is another product that I bought ages ago, stored away during my tabletop gaming interregnum, and rediscovered while looking for something else. I decided on a paint scheme just in time for weeks of rain and humidity levels too high for spray painting. My patience was rewarded once I was able to get started - the work was quick. Unlike much of my unfinished product pile, this is actually still available for purchase from the manufacturer.


The curved appearance of the bunker puts certain Star Wars visuals in mind. Not the sharp edges of Imperial design, of course. Rather, the rounded architecture seen on some planets away from the core - places like Tatooine and Naboo.

This product comes in two pieces - the main body and a cover. The main body includes a sculpted interior including floor grating and steps down to the entrance. The other piece is a simple round cover for the interior. The two pieces do not lock into each other - there is nothing holding the cover on the main body.


Sanding
The bunker is cast resin and needed some sanding to remove some rough edges and flash. There is also some chipping near the bunker entrance, but it's not particularly noticeable when the piece is sitting on the table. Besides, it adds to the worn look I was going for. I also roughed up the surfaces of the piece due to concerns about the paint bonding to the smooth resin. I wore a respirator during the sanding process, having been warned about inhaling resin dust awhile back.

Cleaning
The next step involved soap, warm water, and a brush. Taking the time to clean what I'm working on is a habit for me at this point.

Spray Painting - First Layer
I sprayed the underside of both pieces and the interior of the main body with Krylon COLORmaxx Paint + Primer in Flat Black. I was planning on a dark gray or metallic for the interior, so black works well as an undercoat. The goal of painting the undersides is simply to put down a layer to protect the resin.


Spray Painting - Second Layer
The base color for the bunker is Krylon Camouflage Ultra-Flat Khaki. A sandy color isn't unusual for a concrete surface, especially one that's been exposed to the outside for awhile. Besides, I've been on enough military bases - mostly American - to know that khaki is a common color for buildings like the bunker.

Interior
The floor got a coat of FolkArt 2561 Steel Gray brushed over the black Krylon. I applied some Craft Smart Premium Wax Silver Metallic Finish over the gray paint to give the floor a hint of metallic shine.

Wash Layer
I still have a bottle of black wash that I mixed for a long-ago project. It's come in handy for terrain projects like this one. I applied a layer of wash over all of the interior surfaces and allowed it to pool. The floor is deeply textured with a grate pattern and I wanted the wash to settle into it. I also brushed a layer of wash over the exterior of the bunker, but I wiped off the excess to prevent pooling on those surfaces.


The bunker is a hefty piece of solid resin. It will likely hold up well to handling, but I'm reluctant to subject it to an unplanned drop test. The interior is a nice touch and holds a fair number of 15mm miniatures - the exact count depends on the size of their bases. It was a good value at $12 USD when I purchased it and is a better deal now, although shipping costs may offset currency exchange rates.

Thursday, July 15, 2021

30 Minutes Missions EEMX-17 Alto (Dark Gray) by Bandai - First Impressions

I purchased this model kit to see how it looks with 15mm scale miniatures. Also, building scale models is something I've been wanting to get back into and big stompy robots are as a good place to start as any. This is an initial look with general product information, a description of the build process, and a few comments on its potential for tabletop gaming. I also have a couple of accessory kits for this model that I plan on featuring in a follow up post.

Alto covering 15mm "Earth Exploration Team" members.

Bandai's 30 Minutes Missions (30MM) line is intended as a starting point for getting into Gundam models. The kits in this line are priced lower than comparable Gundam models since they aren't tied to that franchise and its associated licensing fees. A selling point of 30MM is the relative speed and ease of assembling a kit without sacrificing quality.

Bandai created its own lore for 30MM, based around an alien invasion. I'm not versed in Gundam lore, but I have picked up the broad strokes of the franchise over the decades it's been around. Even I can recognize that the Alto is loosely based on the concept of the GM - a mass produced unit deployed in quantity by an Earth-based military against a threat from space.

30MM is named for the amount of time it's supposed to take to assemble a kit. I took closer to an hour. Inexperience played a role, but I also found myself going slow to savor the process. Note that I still need to clean up the nubs left from clipping off the parts.

Close up of backpack. Note the holes where accessories can be attached and the melee weapon in the left hand.

The sprues (or runners) are laid out intuitively. Each runner holds parts of a particular color or type of plastic. Parts that go together on the model are grouped together on the runners. This reduces the need to squint and hunt for parts spread around a runner.

I choose the dark gray and black color scheme as something that would be plausible for a unit with a low observable coating. Military colors - green and tan - are available. These also come in brighter colors. I'm tempted to get the Alto's counterpart - the Portanova - in red or blue. I may see how well the plastic takes spray primer and paint sometime down the road.

Trying a more daring pose to test the articulation.

Although the Alto is a 1/144 scale model, it works well enough with 15mm miniatures using an eyeball comparison. It looks like there should be just enough space for a cockpit big enough for a 15mm scale pilot in the chest. It might be a tight squeeze, though - certainly not as roomy as some mecha cockpits I've seen in various media. I'll have to dig out more of my 15mm collection for further comparison.

Of course, the whole issue of "where's the cockpit?" can be dodged by declaring it a remotely piloted or AI controlled drone. That might be enough justification to make it work with 28mm scale miniatures. It might work as a major threat to a band of adventurers in a sci-fi RPG game.

The Alto is well articulated and stays in a pose without "drooping" - at least, when the joints are new. There is a good amount of detail, considering that this is supposed to be a starter model. The holes are attachment points for additional parts. That offers the ability to customize the model for a particular role - sniper, command vehicle, close combat variant, etc. Two option kits came in the bundle that I ordered - I'll post a follow up after I get a chance to assemble and play around with them.

Thursday, April 1, 2021

Cleaning up Gale Force Nine's Battlefield in a Box: Desert Oasis (BB537)

I pulled this piece out of storage to find that time wasn't kind to it. I put it away in the original packaging - a plastic bag and styrofoam inserts. The styrofoam kept the plastic bag pushed against the piece. As a result, the plastic became stuck to the piece and left behind a sticky residue on parts of the surface.

A simple, but versatile terrain piece.

A little research and some trial and error revealed that warm soap and water was the best approach. My initial attempts with alcohol and Simple Green removed the paint in the out of the way spots I used for testing. It took repeated washings in the sink, but most of the residue came off. Enough of the sticky residue remains to be somewhat noticeable while handing the piece and it is visible on the "water" part of the oasis. The last couple of washings produced no further improvements, so I've hit a dead end with this approach.

In the future, I'm going to avoid storing pieces like this in situations where plastic packaging will be pressed against the surface for long periods. This piece will either get put away with the rest of my terrain in bins or loose in its original box without the bag or foam. I'm also planning on inspecting the rest of the terrain I have stored away for similar effects.

Goldar enjoying a pitstop at a desert oasis.

About the Desert Oasis

There are two versions of this terrain piece - BB537 and BB219. The only difference between the two seems to be the packaging. BB537 came out in 2011 as part of the "essential" Battlefield in a Box line. BB219 appeared in 2017 and was marketed for use in Flames of War. To the best of my knowledge, neither version is currently available from Gale Force Nine.

As with all of Gale Force Nine's Battlefield in a Box pieces, the Desert Oasis is ready to use out of the packaging (as long as you don't put it away and forget about it for a year or two). The earth looks like rocks and sand or dry soil. The water is smooth and blue. I find the palm trees a little unconvincing, but they don't have to be mounted on it. The Desert Oasis also came with a couple of packets of static grass to further enhance its appearance.

The Desert Oasis is a fairly straightforward terrain piece. It is scale agnostic, working fine for 15mm or 28mm figures. Although the name suggests otherwise, the piece can be used on a variety of terrain boards. Mount the palm trees and it works as a tidal pool on a beach. Remove the palm trees and it could be a pond in a wilderness or park.

A GZG survey team takes samples from a desert spring.

Future Plans

I picked up this piece on clearance quite awhile back. It was when I was trying to build up my collection quickly and I didn't a specific purpose in mind when I got it. It would be a shame to throw it away, but the remaining residue is an issue. I may end up filling in the holes used to mount the palm trees and repainting the edges a slightly darker earth color to give the piece a little more utility. The water may also get another coat of paint to cover up the residue. Or I might pour a little clear resin over it to make it look more like water and cover up the residue. I'm still pondering my options at this time.


Wednesday, March 17, 2021

Star Wars Miniatures Viper X-1 Droid Repaint

I purchased these awhile back as combat robots suitable for a variety of scales. The Viper X-1 Droid comes from the Dark Empire comic series that also featured a couple more Imperial superweapons, the New Republic E-Wing starfighter, and the notion of resurrecting Emperor Palpatine. Even as a part of the Star Wars Legends continuity, these should be obscure enough to fit into a variety of sci-fi settings with looking too out of place. These models were made by Wizards of the Coast as part of the Star Wars Miniatures game.

There's a local crawfish boil coming up. Don't know why that came to mind.

Repainting these models serves a few purposes:
  • One of them had some surface damage when it arrived. A coat or two of paint covers up the scuff marks nicely.
  • Changing the colors further obscures their origins.
  • I just really didn't like the brown color.

I couldn't make up my mind on which military themed color to use. Olive and khaki are both classic colors for military hardware, but aren't suitable for all terrain. Since I had two models, I decided on one of each color.

Priming
Both models were pre-painted, so I didn't feel the need to prime them.

Spray Coats
I began by spraying the underside of both models with Krylon Camouflage Ultra-Flat Black. Next were the base colors for each model. One got a coat of Krylon Camouflage Ultra-Flat Khaki and the other got the same brand of spray paint in Olive. The base colors were sprayed in a downward direction on the upper portions of the models. This left the black layer on the bottom of each model intact to provide shading.

Front and rear comparisons.

Wear Marks
The appearance of paint worn away to bare metal was achieved with a Sharpie Silver Metallic marker. I ran the marker around edges that seemed more likely to suffer from wear – the claws and areas that might bump into surrounding objects while moving.

Detailing
The one detail I wanted to pick out were the optics. They were originally painted black, but I wanted them to stand out. A little Reaper 09279 Fresh Blood did the trick.

Wash
I brushed on some black wash all over the model and wiped off the excess with a sponge. The wash was a mix that was left over from a previous project. It works well enough for terrain or large models like these. In addition to bringing out the recessed details, it all smoothed out the shading provided by the spray coats.

Scale comparisons with 28mm and 15mm figures.

Basing
I painted the base edge black and spread some sand over a layer of watered down PVA glue over the base surface. After the glue dried, I applied a mix of PVA glue, brown craft paint, and water to color and further secure the sand. Once the glue/paint/sand mix dried, I brushed on some lighter colored craft paint to create the appearance of dry soil.

The repaint turned out well. Although I can't decide if the weathering is too much or not quite enough. In any case, I'm looking forward to when these robots will be menacing some 15mm or 28mm figures on the tabletop.

Tuesday, January 26, 2021

Ground Zero Games Light-Duty Vacc-Suits

These are from the "Civilians, Colonists, Cops, etc" part of Ground Zero Games 15mm Stargrunt line. I combined the following three sets to create a large survey team equipped for hostile environment exploration and their armed escorts:

SG15-V17 Survey Team Personnel in vacc-suits

SG15-V10 Spacesuited crew in light-duty vacc-suits

SG15-V15 Armed crew figures in light duty vacc-suits

Survey team setting up in a sheltered area.

These figures fit into a variety of sci-fi "space" settings. I purchased them for use in miniature wargame or roleplaying game scenarios that need spacesuited figures, but not figures in power armor or any other environmental protection with a strong military look. The GZG "light-duty vacc-suits" work equally well for an optimistic future of space explorers trekking around the galaxy to a blue collar existence of investigating derelict spacecraft out of fear that the megacorp is going to yank everyone's bonus otherwise.

In keeping with the generic appearance of these figures, I settled on a simple white and grey paint scheme. I did consider a more colorful scheme using something like Starfleet division colors - one color for the armed figures, a different color for the ones carrying survey gear, another for the figures just walking around, etc. Unfortunately, I felt that it would narrow the utility of the figures. White is more straightforward and is the color real world space agencies use for their environmental suits. It reflects solar radiation and helps with temperature regulation. White also contrasts nicely with just about any wash.

Survey team members stuck with the thankless job of hauling the gear while others stand around chatting.

Preparation
The figures were clean out of the package - no flash or noticeable mold lines. I glued the integral round bases to steel washers. This reinforces the soft metal of the integral bases and offers the option of magnetic storage and transport later on.

Priming
Grey spray primer. I didn't feel the need for the two tone approach I sometimes use for 15mm figures.

Base Coat
I painted the suits with Privateer Press Formula P3 Morrow White. It flows well and isn't as chalky as other white paints. I could have applied another coat since some of the grey primer was showing through. On the other hand, I was planning on using a wash later, so I didn't need for the white to be perfectly opaque.

Details
Citadel Colour Codex Grey was used for the helmets, backpacks, equipment, and accessories. The contrast looks better than plain white. Also, I wanted the weapons to be more visible to make distinguishing between the survey team members and armed escort detail as easy as possible during play.

Wash
I had a wash mix left over from a previous project. It did a good enough job at bringing out the details, but I might go over the figures again with something else later.

Basing
The bases were painted brown on top and black around the edges. Texturing was achieved with a little sand sprinkled over a mix of watered down PVA glue and brown craft paint.

Armed security detail returning from perimeter patrol.

Overall, I had a good time with this project. It's always a pleasure working with a quality product. I sometimes find painting an army tedious, but I had a fun time painting up this group. It's been awhile since I've worked on my 15mm collection, but I have plans to do more with it this year.