Sunday, May 19, 2013

Learning Experiences, Case #3 - Reaper Bones Werewolf (77009)

The latest update puts my package from the Reaper Bones Kickstarter sometime in July or August. Maybe. Some folks are really unhappy with that. Me? I'm looking on the bright side. At least my Vampire box plus add-ons won't show up while I'm away on my June vacation. And I'll have more time to knock down my project backlog.

One of those projects is slapping some paint on a Bones miniature to see how things work out. Word from Reaper is that primer is not needed for good results on Bones. The vinyl material, once cleaned with soap and water, is supposed to bond effectively with undiluted acrylic paint.

Before painting. Kind of hard to see the details on the miniature.

I tried that awhile back. After leaving the paint to dry for a couple of days, a close inspection revealed some patchy spots in the paint. A few light scratches with my thumbnail and the paint came right off.

I wouldn't call that a success. Although I now know that Simple Green works as well as it does when stripping a metal miniature.

These are the results of my second attempt. Clean miniature. No primer. This time I was using craft paint. It was a little thick, so I did use some flow improver in it.

First basecoat. Note how the paint brought out the details and the lack of paint on the raised areas.

The first basecoat flowed nicely over the miniature. Note the details that are difficult to see when the miniature is still unpainted. Unfortunately, the paint acted more like a thick wash than a basecoat. The paint
flowed off the raised areas, leaving them lightly stained or white.

I mixed the second basecoat thicker than the first. The coverage was better, but not even.

Second basecoat. The coverage is better, but there are uneven patches not obvious from the photo.

The worst was when I returned to the miniature a day later. I noticed some patchy areas similar to my first attempt to paint the figure. Some light scratching confirmed my suspicion - the paint came off easily. See the white area on the ear? It's not a reflection, it's where the paint came off. The paint job would not have survived normal storage, much less wear and tear on the tabletop.

Looks like the werewolf will be getting another bath in Simple Green. Next time, I'm hitting it
with some spray primer and going from there.

Tuesday, April 30, 2013

Ashen Stars - Dead Rock Seven


Recently ran another Ashen Stars adventure.

Got mixed feelings about it.

The adventure in question is Dead Rock Seven, from the adventure collection of the same name. It wasn't my first choice. I planned on running the group through the adventures in the collection in order, but ran into issues with the first adventure - The Pleasure Bringers. The noir feel that it tries to evoke fell flat for me. Also, The Pleasure Bringers is set on a pleasure planet with human male-oriented descriptions of what pleasure is. Kind of problematic for a player character group of two female humans and an insect-like male. After wrestling with the amount of rewriting it would take to make it work for our group, I set it aside and went looking for a better option. Dead Rock Seven seemed promising. It starts with a murder mystery and takes place in a remote asteroid mining outpost. Best of all, it has a pretty straightforward structure.

I know what you're thinking. "This is the part where I read about how it all crashes and burns." And you would be wrong.

There were, however, a couple of near-misses.

The are several NPCs in Dead Rock Seven, which took some getting used to on my part. These weren't just "stay in the background" NPCs either. They all had things to relate to the player characters. Of the eight NPCs in the adventure, I only managed get six into play. One got himself killed before meeting the player characters. The other never got on stage at all, but did get a mention here and there. Of the six that got screen time, one got dropping from a potentially major role into a bit part. The five remaining NPCs did get good scenes interacting with the player characters. This points to an area that I need to strengthen as a GM. I generally don't have more than three or four "speaking role" NPCs in an adventure.

Keeping the game going was a challenge. Our group tends to be goal-oriented problem solvers with a strong tactical sense. They nearly short-circuited the adventure by driving straight for the solution. This would have left them without information they needed to resolve the climax. I reacted by throwing in a couple of things from a little later in the adventure to slow things down enough to get the information in the player character's hands.

Keeping the game short was also a challenge. Ironically, after stretching out the adventure a but, I had to shorten the end and cut short the after game wrap up to finish at a reasonable time.

Our group is starting to settle into Ashen Stars. The players are adapting elements of their more tactical play style to an investigative game. We're all still climbing the learning curve, though.

There was some good background bits presented in Dead Rock Seven that I would like to see expanded a little. The outlaw planet presented in some of the NPCs' backgrounds sounds like a good place for some player characters to find trouble.

Overall, our group is having fun with Ashen Stars. The differences between it and other games make it interesting, but also add to the difficulty of picking it up. I'm still struggling with it, but I can't put my finger on why.

I'll have to put some thought into it.

Sunday, April 7, 2013

Magnetic Vent Covers - A Revised Storage Solution for 15mm Miniatures

New fix for an old problem.

Old fixes sometimes stop working. It almost always happens at the least convenient time. Like when other things are demanding attention and money.

This time around, the old fix was the storage solution for 15mm miniatures I settled on awhile back. With my collection of painted 15mm metal men growing nicely, I needed more storage space. "No problem," I thought, "I'll just throw together another container and move on to the next project."

The first sign of trouble showed up when I inspected the container I magnetized earlier for reference. The strips of magnetic material showed clear signs of damage. Even the limited wear and tear from figures coming loose and bumping into the edges was enough to cause chipping. This sparked some concerns about the durability of the material.

My concerns grew deeper when I took the roll of magnetic material out of storage. It was even more damaged. Granted, I look through my storage bins fairly often, but the roll was placed to avoid knocking into anything else.

Curses!

Worse, when I started to cut strips of material off the roll, I found that the stuff would not uncurl. Even laying the strips flat overnight under some books was not enough to remove the curl. I tried using the strips anyway, but they would start curling up in the container. Even gluing them down with super glue failed to combat the problem.

In the end, I had to start over from scratch. Researching a new fix was not something I wanted to spend time on, but I was out of options. I had to find a solution that would fit into a limited budget and would avoid the wear and curling issues.

I found out about magnetic vent covers after a little time with Google. This stuff is normally used for sealing up unused metal vents in a central air system. A set of three 8x15 inch sheets is less than $5 (US). Cheap enough to justify picking up a pack to experiment with while keeping other options open.

Sheets cut to fit.

The material comes in smooth sheets. One side is colored white to blend into walls. The business side is a dark brown. It cuts easily with a good set of scissors.

Seems to be working alright.

Multiple layers are ideal. A single layer produces a fairly weak magnetic field. 15mm miniatures based on steel washers will tend to slide around and come loose. Laying down additional layers on top of each other increases the magnetic attraction, but the sheets have poles like any other magnet. Laying down a sheet in the wrong direction will weaken the overall strength of the magnetic field. A little trial and error is enough to work out the best placement. As a bonus, the additional layers do not need to be glued down. They stick to each other on their own.

Overall, this looks like a winner. It is as effective as any other fix I have seen. The cost is very modest. And, since the sheets are easy to cut, it is simple to customize to fit the container I have available.

Monday, April 1, 2013

Matchbox Finds for 15mm #3

Sky Scorcher


An aggressive looking attack helicopter, part of Matchbox's Sky Busters line. The design is well suited for a near future setting. The weapons load out is impressive - missiles, rocket pods, and twin chin guns. The scale might be better suited for 10mm than 15mm judging from the two seats in the cockpit. My plans are to use it to represent off-board air support for games like Tomorrow's War. It looks pretty good right out of the package. I might not even bother with a complete repaint. Covering up the markings, a quick wash, and touching up some of the details might be enough for the tabletop.


Blade Force


I couldn't resist picking up this cargo helicopter with the Sky Scorcher. It's also part of the Sky Busters line. The overall look fits in well with the Sky Scorcher and some of my other Matchbox aircraft. Not visible in the picture is a cargo hook between the rear landing gear. This piece is not likely to see much use on the board except as an objective parked on a landing pad. Of course, a scenario where cargo has to be moved off the board using this as model might be workable.


SWAT Truck


A fairly generic looking armored truck, not based directly on a real world vehicle as far as I know. A repaint in a more realistic color is definitely required before these pieces hit the table. They could be handy as battlefield taxis or vehicles in a civilian security force. Adding a weapon to the top would complete the look.


Oshkosh M-ATV


This little guy is based on a real world vehicle. The long version of the name is the MRAP All-Terrain Vehicle. MRAP itself stands for Mine Resistant Ambush Protected. Basically, its a utility vehicle armored against the kinds of conditions found in recent conflicts. The top is almost ready-made for a support weapon. There is some nice detailing, but much of it is obscured by the paint job. The doors make it a little small for 15mm modern, but a repaint would make it well suited for 15mm sci-fi gaming.


The Bat


This is obviously a licensed product. Part of the Sky Busters line. The tiny seat in the cockpit looks like a very tight squeeze for a 15mm figure, but covering the canopy with paint will go a long way in concealing the scale.. A repaint could turn it into an alien gunship or armored anti-grav vehicle. The main reason I picked these pieces up was to make up for my current lack of alien vehicles. I'll have to keep an eye out of suitable flight stands.

Saturday, March 30, 2013

Ashen Stars - The Witness of My Worth


I ended up spending a fair amount of time looking for a good starter adventure for Ashen Stars. The demo offers up a taste of what the game is like, but I didn't want to kick off the campaign with it. I bought and read all the Ashen Stars adventures available to date. They were good, but not as jumping off points. I considered writing an adventure, but I didn't feel confident enough with the system. In the end, I sheepishly decided to run the adventure provided in the core book.

Yeah, I know. Core book adventures tend to be mediocre. Writing for a group that is, naturally, unfamiliar with the game means keeping things simple. The need to introduce game concepts and mechanics overshadow the things that make for a memorable game. Cunning plot twists and strong NPCs might take away from the process of learning how the game works. These assumptions, based on long experience, were why I initially didn't even consider the one in Ashen Stars. I changed my mind after reading through it while looking for ideas.

Oh, right. Robin Laws wrote this. Maybe I should have picked up on that particular clue a little sooner.

"The Witness of My Worth" did the job of introducing Ashen Stars without feeling like there were training wheels attached. The multiple ways through the adventure gave the players meaningful choices. The plot, based firmly on space opera troupes (specifically Star Trek), kept the players engaged throughout the session. Important elements of the setting were presented in a way that did not interrupt the flow of the action. Mechanics were introduced without feeling forced. The group felt challenged by a "real" adventure rather than going through "AS 101: The Keep Along the Borderspace."

The players initially had trouble getting into the mindset of an investigative game. While there are events moving in the background, there is no GM directed story to sweep the player characters along a predetermined course. It requires player characters to assert themselves over the adventure and drive it forward. Simply reacting to events doesn't work. They have to ask questions, get answers, and use those answers to determine their next step.

Likewise, the GM has to be willing to give up some control to the players. Ashen Stars is neither a railroad or a sandbox. It hands the GM a road map, shows the road signs to the player characters, and lets the players decide between the highway, the back streets, or the shortcut through Albuquerque.

I was surprised to blow through the whole thing in one session. I expected to run it in at least two sessions, since the group tends to give out after three hours. The desire to find that next piece of the puzzle kept the players going until the climax. The need to solve the mystery kept them going to the end.

We're all looking forward to the next time.

Thursday, March 21, 2013

Half Price Books Finds #2 - How to Make Wargames Terrain (In Stereo!)

New school from a decade ago and old school from almost two decades ago. The 2003 How To Make Wargames Terrain (left) and the 1996 How To Make Wargames Terrain (right), both by Games Workshop.

I found these awhile back on separate trips and decided to compare them. The two books present some sharp contrasts. While both books cover the same topic, each takes an approach firmly rooted in the trends of its time.

Now, to be clear, this isn't a full review of the books. I do offer some opinions on each book, but the focus is contrasting the two due to the differences in publication date.

The 1996 version is written as an instruction book for someone new to the process of creating terrain. Everything is laid out in logical steps. It starts off with much terrain is needed for Games Workshop miniatures games as they existed at the time, so a newcomer can plan out what he needs. It explains the tools and materials needed for terrain projects. And it presents some simple projects to start off with and continues with progressively more advanced projects as the reader's skill level develops. This approach was necessary at the time due to the lack of alternatives. The vast amount of online resources covering the topic didn't exist back then, after all.

The 2003 version assumes some familiarity with the subject matter. It leads with the need to construct a game table and creating terrain for that table. This is quite a challenge for somebody just starting out, but is a good place for someone with experience to start the planning process. Descriptions of tools and materials is pushed to the back. Most of the book is organized by terrain type: hills, woods, water, buildings, etc. Overall, the book is better suited as a reference work for someone who has already picked up the basics.

The 1996 and 2003 versions reflect very different views on materials. The 1996 presents less expensive materials as a viable option. The 2003 is set solidly in the insulation foam, plasticard, and MDF era. Granted, there are excellent reasons for using the more expensive materials - they look good and are very durable. On the other hand, someone new to the hobby does need to know about the less expensive options. Cardboard and styrofoam may not look as convincing and will not last as long as MDF and insulation foam, but they are more accessible to a hobbyist with a limited budget. Besides, the first few projects for someone starting out will be learning experiences, so why bother driving up the price of materials?

The pictures in each book really bring home the different times they were published in. The terrain in the 1996 book is less detailed, lacking the professional polish of the terrain in the 2003 book. Likewise, the models in the 1996 books are boldly painted with the green bases of the "paint it red" period. The 2003 book's models look more familiar to a current gamer. Each one shows the full panoply of techniques and materials: blending, highlighting, washes, and various basing materials. Neither approach is wrong, mind you. I certainly wouldn't feel comfortable painting a model without washes, static grass, and paints available in triads. But the look of the models in the 1996 version does have a certain charm.

In the end, both books are products of their respective times. Side by side, the two provide alternative views on the same subject. The 2003 version is relatively current. Mastering the materials and techniques in the 2003 version will allow the reader to make quality terrain. The only big change in the decade since the book was published is the growing availability and quality of pre-made terrain, something well outside the scope of this discussion. However, the 1996 presents an alternative view - older techniques using cheaper materials can also produce quality terrain. Will it lack the polish of the terrain in the 2003 book? Maybe, but for many gamers, that doesn't matter. There is good stuff in both books, depending on the project and the situation.

Sunday, March 10, 2013

A Look at Character Creation in Ashen Stars

Spent last month's gaming sessions working up new characters. The group is new to Ashen Stars, so it took awhile. The mechanical parts were relatively straightforward. The emphasis the game places on character development took the players a little off guard.

Mechanics

The players divide up shipboard and groundside roles between them. The shipboard roles relate to the operation of the player's ship in combat. The groundside roles define what each character brings to an investigation. The mechanical aspect of the roles amount to a title and a list of the skills needed to be effective in the role. The roles are not as restrictive as classes. Players can even opt out as a group from using roles and simply pick out their skills directly.

Skill selection is a simple point buy. There are no conversions between experience or other points to skill points. One point buys one rank in a skill. Points may be banked for use after character generation. These banked points can be used later, even during an adventure, to purchase new skills.

Equipment is simple. No need to go through lists to purchase every single item. Player characters are assumed to start with what they need to perform their role. This includes a sidearm, a communications device, and a data retrieval/scanning device. The only time players need to pour over lists is when big ticket items like cyberwear or their ship come into the picture.

Character Arcs

Players create a character arc with a beginning, middle, and (if desired) conclusion. These arcs relate to some goal of each player character (find a lost sister, reestablish and uphold lawful government, have a grand adventure and look good doing it). The goal and each step in achieving it are presented as one sentence ideas. These are the seeds for future adventure subplots. It is still up to the GM to incorporate these ideas into the campaign. The details (who, what, where, when, and how) are controlled by the GM, but this allows the players input into the development of their characters.

Reactions

The group had no problems with the mechanical aspects of character generation. Looking up what each skill or piece of cyberwear did take time, but grasping the concepts was not an issue.

Coming up with character arcs was a little more challenging. It's an approach to character development that places more on the players' shoulders. It is more proactive than writing up a backstory and seeing what, if anything, the GM decides to use. It allows the player to decide what is important to their character and how that effects future game sessions.

Wednesday, March 6, 2013

Painting By Numbers #9 - More Earth Exploration Teams

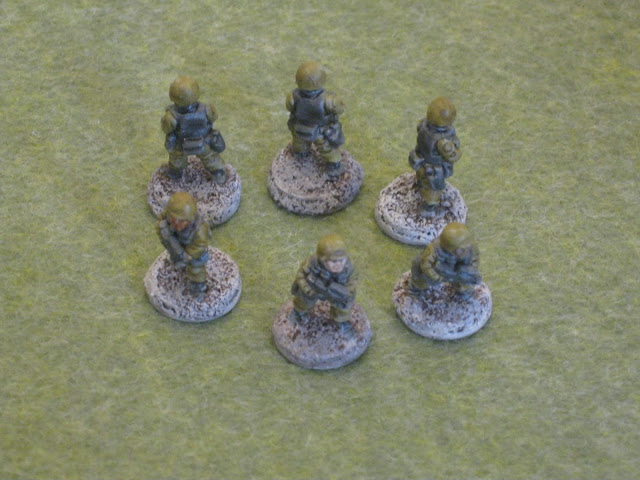
The appearance of these 15mm soldiers is inspired by a popular and long-running science fiction franchise. They'll be useful as security or light infantry in near-future or hard science fiction settings.


Note that one group has helmets and the other has patrol caps.

Base colors as follows:

Uniforms: Reaper Camouflage Green.
Vests, weapons, and boots: Reaper Stormy Grey.
Faces: Reaper Fair Skin or Russet Brown.

Washes as follows:

Vests, weapons, and boots: Citadel Badab Black.
All other areas: Citadel Gryphonne Sepia, followed by Devlan Mud.

I was going to paint the vests, weapons, and boots black. This would have resulted in a flat appearance. The dark grey with a black wash looks dark enough while letting the details show.

The first wash of Gryphonne Sepia was too subtle and too red for the effect I wanted. Going over the same areas with Devlan Mud provided the shading the models needed.

Monday, March 4, 2013

Painting By Numbers #8 - Earth Exploration Team

These are 15mm miniatures inspired by characters from a popular and long-running science fiction franchise. In addition to representing those characters, they will be useful as team leaders for security or light infantry teams.


The sunglasses on the one model is a nice touch.

Sunday, March 3, 2013

Painting By Numbers #7 - Space Portal Guards

Part of my latest completed 15mm painting project. These alien warriors with their jackal-shaped helmets are pretty distinctive. That distinctive appearance limits their overall utility, although they could be used as a Egyptian themed army in a pulp or space opera setting.


The one with gold armor is the squad leader. The team leaders are picked out with blue details. The regular troops have red details in homage to a certain science fiction franchise.

Painting was straightforward. The armor was based with a medium grey followed by an overbrush of metallic silver. The gold areas were based with brown and overbrushed with metallic gold. All areas got a diluted dark wash followed by a brown wash to bring out the details and weather the figures a little.