Thursday, April 7, 2022

The AD&D Monster Manual (1979) A - Z: Episode 2: "A - How Is Anhkheg Pronounced, Anyway?"

Continuing a series expressing a middle aged guy's opinions about the AD&D Monster Manual (D&D First Edition) from 1979. This video covers the "A" section. Warning: Attempts at humor include a dad joke referencing a decades-old sitcom.


This video is shorter than the introductory episode, mainly because the "A" section is only a couple of pages long. I decided on a longer shot to make it easier to get hand gestures in frame. Might try a middle ground for the next one.


Thursday, March 17, 2022

Throwback Project - More Wargames Factory Shock Trooper Test Pieces

Back in April 2021, I assembled and painted one of these models to test out a color scheme suitable for the whole box. That test worked well, but I had a couple of other ideas that I wanted to try before I started painting in bulk. Other things caught my attention and, with no immediate need for the figures, I shelved the project.

"It's been almost a year since this blogger made progress on this project?" "Time flies."

I recently pulled the box back out with a few goals in mind:
  • Getting more time working on multi-part 28mm scale plastic models. I'm in need of miniatures suitable as "Psychos" for my Five Parsecs From Home campaign. The strongest candidates in my current collection are box of Necromunda Eschers. However, I'm reluctant to start on them without more experience with assembling plastic miniatures.
  • Testing out a couple of military color schemes for the Wargames Factory Shock Troopers box. They will all likely end up in my Five Parsecs From Home campaign at some point, so moving forward with this project serves that end as well.
  • Developing techniques suitable for speed painting armies. I'm used to painting miniatures individually, but that approach is impractical for groups of thematically related figures. Projects like this, the Reaper Bones Zombies, and the Reaper Bones Nova Corp are helping to build up my experience in that area.
Changing My Choice of Adhesive
I switched from my usual Gorilla Super Glue to plastic cement for this product. This gave me more time to get the arms in the desired position while everything set. I'm planning on using the same stuff on the Eschers based on my experience here. I did use super glue in one area - attaching the models to the metal washers I used as bases.

They seem to be holding together well.

Thoughts on Flame Throwers
I understand that historical soldiers using flame throwers had a lower than average life expectancy in combat. A flame thrower is a relatively short ranged weapon with limited ammunition, requiring the operator to close with the target. The discharge of a flame thrower tends to attract attention and rifle rounds. While the risk of taking a round in the fuel tank is overstated, drawing fire is generally unhealthy. I kept these notions in mind while picking out bits for the model.

Olive Drab Flame Trooper - Assembly
The fuel tank on this particular flame thrower design is tiny. Given the limited ammunition, it made sense to issue this trooper a sidearm. A shotgun would have been my preference, but I made do with one of the holstered pistols in the kit. I also added a water canteen since operating a flame thrower has got to be at least as hot as grilling a meal for the family in Texas on Independence Day. The choice of head was based on which one appeared to offer the best protection from both heat and small arms fire.

Not much ammunition in that tank, I imagine.

Olive Drab Flame Trooper - Paint Scheme
The sight of assembled trooper evoked far away memories of plastic green army men carrying M2 flame throwers battling it out in the back yard. Inspired, I settled on an olive color scheme.
  • Primer coat: Krylon Fusion All-In-One Matte Black. Sprayed for full coverage.
  • Base coat: Krylon Camouflage Ultra-Flat Olive. Sprayed in a zenithal pattern.
  • Highlight layer: Reaper 09177 Camouflage Green. Dry brushed on the upper surfaces.
  • Gray areas (weapon, mask, boots): Mix of Citadel Colour Codex Grey with a little Chaos Black.
  • Wash coats: Army Painter Dark Tone and Strong Tone Quickshade Inks. Each layer was applied separately and allowed to dry completely before the next.
Khaki NCO - Assembly
Basically, I wanted to use the pointing arm. Pairing it with another arm holding a pistol and a dagger fit the theme of some kinda unit leader. The choice of a head came down to the one wearing a garrison cap and the one with tentacles. I didn't spent long making my decision. Even if I eventually get rid of rest of the box, I'll be keeping the tentacled heads around in my bits collection for as long as they last.

These came from an extra sprue, so I have a box of eighteen to go.

Khaki NCO - Paint Scheme
The steps using spray coats substituted Krylon Camouflage Ultra-Flat Khaki for the Olive, but were otherwise identical to the Olive Drab Flame Trooper. The gray areas used the same mix of Citadel Colour Codex Grey with a little Chaos Black. The wash coats were also used the same products as the Olive Drab Flame Trooper.
  • Highlight layer: Reaper 09292 Bathalian Chitin. Dry brushed on the upper surfaces.
  • Head: Reaper 09233 Bright Skin. This color is a little too pink to be a realistic skin tone for a human, but works fine in this case.
Basing
The assembled plastic models were glued to one inch steel fender washers before painting. I used the same techniques for texturing the base as I do for Reaper Bones miniatures.

Decisions, decisions.

These turned out well. Which leaves me with a problem. I can't decide which paint scheme to go with for the box! Maybe I can divide up the remaining troopers into teams, each in a different color? I'll have to think it over.

Monday, March 14, 2022

A Trash Bash Weekend!

I spent this weekend's hobby time making things out of junk. Like many craft projects, it started with something simple and ended up consuming hours of time. Still, the process of fitting things together is always soothing, even if I'm not sure what to do with a couple of the results.

The only thing I spent on this was time.

"Trash Bash" isn't new. I've done it often enough to add it as a tag on this blog. Brian S. Roe champions the practice on his blog and on the Trash Bash International Facebook Group. There are older examples to be found in Games Workshop's "How to Make Wargames Terrain" books (1996, 2003). The appeal is the reduced cost compared to purchasing terrain. Plus, there is a certain satisfaction in repurposing materials otherwise destined for a landfill or recycling bin.

Big enough to fit a 28mm miniature inside.

This weekend's adventure in Trash Bashing began with a discovery. I found out that this pill bottle fits this juice bottle cap. The threading isn't compatible, but the pill bottle locks in place with minimal convincing. It might be handy for a future stasis pod or containment tube terrain project. I set the parts aside since I have no immediate need for such a terrain piece, but the bug had bitten me.

Aft view. I'm not sure about how the engine nacelles will hold up.

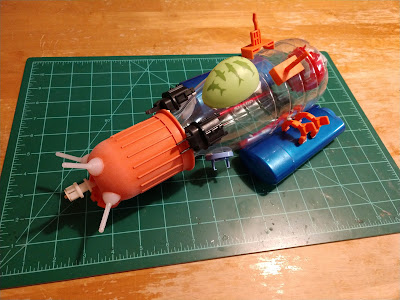
This spaceship is intended for use in my Five Parsecs From Home campaign, but I imagine that it will be handy for a variety of sci-fi games. The body is a coffee creamer bottle. I used tacky putty to attach the parts while trying different configurations. The nosecone was originally built for a project that proved unworkable, but its antenna array works as the forward sensors of an exploration ship. The engine nacelles are that staple of Trash Bashing – deodorant containers. The layout resembles a Star Trek shuttle. I'll likely play around with it a little more before committing to glue the parts together.

Needs more greeblies.

This is another spaceship, but on a different scale. The core part is half of a broken plastic laundry clip. I just added various parts from my collection until I had sometime kinda spaceship-like in my hands. It could work as a frigate with more details and a flight stand. Alternately, I might use it as a flying robot or rework it into a hover bike.

My Easter themed project?

This one was inspired by a variety of images and projects I've seen online. The curve of the spoons fit well with the form of the plastic egg. This could represent a reconnaissance drone, space probe, or a compact single occupant aerospace vehicle. I'm planning on pushing ahead and getting this one done as an Easter themed project for next month. The biggest issue will be finding ways to disguise the distinctive shape of the spoons. The solution for that will involve a deeper dive into my bits collection.

Looks like a racer.

I'll follow up with the ones I pursue further. The Easter egg project looks fun and I should have it done in time for April. I want to play around with the parts and putty on the others before applying any glue on them.

Tuesday, March 8, 2022

Let's Start a New Venture - YouTube!

I decided to try my hand at YouTube with a look at the AD&D Monster Manual. This video is an introduction covering the Forward, Preface, and Explanatory Notes. My first lesson learned is that video editing is challenging. Please excuse the choppiness resulting from me cutting every "uh..." and awkward pause. My second lesson is to come up with a thumbnail before uploading the video to YouTube. Early days, but I like figuring out new skills.


I'll see about making more videos when I get the chance. This new venture won't replace this blog. It's intended to be a new way of expressing my lifelong interest in games. Enjoy!

Sunday, March 6, 2022

Brutal Cities Eternity Lab Module A

Here's one of the Brutal Cities terrain pieces that showed up last month. Brutal Cities is a one-man operation in Australia producing 28mm scale MDF sci-fi terrain. As the name suggests, brutalist architecture is a strong influence, giving the company's terrain a distinctive appearance that isn't associated with any specific setting.

My finished piece and the card showing the color scheme used by Brutal Cities.

The Eternity Lab Module examples on the Brutal Cities website are painted in a striking combination of orange and white. I decided to use the same pattern, but in different colors. The color choices were purely pragmatic. I had spray cans of blue and khaki sitting on the shelf for awhile and wanted to use them up.

Assembly
Putting the piece together was straightforward. The instructions available from the Brutal Cities were clear and there weren't any unexpectedly tricky steps. I regard the REM Shack and Garbage Dumpsters from Warsenal as more challenging builds compared with the relatively simple structure of the Eternity Lab Module A. All parts were assembled using PVA glue.

Rosie (for scale) considers an office for her workshop.

First Spray Coat
Krylon Fusion All-In-One Matte Black. Sprayed on all surfaces including the interior.

Second Spray Coat
Krylon Camouflage Ultra Flat Khaki. Sprayed on all external surfaces. I left some of the Matte Black showing to emulate the appearance of shadows under the cladding.

Third Spray Coat - Cladding Only
Krylon ColorMaster Paint + Primer Satin Iris. I masked all the areas that would remain Khaki. This coat was sprayed on the cladding and ladder.

Rosie inspects the air vents.

Highlight Coats - Khaki Areas
A mix of FolkArt 480 Titanium White and 420 Linen. I started with pure FolkArt 420 Linen and added 480 Titanium White to each layer, highlighting up to pure 480 Titanium White in the corners. In addition to adding more depth to the Ultra Flat Khaki coat, it also covers up areas where the blue spray paint got under the masking tape.

Highlight Coats - Blue Areas
A mix of FolkArt 480 Titanium White, 520 Dark Hydrangea, and 720 Cobalt Blue. The darkest areas got a layer of FolkArt 720 Cobalt Blue. I transitioned from that to FolkArt 520 Dark Hydrangea, mixing the colors as I went from the shadows to the corners. I used the same technique for the lights, but highlighted up to 480 Titanium White.

Weathering Pass - Metallic Wear
Silver Metallic Sharpie marker. I worked with the assumption that the cladding is metal and the structure underneath is concrete or some sci-fi equivalent. With this in mind, I marked up a few spots to simulate paint wearing off and exposing bare metal. I limited this step given how heavy I went with this technique on the Warsenal REM Shack. It looks alright, but I may go back and add a little more later.

Close up of the laser cut etching on the roof.

Detail Work
The laser cut details on MDF pieces like this one sometimes get obscured as layers of paint fill them in. A coat of wash can help, but isn't a completely satisfactory solution. I tried out a new fix for this project. I stabbed the problem. Using a craft knife, I followed the laser cut lines. This removed the paint and made the lines a little deeper and easier to see. I recommend a fresh blade for this and all craft-related stabbing.

Wash Coats
I mixed a dark and brown wash for this piece. The dark wash used a little black craft paint in addition to the Payne's Gray I usually reach for. This resulted in much darker streaking and shadows than I normally get - something that would be visible on the darker blue areas. I applied the dark wash first, wiping off the excess with a sponge with a downward motion, and waited until it was completely dry before adding an additional dark wash coat. Finally, a layer of brown wash added a little dirt to go with the shadows and grime. I paid particular attention to the recessed details like the vents.

"Anybody there? I gave at the office!"

Door
The door that can be glued onto the building or kept separate. I recommend the versatility of keeping the door a separate piece, but bear in mind the gremlins that steal loose parts. Assembly as simple as gluing the two parts together. I painted the door by spraying on a coat of Krylon Fusion All-In-One Matte Black followed by a coat of Krylon ColorMaster Paint + Primer Metallic Aluminum. Finally, I applied a coat of the same dark wash I used on the main piece.

Even I should be able to remember where to order more of these signs.

Signs
I decided to have a little fun playing around with the acrylic signs I also ordered from Brutal Cities while shooting the photos for this post. I can't recommend putting this many signs on a single side of one building, but I wanted to compare how the different colored signs looked. Not all of the signs I ordered were used - a couple were a bit too long to really fit a building of this size. I'll break those out when I get around to my Eternity Labs Module C.

Signs advertising burgers, pet clones, and a milk bar.

Ryan of Brutal Cities put careful thought into the design of this building, both as a tabletop terrain piece and from an architectural perspective. Models on the roof have cover. There is both a ground level doorway and a hatch etched on the roof to permit access to the interior. A ladder provides plausible access to the roof for models on the outside of the building. Vents to provide air flow to any occupants are modeled on the side. It has the appearance of a functional building while still being usable as tabletop terrain.

Overall, I like this piece. It looks good and the interlocking MDF construction is strong. I may have overdone it with the dark wash, though.

Wednesday, March 2, 2022

Misadventure Seeds for Refueling Stations

A gas station in space. Where crews steer their ships when they run low on whatever makes them go. They offer enough amenities to keep crews occupied while their ships are gassed up. Cleaning bridge viewports and cockpit canopies costs extra.

Rosie considers opening a refueling station.

What a refueling station offers for sci-fi roleplaying adventures is twofold. How often ships have to resupply depends on the setting, but they do have to pull over sometime. This leaves the player characters at a relatively isolated location. How fast a ship can be restocked is also setting dependent, but usually takes significant time. So the player characters are stuck for awhile. This gives an enterprising gamemaster an opportunity to get them into trouble without the options of pulling strings or taking off in their ship.

Such a place could take many forms. It depends on details like what spaceship fuel is made of:
  • An orbital station circling a gas giant. It relies on scooper shuttles to collect the atmospheric gases the station processes into spaceship fuel.
  • A station orbiting a star. It uses vast solar arrays to power a manufacturing facility that can produce antimatter in industrial quantities. It's definitely not something that would be anywhere near an inhabited world or structure.
  • A set of landing pads on a backwater planet. The fuel is stored in tanks and semi-regularly topped off by visiting tankers.
  • A self-sufficient ground based refueling facility attached to an automated mining and refining operation that turns raw materials into the glowing crystals that FTL drives depend on.

Adventure Seeds:

"Everybody's Dead" - The player characters' ship drags itself to the nearest station on its last dregs of fuel. The station doesn't respond to coms. With no choice, they dock and discover that there is nobody left alive on the station. Do they stick around to review the recordings somebody left all over the place for clues and try to solve the mystery? Or do they grab just enough fuel to make it elsewhere and make a run for it? Either way, whatever killed off everybody on the station is likely to still be around.

"Whodunit?" - Somebody stumbles on a murder scene. Everybody on the station is now a suspect. Fun times ensue. The folks running the refueling station shut off the flow of fuel to make sure that everybody stays put until they get answers. If things drag out long enough, the local authorities might decide to pin the blame on a certain group of itinerant adventurers. After all, nobody knows them and they have no local influence. The player characters are going to want to do something to head that off.

"Neutral Ground" - The player characters and their sworn enemies find themselves stopping at the same station at the same time. The station authorities make it clear that they won't tolerate a conflict that risks damage to the station. Of course, there's plenty of ways to cause trouble that fall short of that standard. The bad guys are keen to try them all.

"Eat, Get Gas" - This is supposed to be a quick stop on the way to bigger and more important things. Unfortunately, the clues that something weird is going on start to pile up around the player characters. Maybe it's the strange symbols on every surface. Perhaps it's something in the air or food. Do the player characters try to figure out the station's dark secrets or do they just hope that the situation stays stable long enough to fuel up the ship and get out of here?

This post was inspired by a tweet from ToughSF featuring space station art by Alexey Pyatov.

Friday, February 11, 2022

The Last Call - Turn #2 Pre-Battle - Finding More Work from the Local Government

The first decision to make is to stay put or put some light years on The Last Call and go somewhere else. There's no assurance that the grass would actually be greener on another world. With the Local Government as a Patron, there's a reasonable chance of making money by sticking around the Pandora Innovation Zone. It looks like The Last Call will be occupying a hangar for another turn.

Crew Pay
This works out to a single credit per campaign turn. Credit Total: 11 credits.

Ship Debt
The accounts are looking thinner than at the start of Turn #1. I spent only a single credit on this item. Since Ship Debt increases by one credit per campaign turn, this is essentially the same as only paying the interest. Ship Debt: 11 credits. Credit Total: 10 credits.

Medical Care
The Med-Patches acquired on Turn #1 give me a way to get the crew roster back up to full. Removing a campaign turn from Bill's recovery time set me back 4 credits. Then the Med-Patches get slapped on Bill and Rocky. This reduces their recovery times to zero and allows them to act normally on this campaign turn. This also leaves The Last Call with a single Med-Patch in inventory. Credit Total: 6 credits.

The Last Call crew ain't broke, but they ain't exactly rich either.

Crew Tasks
With the crew needing a way to keep the credits flowing in, Mina and Freyja go to see if anybody has a job on offer. +3 bonus to the die roll with both of them looking and a Patron on the contact list.
Patron Roll (1D6): "2" modified to "5" - Mina and Freyja get word that the Local Government has work available.

Bill and Yelena go looking for opportunities to barter for new gear or score a few credits to keep the lights on.
Trade Table Roll - Bill (%): "100" - With a grin and an "ask me no questions and I'll tell you no lies" attitude, Bill rolls back to The Last Call with a collection of Starship Repair Parts. This counts as 1D6 credits for repairing Hull Point damage to the ship. Single use.
Trade Table Roll - Yelena (%): "40" - Yelena swaps some unneeded supplies for a pallet of Trade Goods. These are worth 1D6 credits when sold on another planet. A die roll of "1" means that they spoiled or were damaged in transit. I'll make the roll when The Last Call makes the trip to another port.

Rocky tinkers with the damaged Plasma Rifle Bill found on Turn #1. She gets a +1 bonus to the die roll from her Savvy score.
Repair Roll - Plasma Rifle (1D6): "6" modified to "7" - the Plasma Rifle comes to life with an ominous hum.

Lin tries fixing the Brutal Melee Weapon she busted on the carapace of a Large Bug. She gets a +2 bonus from her Savvy score.
Repair Roll - Brutal Melee Weapon (1D6): "2" modified to "4" - Lin's just going to have to do without her favorite attitude adjustment tool for awhile. She can try again on the next campaign turn.

Good thing I have a plastic Rosie (the miniature I use for Lin) holding a rifle.

The Job Offer
The Local Government is offering a paltry single credit in Danger Pay for this one. Worse, they are in a hurry. The job must be done this turn or the opportunity is lost. The Local Government doesn't offer any Benefits, but there are no Hazards or Conditions on this job either.

Assign Equipment
With the outcome of the battle on Turn #1 firmly in mind, the crew reaches for more firepower before going to work. The Shotguns purchased last turn would come in handy for that goal. The Plasma Rifle that Rocky got working would help even more. Unfortunately, the crew is fresh out of Frakk Grenades.
  • Mina - Shotgun, Glare Sword, Frag Vest, Boosted Leg (permanent, but noted here for completeness).
  • Bill - Shotgun, Hand Laser, Dazzle Grenade.
  • Rocky - Plasma Rifle, Machine Pistol.
  • Lin - Auto Rifle, Hand Laser.
  • Freyja - Shotgun, Machine Pistol.
  • Yelena - Shotgun, Beam Pistol.

Resolve Rumors
I had a pair of Rumors, but my roll of "5" was too high for anything to come up.

Choose Your Battle
The crew of The Last Call doesn't have to worry about Rivals trying to ambush them yet. An Opportunity mission seems like a bad idea with the Local Government getting anxious about whatever they need done. That leaves the Patron mission for the Local Government.

Readying For Battle
This is actually part of the Battle stage, but I'd rather do it now. It helps to know what miniatures and terrain I'll need.

Deployment Conditions Roll (%): "90" - "Caught Off Guard" - The crew all act in the Slow Actions phase of Round #1. Again.

Notable Sights Roll (%): "39" - "Priority Target" - A random enemy gets +1 to their Toughness. If that enemy is killed, the crew gains 1D3 credits.

Patron Mission Objective Roll (1D10): "6" - The Last Call crew must Secure the site.

Determine the Enemy: A series of die rolls reveals that the opposition takes the form of eight Psychos. Unsettled by long exposure to deep space, these folks are mostly armed with Scrap Pistols and Blades. Two are Specialists packing Rattle Guns instead. Fortunately, Psychos are also Bad Shots. The gang is led by a Lieutenant. As Criminal Elements, Psychos may have a bounty on them and tend to be vindictive, increasing the chance that they will become a Rival.

Where am I going to find miniatures suitable for use as a criminal gang? Dunno.

It looks like I'll have to paint up my alternate miniature for Lin. And I have some Psychos to prepare! The battle report for Turn #2 might be awhile.

Tuesday, February 8, 2022

A Brutal Cities Package Appears!

I used some of my Christmas cash on my first order from Brutal Cities, a company offering MDF terrain out of Australia. It's a one person operation run by a gentleman named Ryan. He fulfilled my order as soon as he got back from the holiday break. It took a month for the package to make the voyage from Australia to the United States thanks to the current state of affairs.

I didn't remove the backing on the signs before taking this photo, so they don't look as bright as they should be.

Billed as "Wargaming Architecture" on their website, Brutal Cities terrain has a functional aesthetic that fits into a variety of sci-fi settings. I first learned of the company on YouTube: One Terrain for All Games - Brutal Cities (MDF) by 52 Miniatures. In need of more 28mm scale sci-fi terrain for some reason, I put in a modest order.

Eternity Lab Module A & Module C
Brutal Cities' Eternity Labs is a modular MDF terrain system designed to be stacked up or spread out as needed. Module A is the smallest one and Module C is the largest. Brutal Cities offers a bundle of three Module B pieces in addition to individual pieces. The bundle something I'm keeping in mind if I choose to expand my collection down the road.

Cyberpunk Acrylic Neon Signs
This is a set of eight acrylic signs designed to hook onto a 3mm MDF terrain building. The pink and green are really bright, selling the idea of them being neon - although they would likely be some kind of LED technology even in a cyberpunk hellhole. There's a nice selection of signs advertising various fictional businesses. One's for a milk bar, another for a burger joint, a couple that I'll have to squint at later, and a couple for Brutal Cities itself - which is fair enough, I figure.

One of the signs didn't survive the trip from down under. I haven't decided if I'm going to just leave it as "weathering" or try to glue it back together.

I'm looking forward to putting these together, painting them up, and seeing how they work on the tabletop. There's plenty more variety to choose from if I take a liking to them.

Sunday, February 6, 2022

Zealot Miniatures Demon Gate (Red)

This is a resin piece with a translucent plastic insert representing a portal generated by pointy bits instead of a ring thingy. I purchased mine from Zealot Miniatures when I was going hog wild over various Black Friday/Cyber Monday Sales late last year. The plastic insert is available in red or blue. I opted for red given the aggressively spiky appearance of the resin model. The glow effect took some time and effort, but I think it turned out well.

Not ominous. At all.

Preparation
There were some bits that needed to be fixed. The plastic insert had a rough edge that needed to be sanded down. I also had to remove a tab on the resin part. The biggest issue was that the resin piece tended to wobble, so I had to sand down the bottom to get it to sit level. Following that was the usual scrubbing in warm soap and water. I set the clear plastic inset aside - no priming or paint was applied to it.

"I think we're guarding the wrong thing." "Yes. Yes, you are."

Primer Coat
Tamiya Surface Primer (L) in Gray sprayed evenly over the resin piece.

First Paint Coat
I brushed on a layer of FolkArt 479 Pure Black diluted with water to darken the gray primer and fill in the recessed details.

Second Paint Coat
Next came a light dry brush of FolkArt 480 Titanium White as a highlight on the uppermost areas.

"How about you go through and see what's on the other side?" "How about no."

Glow Effect
I used layers of FolkArt 437 Lipstick Red, 932 Calico Red, and 480 Titanium White to color the crystals sculpted on the model and build up the glow effect radiating out from the crystals and portal. My initial attempt turned out more pink than red. The solution was to darken it down with washes and dry brush more of the glow colors with more of an emphasis on the darkest red color. The washes were FolkArt 479 Pure Black and 231 Real Brown diluted with water. Excess wash was wiped away to prevent pooling. The second layer of red glow colors worked much better.

Assembly
I glued on the red plastic insert with a drop of Tacky Glue. This was to avoid any potential issues with using superglue on clear plastic. No primer or paint was used on the plastic insert.

What happens if somebody goes through the back of one of these things?

This was a quick and fun rainy day project. The completed piece has a distinctive look and works well with 15mm and 28mm scale miniatures. I'm really pleased with how the red glow came out. I'm not sure if I can convince any players to risk their characters on a trip through it, but I can always have something step out of it for a visit.

Friday, February 4, 2022

Warsenal REM Shack TR-MDF-TER-REM-SHK

Known as "The Barn" or "The Red Shed" to the local population, this structure has changed hands (or equivalent manipulator) many times over its existence. The businesses it has hosted include: a small machine maintenance bay, the branch office of a repair services company, a chop shop disguised as a robotics workshop, and a portable communications device outlet. The communications and sensor arrays have gradually been upgraded over the structure's history. The initial set up was a dispatch system for service technicians. The largest expansion took place when the structure briefly hosted a pirate subspace radio station. The original sensor gear was a diagnostic rig, but was later expanded to monitor the nearby area for law enforcement activity during those periods when the structure was used for illicit enterprises. The structure is currently unoccupied and has passed all required inspections.

- Kessler's Upcycling Sales Catalog

Rosie considers a fixer upper for her new workshop.

This is the REM Shack from Warsenal. It is marketed for use in Infinity, but what caught my eye was its potential as a versatile scale-neutral terrain piece. Besides, Five Parsecs From Home turns out to need more terrain than I thought it would.

Assembly
The REM Shack is all MDF except for the plastic antenna. I had a relaxing time putting it together. The instructions - available from Warsenal as a .pdf download - were clear enough. None of the parts needed convincing to go where they needed to go. I used Tacky Glue, but any white glue should work. If I were to get another REM Shack, I might leave a few parts off until after spraying on a base coat. Getting paint into some of nooks and crannies was a little annoying.

Some 15mm scale GZG Survey Team personnel for comparison.

First Spray Coat
Krylon Fusion All-In-One Matte Black sprayed evenly on all surfaces.

Second Spray Coat - Base Only
Krylon ColorMaxx Paint + Primer Matte Deep Gray on the flat base only. This is intended to represent concrete or some sci-fi equivalent. I masked off the base after this coat dried.

Third Spray Coat - Metallics
I picked out certain areas for a layer of Krylon ColorMaster Paint + Primer Metallic Aluminum. These areas were masked off afterwards. I also sprayed the upper surfaces to achieve a zenithal effect.

Fourth Spray Coat - Red
All of the remaining (unmasked) areas got a layer of Krylon ColorMaster Paint + Primer Matte Poppy Red. The red is noticeably lighter in the areas previously sprayed with Metallic Aluminum and darker over the Matte Black.

I'm not sure what that duct is supposed to do, but it looks nice.

Touch Up
I found some overspray after removing the masking tape. It happens. These areas were corrected by various means. I brushed on a little gray paint where the Poppy Red got on the base. A Silver Metallic Sharpie covered up the Poppy Red that showed up on the metallic areas. There was also some Metallic Aluminum showing on some of the Poppy Red areas. I used some diluted black paint to conceal it and simulate grime.

Detail Pass - Yellow
The REM Shack has some small rectangular details that I decided to bring out. They looked like some kind of futuristic fasteners to me, so I was originally going to go with a metallic gold or copper color. However, the yellow I picked to go under the metallic really popped against the Poppy Red. I liked the effect enough to leave it as is.

Weathering Pass - Metallic Wear and Tear
I used a Silver Metallic Sharpie to simulate areas where the red chipped away.

Wash Layer
Finally, I finished up with the messy stage - brushing on a dark wash over all surfaces and wiping off the excess. I used a downward motion where possible to simulate grime flowing down the structure. I followed up with diluted black paint in areas where I wanted the weathering to be darker.

The back is also well detailed.

I've been ordering scatter terrain from Warsenal for quite awhile, but this is the first building I've purchased from them. Overall, I'm happy with it. There is a great deal of complex detail added to a relatively simple shape. It works with both 15mm and 28mm figures and will make a good display piece in between seeing action on the table.