Sunday, December 29, 2013

Ashen Stars - Reflect, Reorient, Reboot


Our group's Ashen Stars game went on hiatus earlier this year. After running two published adventures, something felt off. That unease grew as I read through the other published adventures. Unable to put my finger on it, I put the game on pause while we tried other games.

But that feeling didn't go away.

There was the potential for a good game in Ashen Stars. One that I wanted to run. A better one than I had been running. Where was it?

There could be no ongoing story if I was running a series of unrelated published adventures. I knew that going in. The whole point was to test-drive the game without a major creative commitment. That wasn't the issue.

I had a hard time working the characters arcs into the game. The first two adventures I ran had no room for them. The ones that were in the pipeline didn't either. That bothered me.

I talked about it with the players. They pointed out that, of the two adventures they played, neither had a conclusion that flowed from what the player characters discovered before. They felt that there were no real hints to what the ending would reveal. The solutions felt outside the context of the adventures. From their perspective, it would be like Sherlock Holmes find out that the criminals were the Martians from H.G. Wells' War of the Worlds.

It was good feedback. The issue may have been with those two specific adventures or my handling of them. But that explanation didn't satisfy me.

I thought it over some more. Then it hit me. There was a core issue that I needed to address.

Our group restarted the campaign. A complete reset with new characters and character arcs linked to an ongoing plot. That would provide a solid narrative structure that the previous campaign lacked. The first session was right before the holidays.

More importantly, I dumped the game that I ended up running for the game I wanted. I didn't want space police procedurals of the week with the player characters as interstellar private eyes poking around for clues, finding bodies, interviewing witnesses, and getting in over their heads. In particular, reading through Ashen Stars' attempt at noir left me cold.

Ashen Stars and GUMSHOE should be able to handle more than space cops.

There is a cycle that exists in most TV space opera stories. Star Trek, Babylon 5, classic and reimagined Battlestar Galactica, and Firefly all use it to some extent.
  • The crew gets involved in a situation.
  • The crew gathers information and takes action.
  • As a result of that action, the crew gather more information.
  • Now better informed, the crew takes further action.
  • This cycle continues until the crew has enough information to take actions to resolve the situation.
In these stories, the crew is not explicitly looking for clues to solve a mystery. (Unless the episode is a mystery story this week.) They are getting information and working out how to solve a problem with that information. A key difference between a mystery and a space opera story is when the action takes place. A mystery is about what happened, how it happened, and why it happened. A space opera story is about what is happening, why it is happening, and how to resolve it before past tenses are used to describe it.

What I want is a space opera game. What I was presented with was a mystery game. Fortunately, Ashen Stars and GUMSHOE can do both.

Looking at the published materials with new eyes, I can see the game I want there. It is supported by some of the published adventures. Unfortunately, those adventures are not enough to hang a campaign on. An ongoing plot of my own devising was in order.

And so, a casting off of baggage, a break in continuity, and a fresh start for a game with a little less Mike Hammer and a little more Mass Effect.

Saturday, December 28, 2013

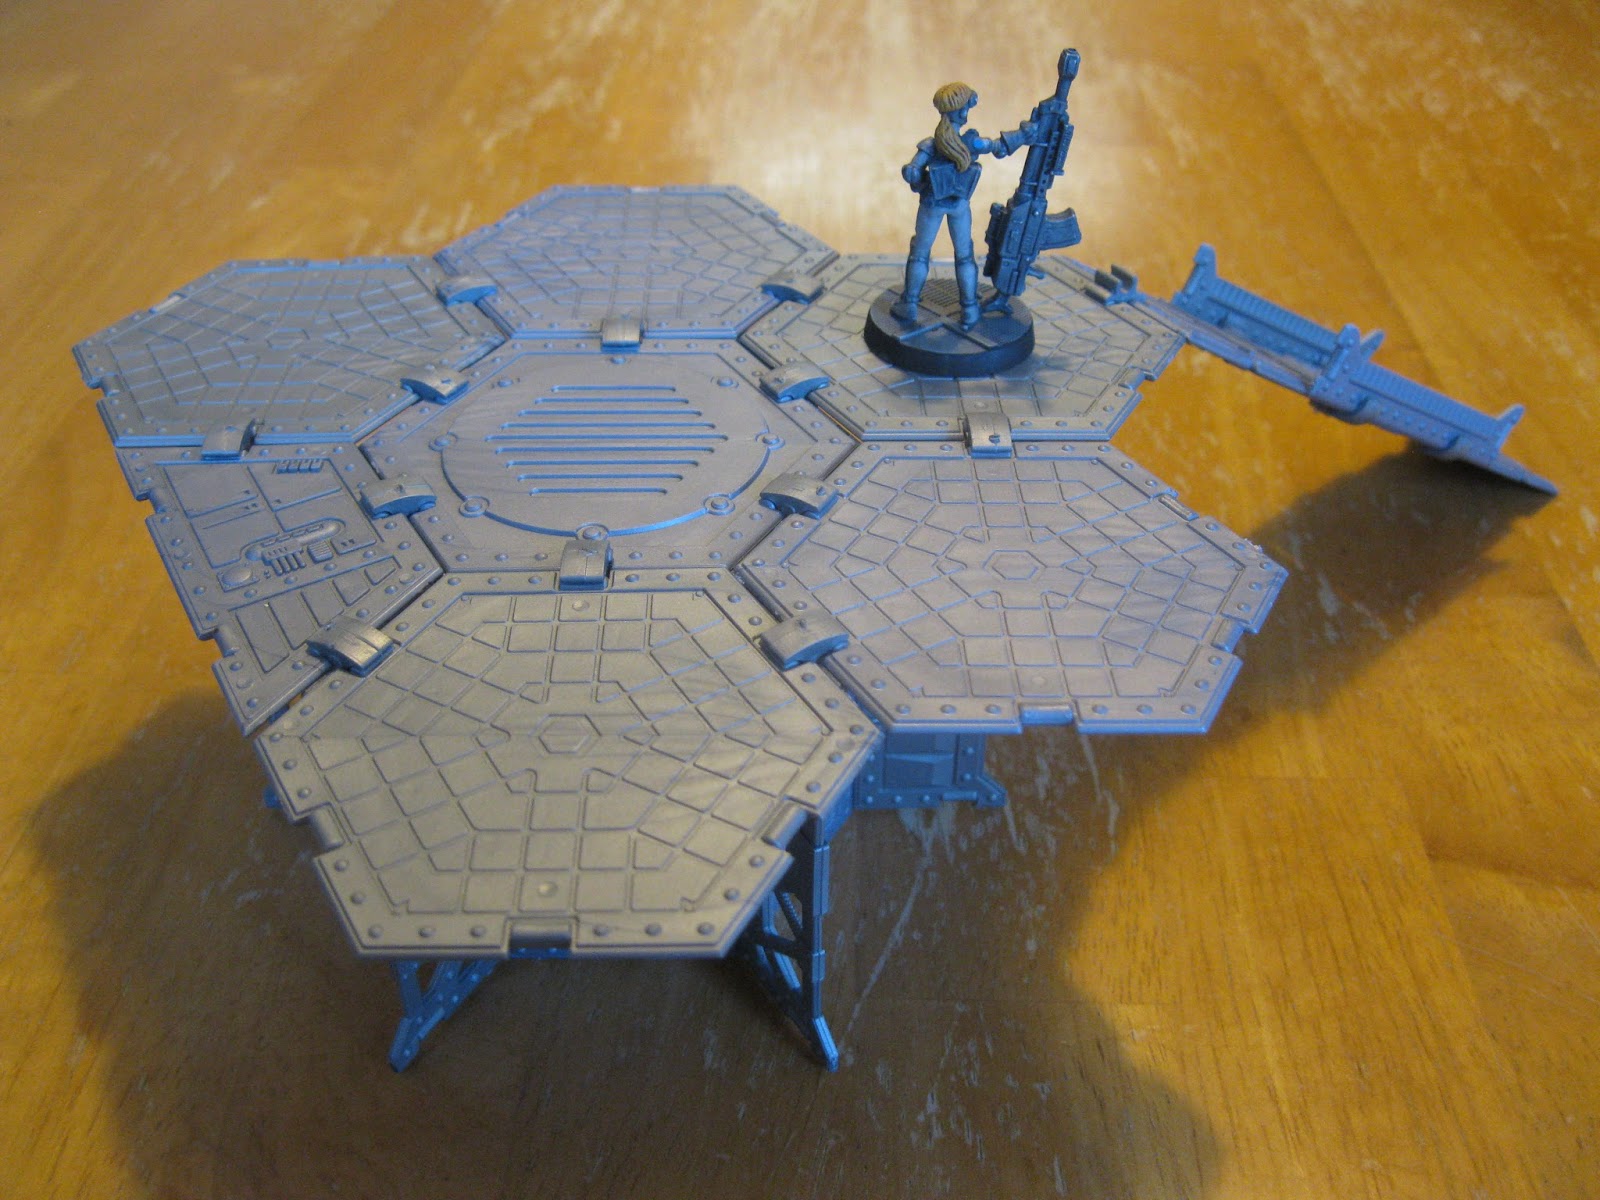
Workbench #7 - Hexagon Construction Landing Pad and Industrial Spire

These are a couple of new terrain pieces built from a pair of Hexagon Construction Sets. The sets are currently distributed in the United States by Pegasus Hobbies. These have been available for awhile, so you likely have seen them before in some form.

A Large and Small Set caught my eye back at Millennium Con. I've been interested in picking them up for awhile now, but not enough to place an online order. But with two of them sitting right there with some cash burning a hole in my pocket, well...

...I've been playing around with them ever since.

My understanding is that the Hexagon Construction Sets were originally made for a Russian wargame scaled for 25mm. They comfortably scale for anything from 15mm to 28mm with a little management of details like ladders. The doors are undersized for 28mm, assuming that the doors are intended to be walked rather than crawled through.

The parts are well detailed with high tech looking greebles. The overall appearance of a finished assembly tends towards unrefined and functional. A terrain piece made from these sets would fit in well with a gothic or steampunk aesthetic.

All of the parts are made of plastic and are held together by plastic clips. Different clips allow for the parts to be assembled at different angles. I did run into an issue with flash on the sprues gumming up a few of the clips. However, the large number of clips available on the sprues make this a minor concern.

Landing pad ramp-side view with two Titan Marines (15mm) and a Sky Scorcher for scale.

This piece fills a hole in my terrain collection - a landing pad and ramp. The design is based loosely on a couple of pieces I saw at Millennium Con 12+1 in 2010. The pad itself is built from 1 half-hexagonal and 6 hexagonal parts. It is supported by 6 rectangular parts. 6 parts originally intended as 25mm scale handrails act as buttresses to reinforce the whole structure. The ramp is built from 2 rectangular parts reinforced with 2 smaller "handrail" parts. The structure is quite sturdy and lightweight. Unpainted.

Landing pad alternate view with Sarah Blitzer (28mm) for scale.

The landing pad is ideal for 15mm. Every 15mm-compatible flying craft in my collection fits on the pad with plenty of room to spare. Of course, that might change if I ever buy some behemoth of a dropship. Using the pad for 28mm scale is a little more problematic. A small shuttle or flying car would fit, though.

Industrial Spire with a Titan Marine (15mm) and Sarah Blitzer (28mm) for scale.

This industrial looking piece is an exercise in what I could make with a bunch of triangular parts. It could be an atmosphere processor, a solar power station, or a widget replicator, However, I think we all know its main job is to block lines of sight. The piece is intended to work with 15mm or 28mm scale figures. Unpainted.

I'm still playing around with the considerable amount of parts still in the sets. The large square parts look handy for a larger structure. The smaller parts have possibilities for scatter terrain once the bigger ones are used up. Overall, I'm glad I picked up these sets.

Saturday, November 16, 2013

Millenniumcon 16 Saturday Morning

The second of two games I played at Millenniumcon 16 last weekend. This was one of the best morning convention games I have ever attended - the hosts brought donuts, kolaches, and coffee.

Wolves from the Sea

Saturday morning slot. GMs: Matt Kibbe and Adam Rios.

Best. Morning. Game. EVER.

Saga is a miniatures skirmish game set during the Dark Ages by Gripping Beast. It is a historical game, but not in the sense of accurately modelling combat in a specific period. Rather, it depicts what might be said about a particular battle after the fact. The kinds of tales that come out late in the evening after a few drinks, a fine repast, and a few more drinks. This was another game I heard about from Meeples and Miniatures and looked forward to giving a try.

This was an open demonstration. Players were paired off against each other and given a selection of four point armies to choose from. I ended up playing the Irish against the Vikings. The scenario started with the warlords from both sides already in close combat range and the rest of their armies deploying on the edges of the board.

Overall setup. Both mats were divided, allowing 8 players to play in 4 simultaneous games.

First Impressions - Pros:

The core game system is light and fast. Granted, this was a stripped-down demonstration game, but all of the players seemed to pick up the rules quickly. Play time was roughly two hours, including instruction time.

The Irish and the Vikings have a very different flavor and rely on different tactics. The Irish use missile fire to soften up their opponents as the range closes. The Vikings favor melee combat. The special abilities of each faction further add to their strengths.

The custom Saga dice determine what a player can do with his army on a particular turn. Units (other than the warlord) must be allocated dice to act in a given turn. Symbols and combinations of symbols can activate special abilities.

The action on the board is very fluid. Units move up to engage and losing units fall back. The back and forth maintains focus. My attention never wondered far from the board, even when it was my opponent's turn.

First Impressions - Cons:

I generally regard "I-go, you-go" initiative as a weakness in a system. It is not as noticeable in Saga. The fluid nature of the game results in relatively little down time during the other player's turns. The period also helped. There were no large fields of fire to encourage players to hunker down in cover and result in a static game.

Each faction has their own custom Saga dice. Each set of six dice costs around $20.00 USD. I regard that as a little on the expensive side.

Overall:

I had a fun time. The game is challenging and kept my attention until the end. Saga is a candidate for my next game, but I have a number of projects to complete until I can take on a new period.

Millenniumcon 16 Friday Night

Millenniumcon 16 was held in Round Rock, TX last weekend. I only managed to play in two games due to a combination of schedule conflicts and game slots filling up. Of course, that's double the number of games I get on a "good" weekend, so I'm pretty happy with that.

Chain of Command Boot Camp

Friday night slot. GM: Tom Primrose.

Central board set up and initial deployments.

Chain of Command is a game that I've been interested in trying since hearing about on the Meeples and Miniatures podcast. It's a WWII platoon level skirmish game by Two Fat Lardies. Normally, I don't play much in the way of historical games, but this one caught my attention.

This was a demonstration game offering a taste of the system without getting bogged down. The scenario featured an American patrol and a German patrol running into each other in the ruins of a European town. The GM took us through force construction, the patrol phase, using command points, the initiative mechanics, and combat.

American G.I.s pile in and around a ruined house for cover.

First Impressions - Pros:

Chain of Command force construction is based on historical deployments. This helps to avoid the "Tiger Problem" found in some WWII games. No showing up to a minor skirmish in a no-name town with every last Tiger tank historically deployed to this part of the front.

The patrol phase and the fact that neither side starts with forces on the board gives the game a very different feel. It avoids the race line start seen in many other miniature games. Instead, two forces grope to find the enemy and scramble to get available forces into the fight.

The initiative system uses dice to determine which units can activate in a particular round. Officers can use command points to activate other units. Senior officers can activate more units than junior officers since they have more command points. A unit with an attached officer is more flexible than one without an officer. This shows the importance of leadership on the battlefield.

The game succeeds at showing the differences between national armies. Each American rifleman had good firepower in the M1 Garand, but the BAR could only provide limited support. This had the effect of spreading out American firepower. Every rifleman not getting in line of sight to a target led to a measurable loss of firepower.

On the other hand, German infantry was armed with a bolt-action rifle, but was supported by belt-fed machine guns with a rapid rate of fire. This meant that their firepower was concentrated in those machine guns. Getting the machine guns into position was the critical part of maneuvering for the Germans.

Decision point: German infantry deploy to stop the American advance.

First Impressions - Cons:

The game never really came together for me. Every rule makes sense - I understand and approve of the logic behind each individual rule. But I never felt those rules flowing together into a system. The game remained a collection of rules. Part of this might be lack of repeated play or the convention experience of splitting a side up among multiple players.

Endgame: the Americans wipe out the defending Germans with a courageous, but costly charge.

Overall:

This is a good game and I had a good time with it. The tactical challenges were interesting and the game was close up until the end. Chain of Command is a game I'll be keeping an eye on, but it might not be my next game.

Monday, October 28, 2013

Painting By Numbers #11 - Rebel Minis Titan Marines Infantry

This is a test batch of some Titan Marines Infantry by Rebel Minis. I felt the need for more sci-fi 15mm infantry to use as OPFOR and these guys won out over the alternatives. The stosstruppen look really sold me. Sometimes there is a need for OPFOR that dress the part.

I was very pleased with these guys when they showed up in the mail. Order fulfillment was fast. The details are good and there are a variety of poses. The mold lines were easy to deal with. The integral bases were small, but I was planning to glue them on washers anyway.

Picking out a color scheme was tough. There was the neo-samurai scheme with blood red armor plates over blue cloth. (I might revisit the idea for a command or elite unit.) A desert camouflage scheme which would have been khaki with a brown wash. (Dull.) A jungle camouflage scheme which would have been olive drab with a brown wash. (Dull.) I even considered a "Space Imperium" sturmtruppen scheme with white armor plates over black cloth. (Funny for awhile, but the joke would get real old, real quick.)


In the end, a quick, efficient scheme for batch painting made the cut. A dark grey primer was followed by a coat of Reaper Stormy Grey (09088). Over that went a coat of Citadel Badab Black Wash. The wash shaded the figures and brought out the details, but that was secondary to darkening the grey base coat. The lenses were picked out with Reaper LED Blue (09288). The basing was my usual sand/paint/water mix drybrushed with a sandy color. The figures got a layer of Testors Dullcote after everything had a day to dry.

This scheme will end up being the standard for my Titan Marine infantry collection. It looks good and is practical for production-style painting. Now I just need to get the rest ready to paint.

Saturday, October 26, 2013

Reaper Miniatures Bones II: The Decision

So, I ended up backing Reaper Miniatures' latest Kickstarter. I actually made the decision a little over a week ago, but I kept up with the updates to see if Reaper came up with something to change my mind. In the end, I stuck it out - a $1.00 pledge, a few add-ons, and a little bit of sales tax (since Reaper and I are in the same state).

In the end, I just didn't want to be stuck with miniatures I didn't have a need for. While there were individual pieces in the Core Set and each Expansion Set that caught my eye, there were many that would end up as clutter. And I have enough gaming-related clutter to deal with as it is. Besides, it's not like this Kickstarter will be the only way to get the pieces I liked. They'll hit the shelves in a year or so. In the meantime, I've got a backlog to work through.


Sunday, October 6, 2013

Reaper Miniatures Bones II: Still Thinking It Over

I'm conflicted on how much money I'm going to be throwing at this one. The "WOW!" feeling I got from the first Reaper Bones Kickstarter just isn't there. And there is the big painting backlog that I've got to get under control.

Looking over the Core Set was a little bit of a disappointment for me. It has about a dozen "I gotta have it" models in it. Plus a dozen more "be nice to have" models. Buying all of those at retail price once they are out would cost less than the $100 of the Core Set. Even better, I could spread the cost out over time.

Some of the Options are really tempting though. The Water Elementals would nicely balance out the transparent Bones I already own. Dungeon Decor II looks handy. And I could always use a Gelatinous Cube and a couple of slimes.

And there is all the unpainted metal, resin, and plastic around my workbench to consider. Do I really need another pile of Reaper Bones to dump on top of all that?

I got nobody but me to blame for the backlog. I spent just shy of $250 on the first Reaper Bones Kickstarter. It's going to take me months to get to the majority of them. Taking advantage of various sales to get "new shiny" figures in 15mm and 28mm on top of that wasn't the smartest move. I just have to shop less and paint more.

Maybe I should just pledge $1 and get a few, carefully selected add-ons? And then I could buckle down on painting until they show up late next year?

Nice theory. Fortunately, I've got time to think it over.

Sunday, September 22, 2013

Painting By Numbers #10a - Reaper Bones Great Worm UPDATE

Chief Lackey Rich over at The Miniatures Page suggested that I post a "down the throat" image of Jimmy. As he pointed out, the mouth is one of the best features of the model. I snapped a quick picture today in Jimmy's natural environment - the inside of my display case.

RAWR!

Thanks for the suggestion, Chief Lackey Rich!

Friday, September 20, 2013

Painting By Numbers #10 - Reaper Bones Great Worm


This is the Great Worm (77006) from the Reaper Bones line. Like Rolf, I bought the Great Worm to experiment on while learning how to work with Reaper Bones plastic. Also like Rolf, I came up with a name to avoid typing "the Great Worm" more often than I have to. "Jimmy" sounded pretty good.

By the way, Rolf is taking a long bath in Simple Green on the recommendation of the folks on the Reaper forum. There might be something strange in the plastic mix used to make Rolf. That "something" did not react well with the Krylon spray paint I used as a base coat. I'll be exploring alternate techniques with him later, but Rolf has been pushed back in the queue in favor of other projects.

In this experiment, I decided to simply approach it like I would a metal miniature. Nothing new and nothing fancy. Just a coat of spray primer, followed by a base color, washes, and details.

The first challenge was to make Jimmy sit flat on a surface. The miniature was deformed in a way that made falling over a concern. I glued Jimmy on a 50mm plastic base from Privateer Press. The wider base made the miniature very stable, particularly after basing material was added.

The spray primer was by Design Master. It has provided a good coat on every material I have ever tried it on - metal, various plastics, and resin. Unfortunately, the smooth surface it provides is not the best for acrylic paint. The paint tends to flow rather than "hold" long enough to dry. This was not a major issue in this case, since I planned to use washes to provide most of the color on Jimmy.


I've seen the underbelly painted a different color from the main body, but decided on a single color for simplicity. The base coat was Reaper Amethyst Purple (09024). Over that went a wash of Reaper Burgundy Wine (09025), Amethyst Purple (09024), and water. Once that was dry, I applied a second layer of wash - Citadel Leviathan Purple.

The fleshy parts of the mouth were painted with Reaper Bright Skin (09233) and given a wash of Citadel Baal Red. Reaper Graveyard Bone (09272) was used for the teeth and the rocks around the body. The rocks embedded in the body were also painted with Reaper Graveyard Bone, but with a touch of Citadel Ball Red after it dried to simulate irritated flesh.

The basing material is sand held in place by a mix of brown craft paint, tacky glue, and water. I overbrushed some linen craft paint over the sand. This gives the base a more natural appearance than a single layer of color could. The outer edge of the base was painted black.

The final step was to seal the miniature and base with Testors Dullcote.

Overall, I like how it turned out. The whole process was free of problems. One surprise was the level of detail. The white of the unpainted Bone material seems to obscure the figure even on close inspection. The washes brought out the more subtle features. Even the coat of gray primer allowed me to pick out more details than before.

Saturday, August 10, 2013

Half Price Books Finds #3 - Four More AD&D Modules


The most recent gaming finds from Half-Price. All were in fine shape - no handwritten notes, no stains, and the corners were still sharp. Which made it rather annoying when it came time to remove the price tags. Taking them off also tore off bits of the covers. Even worse, removing the adhesive that the tags left behind also damaged the covers.

Three of these modules are from the Slave Lords series. The entire series of four modules were recently republished by Wizards of the Coast in a single hardcover volume - Against the Slave Lords. I prefer the originals both for nostalgia and for ease of use. Speaking from personal experience, running a dungeon crawl is easier if the map and encounter book are separate and if both can be laid flat.

The Slave Lords series is considered a classic, but does have flaws. I found the first two modules - A1 Slave Pits of the Undercity and A2 Secret of the Slavers Stockade - to be the strongest of the series. Both are straightforward dungeon crawls with challenging encounters and memorable NPCs. A3 Assault on the Aerie of the Slave Lords suffers from being two very different adventures leading to a foregone conclusion. In the first part of the adventure, the party has to infiltrate the Slave Lords' stronghold. This is a interesting change from plowing through monsters and traps. In the second, the stronghold funnels the party through a deadly set of encounters only for the party to end up captured through the use of a deus ex machina. This renders the party's previous efforts moot. If the party is going to end up captured no matter what they do, why bother spending all that time running through the stronghold? On a meta level, the capture is necessary to set up the next module in the series, but that isn't a satisfying reason for many players. A4 In the Dungeons of the Slave Lords starts up with the party thrown into a dungeon with none of their equipment or usual selection of spells. Taking away their hard-won cool stuff in a game that is based on killing things and getting their stuff is guaranteed to annoy players. The challenge is for the party of use their limited resources to escape the dungeon. Confronting the Slave Lords and getting their stuff back is possible, but not automatic.

The other module is D1-2 Descent into the Depths of the Earth. It is part of the series that starts with G1-2-3 Against the Giants, continues with D3 Vault of the Drow, and ends with Q1 Queen of the Demonweb Pits. This series was critical in introducing the Drow and the Underdark to D&D lore. If I ever manage to get a copy of D3 Vault of the Drow, I will be able to do something I never got the chance to in the old days - running a party through the entire series.