Wednesday, May 4, 2022

May the 4th - More Atmospheric Water Condenser Terrain

I wanted a project that tied into May the Fourth Be With You, but I also didn't want to just pick up a Star Wars miniature or model. Instead, I looked through my mess to see if there was anything Star Wars inspired I could do. While last year's Atmospheric Water Condenser Scatter Terrain didn't start as such a project, it went that way after I slapped on a worn desert themed paint job. So I decided to make a couple more.

Original terrain piece in the middle for comparison. Rosie included for scale.

And I immediately ran into the problem of not having all the parts and paint to replicate the original Atmospheric Water Condenser exactly. The others could represent different models or field modifications using after market parts. In any event, discussing the original parts and their replacements might be instructional for those tackling their own projects.

Core parts from left to right: dial, hub, pull tab. Original terrain piece in background for comparison.

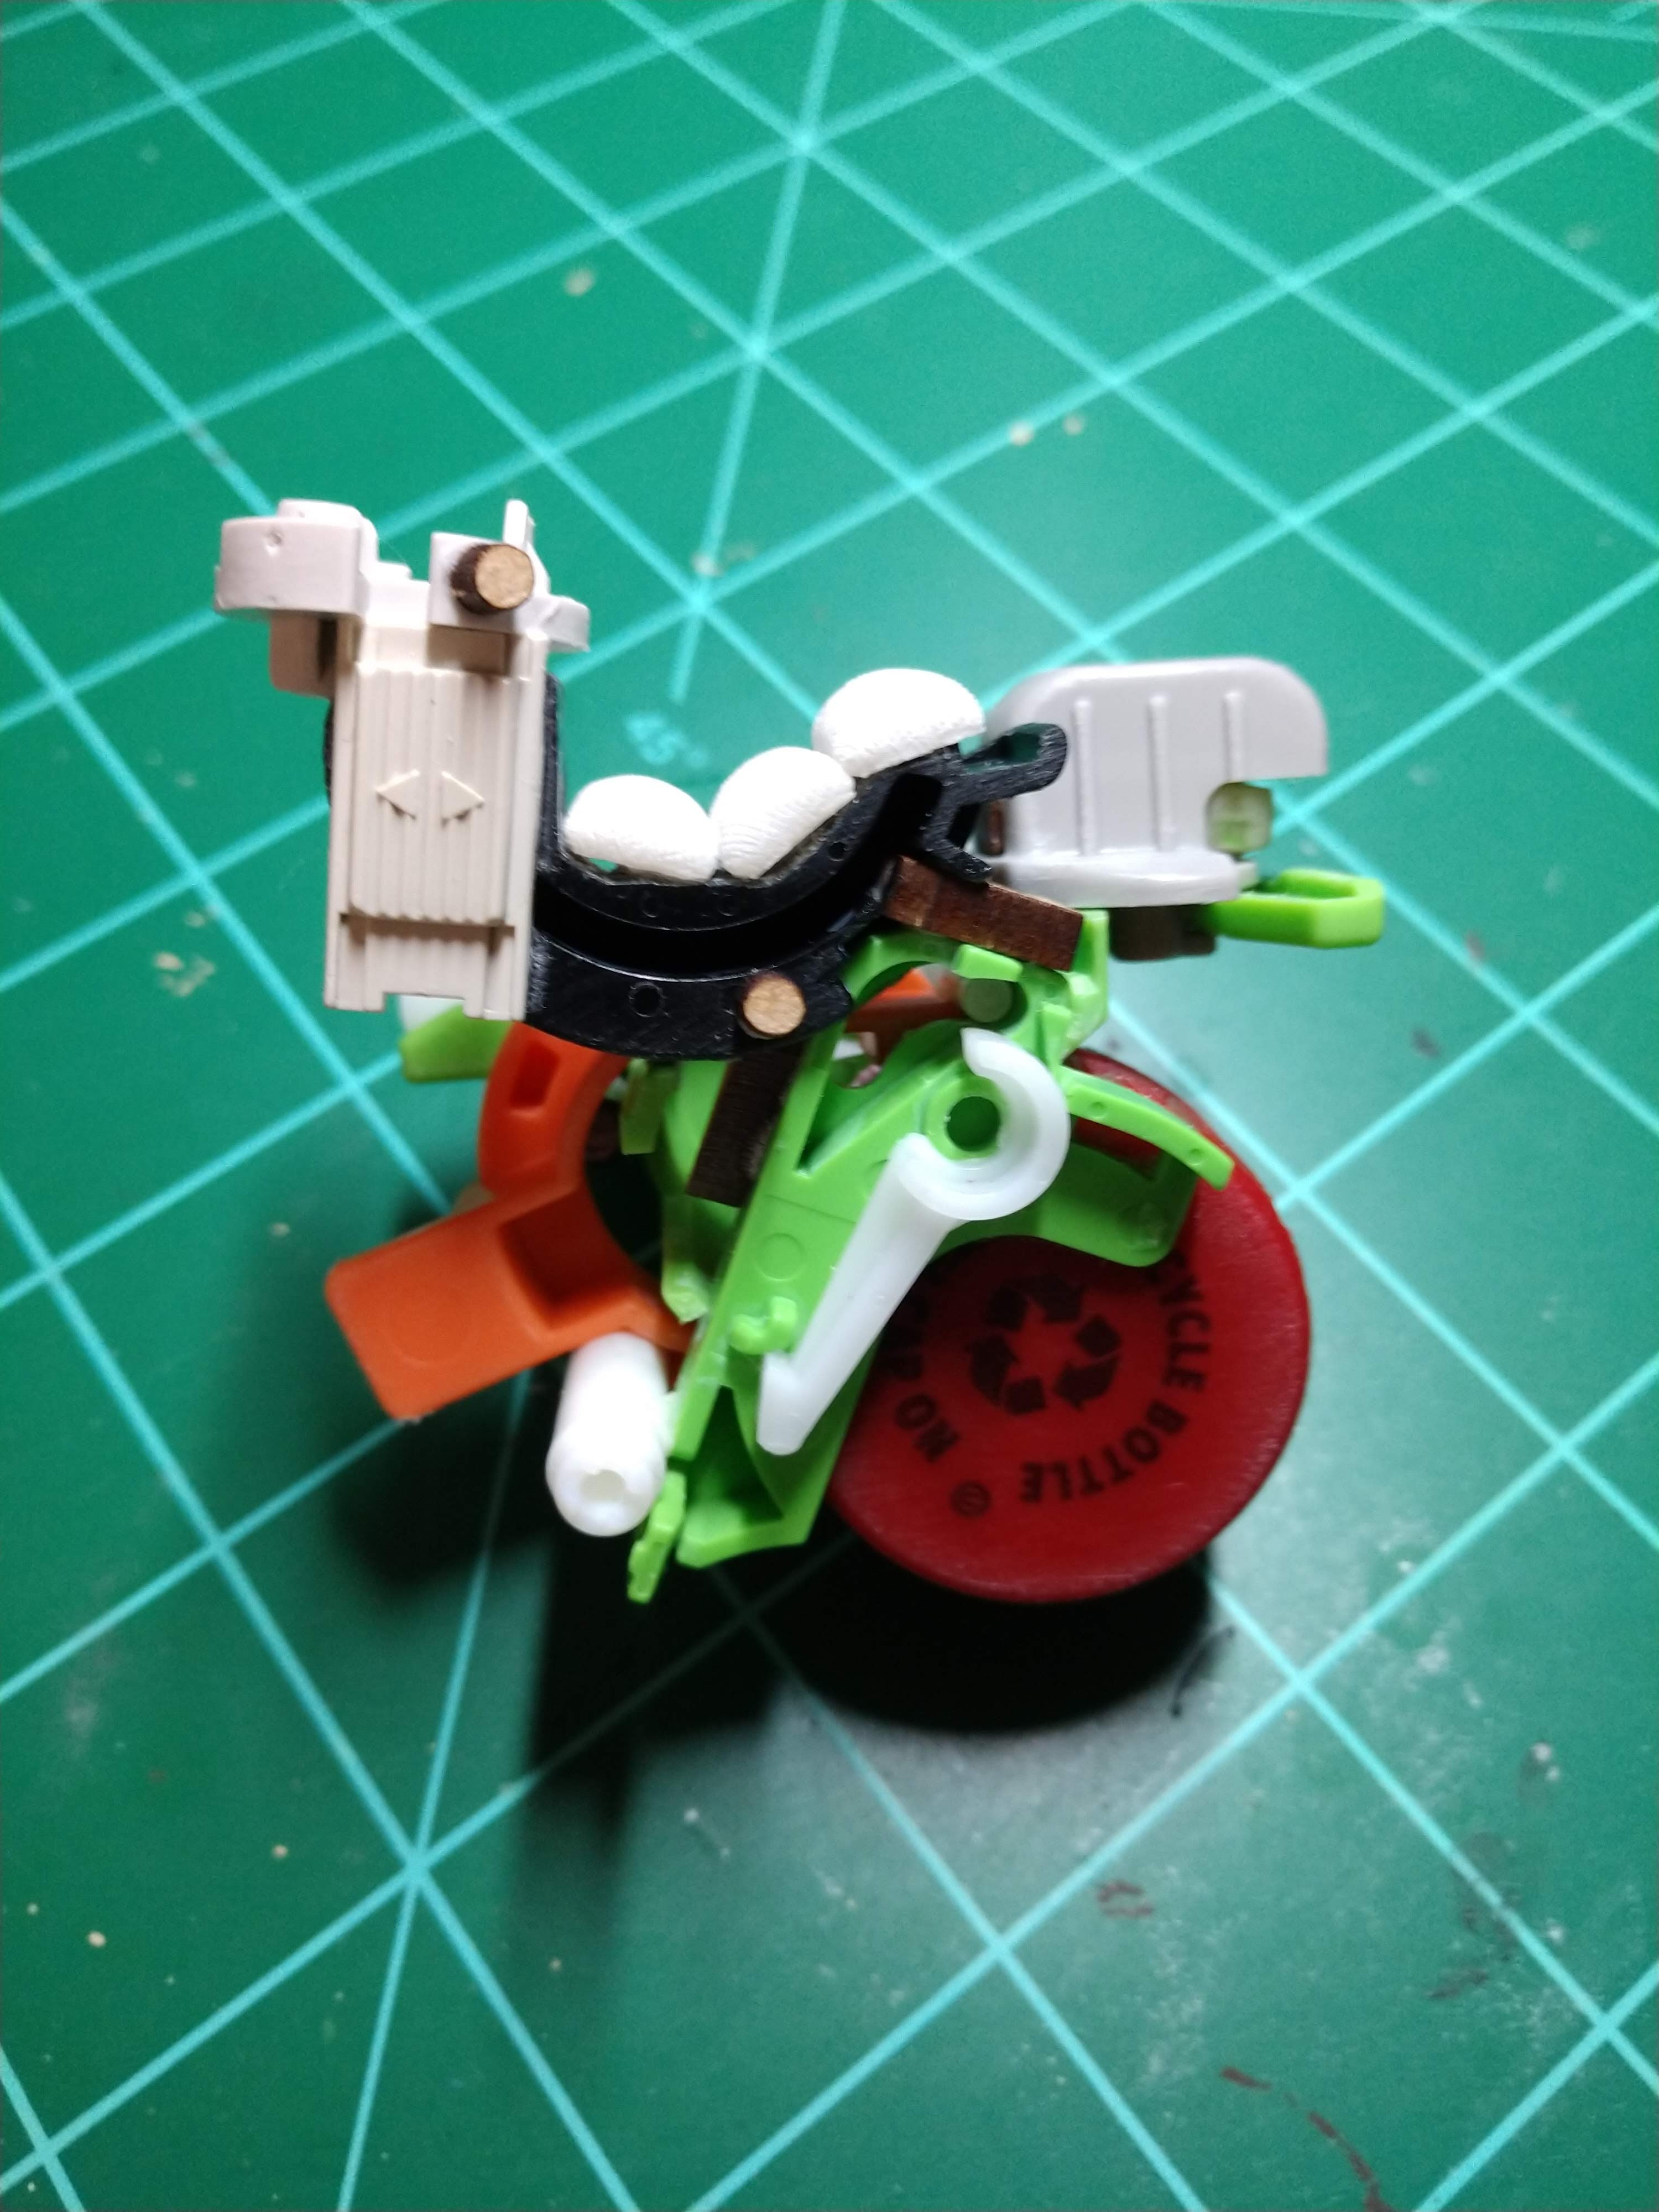
The circular section of the original terrain piece was assembled from a selector dial, a pull tab, a ballpoint pen part, and an upside down keyboard button. I had more dials and pull tabs, but didn't have the same pen parts or buttons. What I used instead were alternate pen parts and cylindrical bits that I can't remember the origins of. It was fortunate that I had some left, but I was prepared to use plastic lids, bottle caps, or other round parts for the dial.

The central tower is the hub of a paper feed roller from some model of printer. I found more in my collection. However, I had the idea of substituting the pump from a liquid soap dispenser or spray bottle while digging around for the hubs. All that was really needed was a tall section for the middle of the piece.

Alternatives to the core parts that I considered, but didn't have to use.

I built the circular sections, but did not attach the towers to make spray priming and painting easier. After priming everything in black, I ran into the next issue. My supply of Krylon Camouflage Ultra-Flat Khaki was down to a single, almost empty can that I've been reserving for another project. I substituted a gray for the khaki on the circular sections. This ultimately resulted in a less earthy tone to the finished pieces. It works fine, but I prefer the warmer color of the original. They were looking a little flat, so I brushed on some FolkArt 480 Titanium White over them to produce some highlights and weathering. For the towers, I went in an entirely different direction - metallic. A coat of Krylon ColorMaster Paint + Primer Metallic Aluminum over the black primer contrasted nicely with the dull gray circular assemblies.

Next, I attached the towers to the circular assemblies. Gorilla Super Glue wouldn't be enough to keep the towers in place by itself. The original used a mechanical solution that I repeated here. I drilled out the bottoms of the hubs and used an existing hole in the dials for a screw. I still applied a little glue to the hub as a backup.

I applied a dark wash. Unfortunately, it turned out to be way too dark, even after wiping off the excess. Correcting the colors involved brushing on some Citadel Colour Mithril Silver over the tower and more FolkArt 480 Titanium White over the circular assembly. I left the wash still showing in the recesses.

Original terrain piece in the middle.

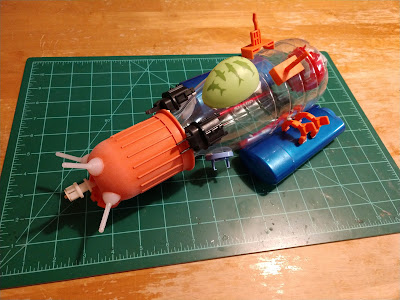
And there they are. Some more scatter terrain that is reminiscent of Star Wars while not directly copying anything from the franchise. Doing Star Wars stuff was fun! Maybe I could do more this month?

Tuesday, May 3, 2022

The AD&D Monster Manual (1979) A - Z: Episode 3: "B - Baboon to Beholder"

Commentary and opinions on the "Advanced Dungeons & Dragons Monster Manual" by Gary Gygax. This video covers the first half of the "B" section.


The following is the original script. Changes were made during recording and editing the video. This version doesn't reflect those changes. It is provided for those who prefer a written version over video.

I was hoping to get section B done in one go. However, since it is twice as long as the previous section, I've decided to break it up into two episodes. This episode covers section B from the Baboon to the Beholder. Next episode will cover the rest of section B.

Baboon
Curiously, "Climbing" is listed as a Special Defense of the Baboon, but no details are given. Much like the Ape, Baboons are relatively non-threatening to an adventuring party. While they will defend their territory, half the group will be young who will not attack and there is a 90% chance that the Baboons will flee if pressed. This is another entry that I question. It doesn't seem to have much in the way of utility.

Badger
The Badger is described as "typically solitary" but their Number Appearing is listed as 2-5. Badgers were historically hunted or trapped for their fur and the entry gives the value of a Badger pelt as 10-30 gold pieces. This presents an adventuring party with an option for supplementing their income while moving through a wilderness area. The entry also describes the Giant Badger as being twice the size with scaled up combat stats. It does not state that Giant Badger pelts are any more valuable than the regular variety.

Baluchitherium
This was based the world's largest land mammal, which lived roughly 35 to 24 million years ago. Combat wise, it can deal a good amount of damage while tanking anything an adventuring party can throw at it with its 14 hit dice. In the end, it's another prehistoric animal converted into an AD&D monster. Given its lack of treasure, I'm not sure why an adventuring party would choose to take one of these on.

Barracuda
An adventuring party is unlikely to encounter these animals unless they were diving in the ocean or deep sea fishing. It's possible, given the existence of various magics, but is a situation that I've never personally encountered.

Basilisk
This slow-moving, eight-legged reptile is inspired by medieval European myth. It has a bite attack, but who cares because the only reason a DM would bring one in is its petrification attack. Any "fleshy creature" that meets its gaze gets turned to stone. Presumably a saving throw is allowed, but the entry doesn't specify. Reflecting its gaze back will cause the Basilisk to petrify itself, but it is noted that there needs to be enough light around to make this effective. Interestingly, the Basilisk can see into the Astral and Ethereal Planes. Its gaze is lethal in the Astral Plane while victims in the Ethereal Plane are turned into Ethereal Stone, which is invisible except on the Ethereal Plane. This makes it a threat for almost any adventuring party and no doubt inspired groans and thrown objects from generations of players. The Basilisk is a monster with a strong legacy, appearing in later editions and in other F20 games having lost none of its fearsome reputation.

Bear
This entry features the Black, Brown, and Cave Bears. Black and Brown are based on the real world animals of the same names. The Cave Bear could be described as a "Dire" Bear in more recent editions, being larger, more aggressive, and preferring a carnivorous diet. In the real world, most bear encounters involve bears detecting a food source controlled by humans and the resulting interactions. It is entirely plausible that a Black or Brown Bear might investigate an adventuring party's camp site and raid it for their rations or trash while they are away or asleep. The Special Attack of all Bear types - the Bear Hug - is described in detail. It is also noted that Brown and Cave Bears will continue to fight for a short period after reaching negative hit points, although damage pushing them below -9 hit points will kill them immediately.

Beaver, Giant
Giant Beavers are based on the real world animal, but are larger and intelligent enough to grasp abstract concepts. They are sometimes willing to use their skills in building structures out of natural materials - dams in particular - in exchange for "coins and other valuables". This explains their Treasure Type of C, which is presumably stored in their "castle-like" dens. Not all interactions with Giant Beavers are assumed to be equitable, since the value of their pelts and young are also given. This entry is much more interesting than I remember it being.

Beetle, Giant
This entry features the Bombardier, Boring, Fire, Rhinoceros, Stag, and Water varieties of Giant Beetle. All Giant Beetles are described as "basically unintelligent and always hungry". Gygax takes particular care to note how beetles tear their food apart while ingesting it and that "nothing actually eaten by giant beetles can be revived in any manner short of a wish". I'm guessing that the situation must have come up at least once in his campaigns.

Every type of Giant Beetle has a gimmick. The Bombardier Beetle can expel a cloud of acidic vapor a couple times of day. The sound made by releasing the vapor is loud enough to stun or deafen those nearby. The Boring Beetle is a little dull when it comes to social interactions and feeds on rotting wood. Large groups may develop a communal intelligence, but no game effects are noted. The Fire Beetle possesses a pair of glands that glow brightly enough to be a light source. This makes them a target for miners and player characters who don't want to bother with torches or lanterns. Unfortunately for all concerned, the glands only produce light for a few days. Rhinoceros and Stag Beetles are both characterized by their large horns, which they use to attack. Finally, the Water Beetle is found in deep bodies of fresh water.

Of all of these, only the Bombardier and Fire Beetles made any lasting impression on me. I vaguely remember using Bombardier Beetles in a game, where they thoroughly annoyed the players. Fire Beetles featured in many games, since players would seek them out as light sources until Continual Light spells became available to the party.

Beholder
The Beholder is an iconic D&D monster. This is a monster that can wipe whole armies of low level hirelings and the adventuring parties that employed them in one go. In many ways, the Beholder embodies the wild, anything goes nature of early D&D. The Beholder also shows some of the weaknesses of early D&D when compared to more modern RPG designs.

Nine of those ten eyes are on stalks that sprout off its top. The other is larger and located above the mouth. By the way, the Beholder has a bite attack, but who cares? Each of the Beholder's ten eyes can generate a magical attack. The entry goes into detail about how many eyes can attack a target depending on its position relative to the Beholder and how many eyes stop functioning depending on how much damage the Beholder suffers. The entry does not specify which eye possesses which magical attack. Do the listed attacks go clockwise starting from the front-most eye-stalk? Counterclockwise? Does the count start with the main eye on the body? Or is it randomly determined when the encounter is generated?

While the entry listed the magical attacks, it doesn't provide any details. Most of the attacks duplicate spells or the effects on magical items. However, the burden of knowing what these spells and magic items do is placed squarely on the DM. The DM would either have to possess a working knowledge of these spells and magic items or reference the books during play. The first demands an experienced DM, the second slows down the game. Now, it is true that, in an ideal world, the DM would study the rules beforehand and taking notes as necessary. However, this is not an ideal world. Later systems avoid this issue by providing the required information in the monster entry. This was likely an oversight on Gygax's part. This information was likely second nature to Gygax. Also, he may not have internalized the need to convey all of the necessary information on the page. There is also the issue of space. Including more information in this entry would have meant reducing the size of others. However, I have already pointed out monsters of questionable utility. One or more of them could have been omitted to free up space.

Next time, I'll be starting with the Black Pudding and finishing up the rest of section B.

Monday, May 2, 2022

Warsenal Comanche Tower Lamps

These are the final Warsenal terrain pieces from last year's Black Friday/Cyber Monday haul. These sci-fi street lamps come three to a package and are mostly a combination of MDF and acrylic. A short coil of black coated wire is provided, but I decided to go with something more colorful.


MDF Parts Assembly
The instructions are a single page of exploded views available for download from the Warsenal site. I glued together all the MDF parts with PVA glue. White glue isn't my first choice in many cases, but the bond is strong enough when joining MDF. I left the acrylic parts and wire off until after painting.

Primer Coat
Krylon Fusion All-In-One Matte Black.


Base Color Coat
Krylon ColorMaster Paint + Primer Metallic Aluminum. This gives a shiny metallic appearance with minimal effort.

Dark Wash Coat
FolkArt 479 Pure Black mixed with Liquitex Matte Medium and diluted with water to improve flow. Applied evenly over all surfaces. Brushed on paint and washes tend to bead on Krylon, so I wiped off the excess wash with a sponge to avoid pooling and spotting. The main goals were to dark down the bright metallic a little and bring out the recessed details.


Acrylic Parts Assembly
I was concerned about frosting the clear plastic by using CA glue, so I reached for my bottle of PVA glue during this step. I'm a little dubious about the strength of the bond, but it seems to be holding up well enough.

Wire Detail Assembly
I used a spool of red coated wire I salvaged from some dead electronics awhile back instead of the black wire that came in the package. The red wire is a little stiffer and I wanted a brighter color to stand out from the rest of the pieces. I applied a drop of CA glue to one end, inserted it into the provided hole, wrapped the wire around the piece I was working on, cut off the length of wire I needed, and glued the other end to the second hole provided.


These work well for adding a touch of verisimilitude to an urban sci-fi board. It can be argued that the cable and battery pack shouldn't be exposed, but they add some interesting visual detail. The tower lamps might not work for a sleek sci-fi setting where technology is hidden behind clean lines and smooth panels. However, they would fit into a setting with a cobbled together aesthetic.

Wednesday, April 27, 2022

Trash Bash Monowheel Cycle WIP

This started off as an experiment with making wheels for sci-fi models out of soda bottle caps. Then it turned into a unicycle robot build. It ended up as a monowheel cycle when I cobbled together a seat and threw on some stowage. Now that I see what it looks like with a coat of primer, I'm thinking of adding some wires and a couple more details after some initial painting.

Side view after priming.

Big Wheel Keep On (Not) Turning
The wheel is a pair of soda bottle caps glued together. The edges were sanded down a little so the two pieces fit flush and to give the glue a rougher surface to work with. The ends were also sanded in preparation for painting. The overall shape and the pattern molded into the plastic creates the appearance of a wheel and tread pattern. The idea will come in handy the next time I need wheels for a sci-fi ground vehicle, robot, or in the landing gear of an aerospace craft.

Rear three quarter view before primer.

Unicycle
I was intrigued by the possibilities of the model wheel in my hands. The idea of a single wheeled robot or vehicle has been in the back of my mind for awhile now. A little digging around the bits collection turned up a number of parts that either fit or could be convinced to fit around the wheel. I was initially going for a robotic probe equipped with sensors to explore some unknown world. That's a concept I may return to, but that's not the direction this project went.

Rear three quarter view after primer.

Monowheel Cycle
As I piled things on, the project's appearance diverged from the lines of a purpose-built planetary probe towards a vehicle built from salvage. I started deliberately going for the look of a custom vehicle built by someone who had to scavenge the parts. Greeblies suggesting an engine exhaust and suspension add mechanical plausibility. Some stowage and fuel containers from a Tamiya 1/48 Jerry Can Set give the impression of an owner on the move.

Top down view showing stowage and seat cushions.

The Seat and MDF Reinforcement
Adding a seat was a challenge. With no ready made options at hand, I built one from various plastic parts and used resin sandbags for the cushions. Unfortunately, glue alone wouldn't be strong enough to hold it in place. I used some small MDF pieces to reinforce the seat and add details. These were popped out of laser cut parts from previous projects. Using super glue between MDF and plastic creates a strong bond suitable for structural support.

Top down view after priming.

Priming
Tamiya Surface Primer (L) in Gray spray for full coverage. Priming a project like this is an almost magical moment. The chaotic mix of different colors and shapes turns into a single object, unified under a coat of flat gray.

Side view during assembly. A couple details were added before priming.

Moving Forward
I've got some ideas for putting this project on a plastic base, but there's some testing to be done first. After that, I might brush on some paint to see how it looks with some color on it. Final details will be added after that - I have some wire that will join together some of the mechanical details. And, of course, a couple of wash coats to bring out the details and add weathering.

Monday, April 25, 2022

Zealot Miniatures Magic Portal (Blue)

This is another resin terrain piece using a translucent plastic insert to represent an inter-dimensional passageway. In this case, the popular circular shape was chosen for the generating mechanism. I purchased this piece at the same time as the Demon Gate late last year. The plastic insert is available in blue or red.

Remember: It's a portal, not a gate. Very important.

Preparation
The resin required nothing more than a scrubbing with warm soap and water. I had to remove and sand down a tab on the clear plastic insert. The insert has a significant flaw, but it doesn't stand out (much) at tabletop distances.

Planning
The Magic Portal comes in four parts - the two halves of the circular portal, the platform, and the insert. I decided to prime and paint everything before assembly. Painting the assembled piece would require trying to keep paint off the insert. That seemed to be a great deal of trouble for no real benefit.

Rosie considers another piece of hardware she's been asked to fix.

Plastic Insert
The insert was a little underwhelming out of the package. The swirling details weren't really visible in the clear plastic. There was also the flaw in the material. I decided to apply a wash to bring out the details, hide the flaw, and protect the plastic from the fogging effects of the glue I would be using later on. The initial layers of Secret Weapon W015 Blue didn't coat to my satisfaction. The follow up layers of Secret Weapon W016 Green covered this material better.

Primer Coat
Tamiya Surface Primer (L) in Gray sprayed over all resin parts.

First Paint Coat
As with the Demon Gate, I applied a layer of FolkArt 479 Pure Black diluted with water to darken up the Tamiya Gray and fill the recessed details on the resin parts.

Second Paint Coat
FolkArt 480 Titanium White brushed on the upper areas as a highlight and outward from the inside of the portal.

Magic Portal and Demon Gate comparison.

Source Lighting
A mix of FolkArt 720 Cobalt Blue and Sargent Art Cadmium Green lightened with FolkArt 480 Titanium White as needed. The circular generator would block some of the light from the magical portal, so the glow effect didn't need to be as extensive as on the Demon Gate. I started by brushing on the Cobalt Blue/Cadmium Green mix over all areas that would be touched by light from the portal. Each following layer covered a slightly smaller area closer to the portal. I mixed in a little more Titanium White with each layer until I was using almost pure white right next to the portal.

Touch Up
I ended up overdoing the glow effect in some areas. I brushed on some FolkArt 2561 Steel Gray to bring back an approximation of the base color.

Assembly
This was a straightforward matter of gluing the two halves of the circular gateway around the plastic insert. I had to clamp the halves together to give the Gorilla Super Glue time to work. Then I glued the assembled portal to the platform and clamped that together until everything was solid.

Does this remind anyone of anything?

There is a visible line around the circular resin piece. This is one of the resin halves overlapping the other. I considered sanding it down and repainting the edge, but decided against it. This would remove some the details on the edge and the line isn't as noticeable at tabletop distances.

Close up of the seam between the two halves of the circular portal generator.

It's ironic that this was the piece that I was most looking forward to while the Demon Gate was an afterthought. The Magic Portal works with 28mm scale miniatures, but a 32mm figure might have to duck down a bit to fit through. It would fit in fine if used for 15mm scale games. Together, the Magic Portal and Demon Gate give me options whenever I need an extradimensional passage to and from another space and time. Overall, though, I like the Demon Gate a little more than its rounder counterpart.

Thursday, April 7, 2022

The AD&D Monster Manual (1979) A - Z: Episode 2: "A - How Is Anhkheg Pronounced, Anyway?"

Continuing a series expressing a middle aged guy's opinions about the AD&D Monster Manual (D&D First Edition) from 1979. This video covers the "A" section. Warning: Attempts at humor include a dad joke referencing a decades-old sitcom.


This video is shorter than the introductory episode, mainly because the "A" section is only a couple of pages long. I decided on a longer shot to make it easier to get hand gestures in frame. Might try a middle ground for the next one.


Thursday, March 17, 2022

Throwback Project - More Wargames Factory Shock Trooper Test Pieces

Back in April 2021, I assembled and painted one of these models to test out a color scheme suitable for the whole box. That test worked well, but I had a couple of other ideas that I wanted to try before I started painting in bulk. Other things caught my attention and, with no immediate need for the figures, I shelved the project.

"It's been almost a year since this blogger made progress on this project?" "Time flies."

I recently pulled the box back out with a few goals in mind:
  • Getting more time working on multi-part 28mm scale plastic models. I'm in need of miniatures suitable as "Psychos" for my Five Parsecs From Home campaign. The strongest candidates in my current collection are box of Necromunda Eschers. However, I'm reluctant to start on them without more experience with assembling plastic miniatures.
  • Testing out a couple of military color schemes for the Wargames Factory Shock Troopers box. They will all likely end up in my Five Parsecs From Home campaign at some point, so moving forward with this project serves that end as well.
  • Developing techniques suitable for speed painting armies. I'm used to painting miniatures individually, but that approach is impractical for groups of thematically related figures. Projects like this, the Reaper Bones Zombies, and the Reaper Bones Nova Corp are helping to build up my experience in that area.
Changing My Choice of Adhesive
I switched from my usual Gorilla Super Glue to plastic cement for this product. This gave me more time to get the arms in the desired position while everything set. I'm planning on using the same stuff on the Eschers based on my experience here. I did use super glue in one area - attaching the models to the metal washers I used as bases.

They seem to be holding together well.

Thoughts on Flame Throwers
I understand that historical soldiers using flame throwers had a lower than average life expectancy in combat. A flame thrower is a relatively short ranged weapon with limited ammunition, requiring the operator to close with the target. The discharge of a flame thrower tends to attract attention and rifle rounds. While the risk of taking a round in the fuel tank is overstated, drawing fire is generally unhealthy. I kept these notions in mind while picking out bits for the model.

Olive Drab Flame Trooper - Assembly
The fuel tank on this particular flame thrower design is tiny. Given the limited ammunition, it made sense to issue this trooper a sidearm. A shotgun would have been my preference, but I made do with one of the holstered pistols in the kit. I also added a water canteen since operating a flame thrower has got to be at least as hot as grilling a meal for the family in Texas on Independence Day. The choice of head was based on which one appeared to offer the best protection from both heat and small arms fire.

Not much ammunition in that tank, I imagine.

Olive Drab Flame Trooper - Paint Scheme
The sight of assembled trooper evoked far away memories of plastic green army men carrying M2 flame throwers battling it out in the back yard. Inspired, I settled on an olive color scheme.
  • Primer coat: Krylon Fusion All-In-One Matte Black. Sprayed for full coverage.
  • Base coat: Krylon Camouflage Ultra-Flat Olive. Sprayed in a zenithal pattern.
  • Highlight layer: Reaper 09177 Camouflage Green. Dry brushed on the upper surfaces.
  • Gray areas (weapon, mask, boots): Mix of Citadel Colour Codex Grey with a little Chaos Black.
  • Wash coats: Army Painter Dark Tone and Strong Tone Quickshade Inks. Each layer was applied separately and allowed to dry completely before the next.
Khaki NCO - Assembly
Basically, I wanted to use the pointing arm. Pairing it with another arm holding a pistol and a dagger fit the theme of some kinda unit leader. The choice of a head came down to the one wearing a garrison cap and the one with tentacles. I didn't spent long making my decision. Even if I eventually get rid of rest of the box, I'll be keeping the tentacled heads around in my bits collection for as long as they last.

These came from an extra sprue, so I have a box of eighteen to go.

Khaki NCO - Paint Scheme
The steps using spray coats substituted Krylon Camouflage Ultra-Flat Khaki for the Olive, but were otherwise identical to the Olive Drab Flame Trooper. The gray areas used the same mix of Citadel Colour Codex Grey with a little Chaos Black. The wash coats were also used the same products as the Olive Drab Flame Trooper.
  • Highlight layer: Reaper 09292 Bathalian Chitin. Dry brushed on the upper surfaces.
  • Head: Reaper 09233 Bright Skin. This color is a little too pink to be a realistic skin tone for a human, but works fine in this case.
Basing
The assembled plastic models were glued to one inch steel fender washers before painting. I used the same techniques for texturing the base as I do for Reaper Bones miniatures.

Decisions, decisions.

These turned out well. Which leaves me with a problem. I can't decide which paint scheme to go with for the box! Maybe I can divide up the remaining troopers into teams, each in a different color? I'll have to think it over.

Monday, March 14, 2022

A Trash Bash Weekend!

I spent this weekend's hobby time making things out of junk. Like many craft projects, it started with something simple and ended up consuming hours of time. Still, the process of fitting things together is always soothing, even if I'm not sure what to do with a couple of the results.

The only thing I spent on this was time.

"Trash Bash" isn't new. I've done it often enough to add it as a tag on this blog. Brian S. Roe champions the practice on his blog and on the Trash Bash International Facebook Group. There are older examples to be found in Games Workshop's "How to Make Wargames Terrain" books (1996, 2003). The appeal is the reduced cost compared to purchasing terrain. Plus, there is a certain satisfaction in repurposing materials otherwise destined for a landfill or recycling bin.

Big enough to fit a 28mm miniature inside.

This weekend's adventure in Trash Bashing began with a discovery. I found out that this pill bottle fits this juice bottle cap. The threading isn't compatible, but the pill bottle locks in place with minimal convincing. It might be handy for a future stasis pod or containment tube terrain project. I set the parts aside since I have no immediate need for such a terrain piece, but the bug had bitten me.

Aft view. I'm not sure about how the engine nacelles will hold up.

This spaceship is intended for use in my Five Parsecs From Home campaign, but I imagine that it will be handy for a variety of sci-fi games. The body is a coffee creamer bottle. I used tacky putty to attach the parts while trying different configurations. The nosecone was originally built for a project that proved unworkable, but its antenna array works as the forward sensors of an exploration ship. The engine nacelles are that staple of Trash Bashing – deodorant containers. The layout resembles a Star Trek shuttle. I'll likely play around with it a little more before committing to glue the parts together.

Needs more greeblies.

This is another spaceship, but on a different scale. The core part is half of a broken plastic laundry clip. I just added various parts from my collection until I had sometime kinda spaceship-like in my hands. It could work as a frigate with more details and a flight stand. Alternately, I might use it as a flying robot or rework it into a hover bike.

My Easter themed project?

This one was inspired by a variety of images and projects I've seen online. The curve of the spoons fit well with the form of the plastic egg. This could represent a reconnaissance drone, space probe, or a compact single occupant aerospace vehicle. I'm planning on pushing ahead and getting this one done as an Easter themed project for next month. The biggest issue will be finding ways to disguise the distinctive shape of the spoons. The solution for that will involve a deeper dive into my bits collection.

Looks like a racer.

I'll follow up with the ones I pursue further. The Easter egg project looks fun and I should have it done in time for April. I want to play around with the parts and putty on the others before applying any glue on them.

Tuesday, March 8, 2022

Let's Start a New Venture - YouTube!

I decided to try my hand at YouTube with a look at the AD&D Monster Manual. This video is an introduction covering the Forward, Preface, and Explanatory Notes. My first lesson learned is that video editing is challenging. Please excuse the choppiness resulting from me cutting every "uh..." and awkward pause. My second lesson is to come up with a thumbnail before uploading the video to YouTube. Early days, but I like figuring out new skills.


I'll see about making more videos when I get the chance. This new venture won't replace this blog. It's intended to be a new way of expressing my lifelong interest in games. Enjoy!

Sunday, March 6, 2022

Brutal Cities Eternity Lab Module A

Here's one of the Brutal Cities terrain pieces that showed up last month. Brutal Cities is a one-man operation in Australia producing 28mm scale MDF sci-fi terrain. As the name suggests, brutalist architecture is a strong influence, giving the company's terrain a distinctive appearance that isn't associated with any specific setting.

My finished piece and the card showing the color scheme used by Brutal Cities.

The Eternity Lab Module examples on the Brutal Cities website are painted in a striking combination of orange and white. I decided to use the same pattern, but in different colors. The color choices were purely pragmatic. I had spray cans of blue and khaki sitting on the shelf for awhile and wanted to use them up.

Assembly
Putting the piece together was straightforward. The instructions available from the Brutal Cities were clear and there weren't any unexpectedly tricky steps. I regard the REM Shack and Garbage Dumpsters from Warsenal as more challenging builds compared with the relatively simple structure of the Eternity Lab Module A. All parts were assembled using PVA glue.

Rosie (for scale) considers an office for her workshop.

First Spray Coat
Krylon Fusion All-In-One Matte Black. Sprayed on all surfaces including the interior.

Second Spray Coat
Krylon Camouflage Ultra Flat Khaki. Sprayed on all external surfaces. I left some of the Matte Black showing to emulate the appearance of shadows under the cladding.

Third Spray Coat - Cladding Only
Krylon ColorMaster Paint + Primer Satin Iris. I masked all the areas that would remain Khaki. This coat was sprayed on the cladding and ladder.

Rosie inspects the air vents.

Highlight Coats - Khaki Areas
A mix of FolkArt 480 Titanium White and 420 Linen. I started with pure FolkArt 420 Linen and added 480 Titanium White to each layer, highlighting up to pure 480 Titanium White in the corners. In addition to adding more depth to the Ultra Flat Khaki coat, it also covers up areas where the blue spray paint got under the masking tape.

Highlight Coats - Blue Areas
A mix of FolkArt 480 Titanium White, 520 Dark Hydrangea, and 720 Cobalt Blue. The darkest areas got a layer of FolkArt 720 Cobalt Blue. I transitioned from that to FolkArt 520 Dark Hydrangea, mixing the colors as I went from the shadows to the corners. I used the same technique for the lights, but highlighted up to 480 Titanium White.

Weathering Pass - Metallic Wear
Silver Metallic Sharpie marker. I worked with the assumption that the cladding is metal and the structure underneath is concrete or some sci-fi equivalent. With this in mind, I marked up a few spots to simulate paint wearing off and exposing bare metal. I limited this step given how heavy I went with this technique on the Warsenal REM Shack. It looks alright, but I may go back and add a little more later.

Close up of the laser cut etching on the roof.

Detail Work
The laser cut details on MDF pieces like this one sometimes get obscured as layers of paint fill them in. A coat of wash can help, but isn't a completely satisfactory solution. I tried out a new fix for this project. I stabbed the problem. Using a craft knife, I followed the laser cut lines. This removed the paint and made the lines a little deeper and easier to see. I recommend a fresh blade for this and all craft-related stabbing.

Wash Coats
I mixed a dark and brown wash for this piece. The dark wash used a little black craft paint in addition to the Payne's Gray I usually reach for. This resulted in much darker streaking and shadows than I normally get - something that would be visible on the darker blue areas. I applied the dark wash first, wiping off the excess with a sponge with a downward motion, and waited until it was completely dry before adding an additional dark wash coat. Finally, a layer of brown wash added a little dirt to go with the shadows and grime. I paid particular attention to the recessed details like the vents.

"Anybody there? I gave at the office!"

Door
The door that can be glued onto the building or kept separate. I recommend the versatility of keeping the door a separate piece, but bear in mind the gremlins that steal loose parts. Assembly as simple as gluing the two parts together. I painted the door by spraying on a coat of Krylon Fusion All-In-One Matte Black followed by a coat of Krylon ColorMaster Paint + Primer Metallic Aluminum. Finally, I applied a coat of the same dark wash I used on the main piece.

Even I should be able to remember where to order more of these signs.

Signs
I decided to have a little fun playing around with the acrylic signs I also ordered from Brutal Cities while shooting the photos for this post. I can't recommend putting this many signs on a single side of one building, but I wanted to compare how the different colored signs looked. Not all of the signs I ordered were used - a couple were a bit too long to really fit a building of this size. I'll break those out when I get around to my Eternity Labs Module C.

Signs advertising burgers, pet clones, and a milk bar.

Ryan of Brutal Cities put careful thought into the design of this building, both as a tabletop terrain piece and from an architectural perspective. Models on the roof have cover. There is both a ground level doorway and a hatch etched on the roof to permit access to the interior. A ladder provides plausible access to the roof for models on the outside of the building. Vents to provide air flow to any occupants are modeled on the side. It has the appearance of a functional building while still being usable as tabletop terrain.

Overall, I like this piece. It looks good and the interlocking MDF construction is strong. I may have overdone it with the dark wash, though.