In the meantime, an observation – wipe down your work area regularly. I had just finished applying a nice, smooth coat of paint on a flat area of my latest project when I noticed a problem. A cat hair was stuck in the middle of it! Fortunately, the paint was still wet enough for me to fish out the hair with a spare brush and reapply the paint. Unfortunately, a quick check of recently worked on pieces revealed more cat hair. At least none of it is visible at table top distances. Looks like some touching up is in order...
Tuesday, July 24, 2012
Checking In
Just a quick check-in and an observation. I've made progress on some terrain pieces since the last post. Expect pics as soon as I can find the time to take them.
Saturday, June 30, 2012
Painting By Numbers #5 - 15mm ARC Fleet Infantry
Here's my first fully painted bunch of 15mm infantry figures intended for sci-fi wargames. These were actually completed after the first attempts at making terrain out of cardboard and electrical boxes, but before the second attempts.

What Company Made These Miniatures?
Critical Mass Games. These are the ones ordered back in November. I completed a test batch back in February and have used them for scale comparison shots ever since.
How Did These Get Painted?
I primed the figures with gray auto body primer. The base coat was a thinned down medium gray. Next was a blue-black wash. The final step was painting on details like the face plates and shoulder pads.
The bases are steel washers super glued to the integral bases that came with the figures. I textured the base with sand applied over watered down tacky glue. Once this was dry, the sand was colored with a mix of dark brown paint. tacky glue, and water. The mix also further secures the sand on to the base. I drybrushed on some linen paint to produce a sandy color and glued on a few pinches of static grass.
Why This Particular Paint Scheme?
Basically, I wanted to avoid the “Master Chief” look (no green with gold face plates) and the “Stormtrooper / Clone Trooper” look (no white or light gray). The test pieces I did in brown and khaki just didn't look good to me. So medium gray with a dark wash it is.

The colored shoulder pads to denote specialization isn't realistic nor is it intended to be. I just wanted something clearly visible at tabletop distances and didn't feel much like mucking around with coloring the bases.
What About Storage?
Not much to tell, really. The plastic box is part of a stackable storage container that I picked up years ago. The strips are magnetic material from Hobby Lobby. The strips tend to curl since the stuff comes in a roll. I ended up supergluing the ends down to keep them from popping up like seen in a couple of the images. The whole process only took a few minutes.

Any Lessons Learned?
This was my first experience with painting 15mm figures and with painting large numbers of figures in batches. Choosing a simple paint scheme that can be applied to multiple figures in steps enabled an efficient, assembly-line approach. Breaking down the job into batches was also critical. Each batch went quickly and rewarded effort by making progress easy to track.
Learning Experiences, Case #2a – UPDATE: Electrical Box Terrain, Ready for the Tabletop
This is a fresh start incorporating the lessons learned from my previous attempt.

First Lesson Learned – I used super glue to reassemble the piece this time. Some tugging and a short drop served to test the bonds after the glue set. It should stand up to normal use - place it on the table, remove it from the table, put it in a box, maybe drop it on the way a couple of times - just fine.
Second Lesson Learned – I got out the auto body primer and started spraying. Sandable auto body primer is good stuff - it leaves a surface that holds on well to paint and bonds to plastic, metal, and resin. It took two thin layers to get a good, even coat that covered up the original colors of the plastic.
Third Lesson Learned – A darker color for better coverage seemed like a good idea. I also went back to the tried and true method of paint large, flat surfaces - multiple layers of thinned down paint. The paint dried smoothly.

The end result wasn't bad, but it looked dull and flat. Applying a thinned down dark wash brought out the details, but the piece was still missing something. I highlighted the corners and top with the original base color. Finally, I applied a thinned down brown wash to weather the piece. Small steps like these add character to a piece, but I might have gone overboard with the brown wash.
There is another, larger piece in the wings. I plan on adopting the same techniques to complete it later. For now, I've got some other projects to complete first.
Learning Experiences, Case #1a – UPDATE: Working with Cardboard – More Success, Less Fail
Another try and a new approach.

I abandoned the idea of spraying on an undercoat and went straight for my brushes. All of the base colors were applied using “overbrushing” (which is just a fancy way of saying “drybrushing, but with more paint left on the brush). Also, the paint mix was a little thicker than the “milk-like consistancy” I normally use for miniatures or terrain. The overall idea was to go light on the amount of paint drying on the piece at any given time. This prevented the warping and fraying issues encountered with the first test piece.
However, this left me with another problem. The gaps between the cardstock pieces were still clearly visible. The idea behind spraying on a dark undercoat is to cover up these gaps in coverage before applying the base colors. With no undercoat, I had to find another way.
The solution was a dark wash. Normally, a wash serves to bring out details, but this time it filled in the spaces between the cardstock pieces. The result was the appearance of shadows where the cardstock pieces meet.
The wash did darken the piece considerably. I drybrushed the base colors over the wash as a highlight to bring back a brighter look to the piece.

The end result is a nicely weathered looking shack suitable for a “lived-in” sci-fi setting. I've got some plans to use a settlement on a distant world as the backdrop for some upcoming games, so this piece will see time on the board in the future. I might even make a couple more down the road.
Sunday, June 10, 2012
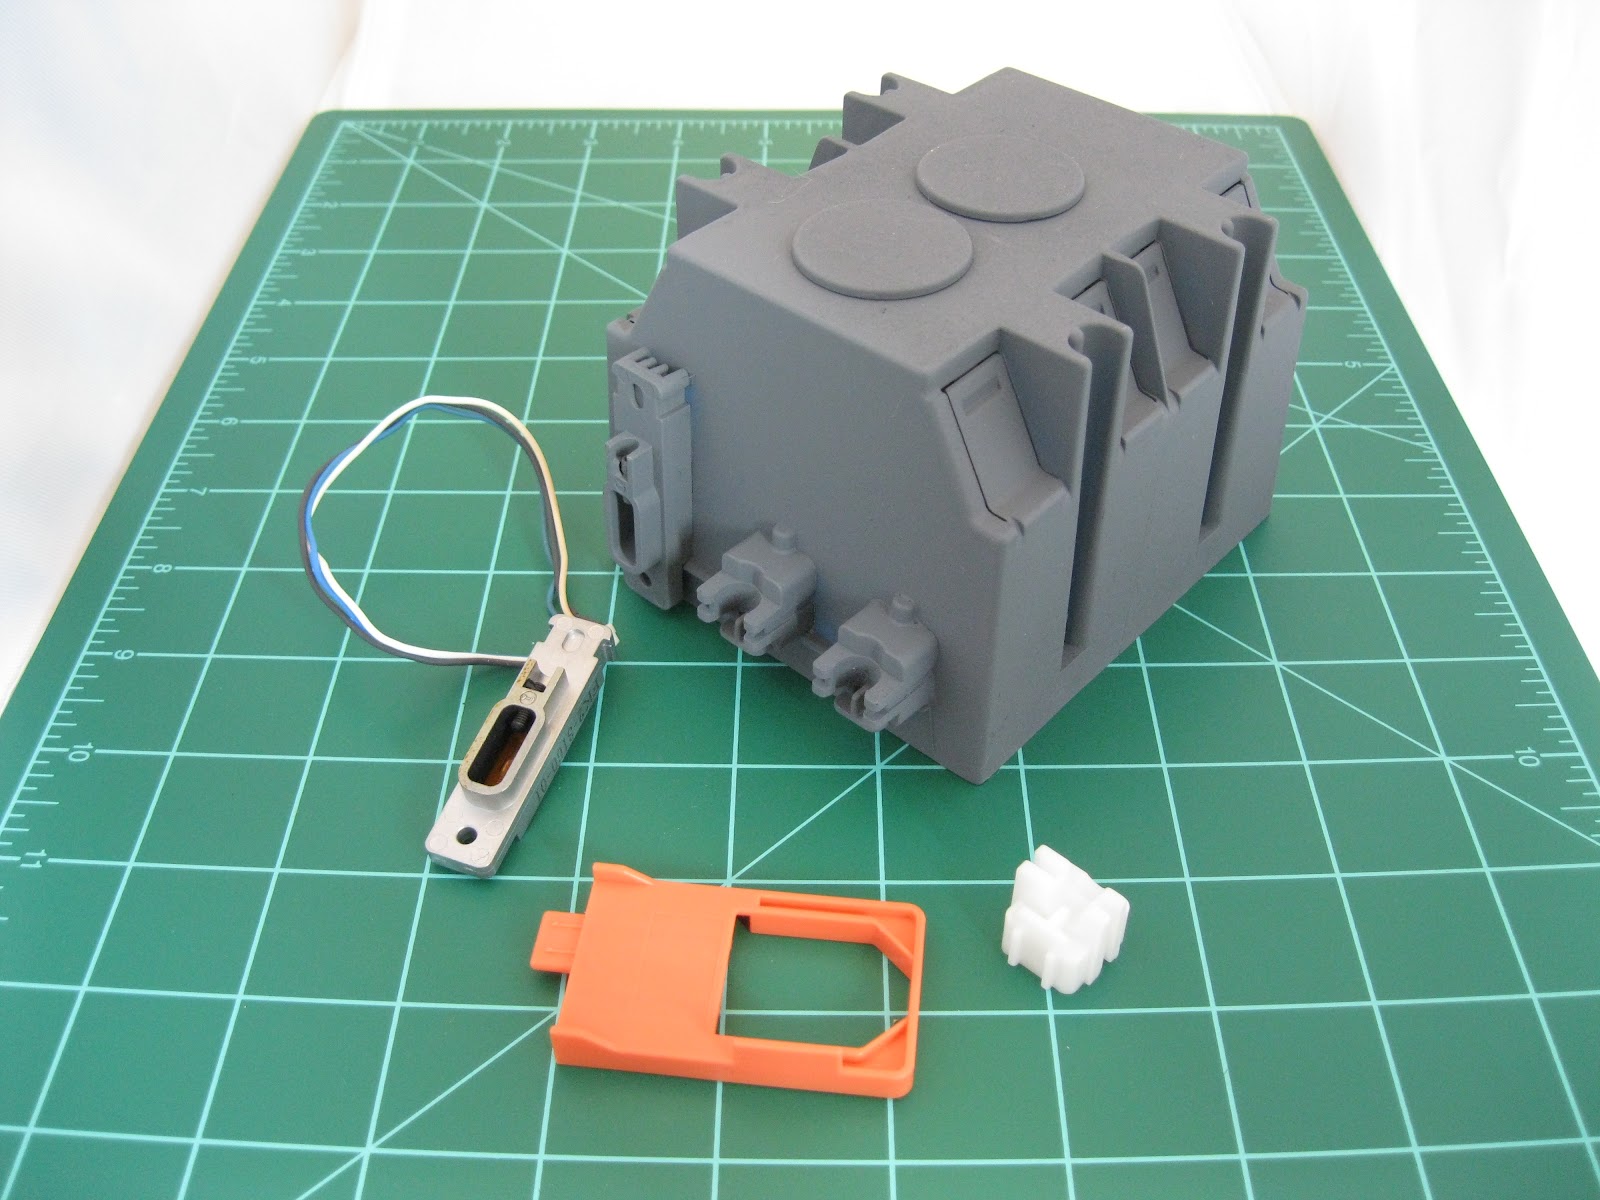
Learning Experiences, Case #2 – Electrical Box Terrain
This is project that got started after doing a little reading on the Internet. The idea is simple – take a blue plastic box normally used for electrical work and modify it to look like a futuristic building suitable for a smaller scale sci-fi game. This article on the Reaper Miniatures site and this post on TMP do a good job of presenting the concept. The boxes and bits were inexpensive and everything looked like it would be within my skill level.
But, as they say, experience is the best teacher.
The first step was getting all the materials. A quick trip to the local Home Depot and a few dollars made me the owner of a couple of promising looking electrical boxes. A few minutes of sorting through my bits boxes yielded enough plastic doodads to provide some additional details like doors. I already had plenty of paints.
There were a few things on the electrical boxes that needed to be removed. Basically, anything that made them look more like electrical boxes and less like buildings. A few minutes work with my trusty Dremel took care of that.
Next was assembly. I washed everything in soap and water and let it all dry completely. Then I sat down to work.
First Point of Failure – Plastic Cement. I decided to use plastic cement since I was assembling plastic bits on plastic bodies. The only exception was a metal bit that I used super glue on. This proved critical awhile later.
After everything was put together, I let everything sit until the next day.
Since I had two electrical boxes, I decided to try two different approaches to painting and see which worked best. The smaller box got sprayed with some Krylon Fusion left over from a home improvement project from last year. The bigger box got hit with some craft store primer left over from one of my wife's projects, also from last year.
Second Point of Failure (Smaller Box) – Spraying on a base coat without primer. I noticed I wasn't getting good coverage on the smaller box. The original colors of the plastic box and bits were showing through the light gray of the spray paint. I applied more paint to correct for this, ultimately spraying down two fairly thick layers. This turned out to be a mistake. The second layer never really set correctly – it was still tacky to the touch after a couple of days. The age of the paint may have also been a factor.
Second Point of Failure (Larger Box) – Cheap primer. I had a much easier time spraying down the primer on the larger box, although multiple thin coats were needed for good coverage. The primer set overnight and was ready for painting. Unfortunately, it didn't do a good job of holding on to the paint. I have some experience with painting large, flat surfaces on miniatures – shields and larger pieces like Warjacks – so I knew the need to thin down the paints and go for multiple thin layers. But the paint refused to flow properly on the surface of the primer. It either pooled or ran down the sides. In any case, the results were unpleasant.
At this point, I had two unusable terrain pieces – one with paint that wouldn't set, the other with paint too ugly to put on the table. Hoping that everything would look better in the morning, I gave up and went to bed.
The next morning revealed even more horror. At some point during the night, one of the boxes was knocked to the floor. (Ah, the joys of letting my wife keep cats around.) As I leaned down to pick up the wayward terrain piece, I noticed that a few of the plastic bits had come off. A little experimenting revealed that the plastic cement had failed to provide a strong bond. I could break the plastic bits off the boxes with little effort. On the other hand, the metal bit I had super glued on refused to budge. These pieces wouldn't have lasted long if they had made it to the table.
Lessons Learned:
- Both pieces have taken a long soak in a solution of Simple Green and water. The paint and primer came off after a good scrubbing. They need another wash in soap and water to get rid of any residue from the Simple Green, but are otherwise ready for assembly.
- First Lesson Learned – Assembly. I will be using super glue to assemble everything with time around. The bond is much stronger than plastic cement on this material.
- Second Lesson Learned – Priming. Both pieces will be primed a dark gray with an auto body primer. The dark color will cover up the original colors of the plastic better. I've also had good results with auto body primer providing a good surface for paints on large, flat surfaces. Multiple layers of thinly applied primer will be used to provide good coverage.
- Third Lesson Learned – Painting. I'll try a slightly thicker paint mix when I get started. The paint mix I used before didn't seem too thin, but it's best to be sure. It's easier to thin down a paint than thicken it back up, anyway.
Saturday, June 9, 2012
Learning Experiences, Case #1 - Working with Cardboard
This started with some small cardboard pieces I found around the office. Here is what one looks like:

They are just the right size and shape to hold small items. Prior to this project, holding bits was their main contribution to my gaming projects.

They are just the right size and shape to hold small items. Prior to this project, holding bits was their main contribution to my gaming projects.


They are just the right size and shape to hold small items. Prior to this project, holding bits was their main contribution to my gaming projects.

Then, one day, I flipped one over. It was about the right size and shape to be some kind of 15mm building. Maybe a bunker or a small house or something.
Eventually, I was inspired by a thread over at TMP about cobbled-together colonies. I used some other cardboard pieces and other bits to make something that wouldn't look out of place in a sci-fi setting like Firefly. So far, so good.
(By the way, I wasn't the only one inspired by that thread. Check out these MDF pieces offered by GameCraft Miniatures. Good stuff.)
The failure occurred when it came time to paint the thing. This was supposed to be a quick, cheap, and easy project. An afternoon prototype. The kind of thing that gets done in between more time- and resource-consuming work. So I reach for some black spray paint.
Now, in my defense, I had yet to try painting cardboard. Imagine my surprise when the cardboard starts coming apart. I expected some warping, but the material started to fray where I sprayed it. I'm not sure if it was the cheap spray paint or the amount I used, but the piece was unusable after that.
No pictures, I'm afraid. The offending piece got thrown out. I have some ideas on a new approach, but it will have to wait a little longer.
Learning Experiences
I've heard it said that failure can be a learning experience. Unfortunately, I've also heard it said that “learning experience” is a way to say “total butt kicking” with a positive spin.
No, this isn't about why I haven't undated in a long while. That can be attributed to a combination of too many other commitments, too little time, and just plain laziness.
The particular failures I'll be describing are a couple of terrain projects. They started out with high hopes and limited budgets. One ended up in the trash and the other ended up getting stripped of paint for another try.
Next: Case #1 - Working with Cardboard.
Sunday, March 25, 2012
Scored a Copy of Survive: Escape from Atlantis!
I tried out Survive: Escape from Atlantis late last year and liked it enough to put it on My List of Stuff to Get When I Have the Money. Unfortunately, by the time I got through the Holiday Season with some gift money burning a whole in my pocket, I heard that the game was sold out. Word from Stronghold Games was that it would be reprinted sometime in 2012.
This blew a hole in my post-Holiday plans. Survive: Escape from Atlantis struck me as a good family game. Getting it was to be a step towards getting a regular family game night going. Now I would have to look for alternatives while keeping an eye out for the new printing. Checking online came up empty. The game made My List of Titles to Check For Every Time I Set Foot in a Game Store.
I resigned myself to a bit of a wait.
Imagine my pleasant surprise when I saw some copies at Barnes and Noble. I had already sold my wife on the game awhile back, so a copy got rung up with a book for each member of the family. (My book was Erwin Rommel's Infantry Attacks.)
I unwrapped the game and set to reading the rules. My wife, daughter, and me started up a game after dinner. We all had a good time and it looks like it will be a staple once we get family game night going again.
I guess you just get lucky, sometimes.
Saturday, March 3, 2012
Matchbox Finds For 15mm #1
The Oshkosh HEMTT A4

The Oshkosh HEMTT A4 in box, out of box, and with a 15mm ARC Fleet rifleman for scale. From the Matchbox Real Working Rigs line. HEMTT is short for an even bigger mouthful: Heavy Expanded Mobility Tactical Truck. The real thing is made by Oshkosh Defense and is in service today.
My plans for this pair involve a repaint to match my existing collection. Although they are modeled on a current design, they should serve well as generic space military trucks. And there is an added bonus – the container in the back is removable. That simplifies customizing the truck to carry other loads or simply using the containers as terrain.
Stealth Launch

The Stealth Launch in box, out of box, and with a 15mm Arc Fleet rifleman for scale. From the Matchbox Sky Busters Missions line.
The Stealth Launch is available in gray and black. I felt that the gray was more “military” looking than the black with racing stripes look of the alternative. At least I could pass the orange racing stripes on the gray ones as warning markers of some kind. I might touch these up a bit, maybe put a wash on them to bring out the details, but they do look good out the package. I have a scenario involving a raid on an airstrip in mind, but that's pretty far down my “to do” list.
Tucker Sno-Cat

The Tucker Sno-Cat in box, out of box, and with a 15mm ARC Fleet rifleman for scale. From the Matchbox Real Working Rigs line.
These are likely to see use a civilian vehicles. They look similar to some real life amphibious all-terrain vehicles, so they could serve as colonial exploration vehicles after I remove the plow blade. Or I could use them as technicals after adding some weapons and painting them up with a “Road Warrior” look.
Matchbox For 15mm
Matchbox vehicles are promising to be a handy addition to modern and sci-fi 15mm miniatures wargaming. They will never replace the variety of vehicle models available online, but work well to supplement a vehicle collection. True, they're not perfect, but their limitations are manageable.
Cons
Pros
Cons
- Scale can vary from vehicle to vehicle. You'll want to take a close look at each potential purchase while still in the store. Nothing is worse than bringing something home and finding that it's too big or small. Fortunately, the clear blister packaging makes this pretty easy.
- The paint jobs vary from glossy and garish to flat and uninspired. Many vehicles will need complete repainting to match the look of everything else on the table.
- Not every need is covered. There aren't many armored vehicles on the market, for example.
Pros
- Matchbox is widely available. Most of the big box stores that carry toys have Matchbox available.
- The level of detail is good.The prices are reasonable compared to metal and some resin models.
- Civilian vehicles are common, a niche not filled by many 15mm miniature vehicle lines.
Next: Matchbox finds.
Subscribe to:
Posts (Atom)